


Quick Tip: Using the Color Lookup Adjustment Layer In CS6
Feb 4, 2013
Udi Tirosh
Udi Tirosh is an entrepreneur, photography inventor, journalist, educator, and writer based in Israel. With over 25 years of experience in the photo-video industry, Udi has built and sold several photography-related brands. Udi has a double degree in mass media communications and computer science.
Share:
CS6 introduced a new adjustment layer. It’s called the Color Lookup Adjustment Layer, and it is a great tool to create different looks and styles. If used correctly it is a very powerful tool.
For the sake of this demo, I am going to use a photo called “Gentleman Mask”, while it will be the base image for our layering games, there is a the movies at the bottom shows the entire processing done on the initial image.

I normally resort to building looks with Color Efex Pro, which is an awesome package for color grading and trying out different looks. I prefer this over actions, as I find them hard to control and they never give me the look I’m searching for. But the color lookup table is so easy to use that it may take its place.
Anyhow, back to the Lookup tables. Color Lookup Tables are basically tables that define the way colors are arranged and viewed in an image. So, for example, the LUT used by your monitor driver defines how the data marked “yellow” in the image file should be rendered on the screen. Kinda like an advanced color profile.
If you apply such a table to an image, its look, or colors of that image are transformed into different colors. This way you can easily change from one look to another. Some examples would be changing an image from color to B&W or to negative.
LUT’s are also used between software applications, mainly in the movie industry to maintain consistency in look, even if the underlying math of the software is different. (It seems like adobe is strongly hinting film features in PS with this tool).
That’s a lot of technical babble, but what I really want to know is what it does out of the box.
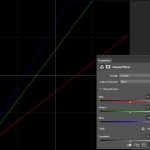
Clicking the color lookup table will present you with nothing more than an interface that doesn’t say much, and if you don’t know what it’s power is, you’ll be quick to discard it and look for something else.

The properties of the CLAL (Color Lookup Adjustment Layer) consists of 3 buttons; 3DLUT file, Abstract and Device Link, each with its own drop down menu.

If you click on one of the drop-down menu’s photoshop prompt’s you to load a file. Skip this by pressing cancel, which brings you back to the list.

You’ll find 19 different styles in the 3DLUT list, 14 in the Abstract List and 5 in the Device Link list. These styles are pre-installed with CS6 and are ready to use. You can even load LUT’s if necessary (if you know how to make or get them…).
Selecting one of these styles will immediately change the look of the underlying layers.
Have a go with these settings and apply them to your photo, remember it’s an adjustment layer, so your changes are non destructive and nothing gets lost on the original image.
For your convenience I made 3 previews of what each LUT does. Now take note that most will look different on your photo, as it depends on the information of the underlying photo, but it gives a general idea.
Here is the fun part. You don’t have to stop with just using one adjustment layer or style, you can play with opacity between layers and stack a few adjustment layers for more versatility, making this simple little tool a quick and powerful style builder for your images. What I would really like to see is a simple tool that can build LUT files. something as easy as the tone splitting in LR4 :)


Also have a look at this video by Julieanne Kost over at AdobeTV with a quick tip of the Color Lookup Adjustment Layer.
Finally, there is a quick color look up cheat-sheet – a downloadable file that that holds a Smart Object for the image with various LUTs applied simultaneously so you can insert your own photo to see the different styles. (we have a similar cheat sheet for B&W conversion)
And as promised here is the edit screen cap on “Gentleman Mask”
About The Author
Roderique “Dracorubio” Arisiaman is a Dutch Photoshop Artist and Photographer who creates surreal images using both disciplines to the fullest. His current work is featured in magazines and galleries and online blogs. You can Follow him on twitter, Facebook and Visit his Portfolio website

Udi Tirosh
Udi Tirosh is an entrepreneur, photography inventor, journalist, educator, and writer based in Israel. With over 25 years of experience in the photo-video industry, Udi has built and sold several photography-related brands. Udi has a double degree in mass media communications and computer science.


Join the Discussion
DIYP Comment Policy
Be nice, be on-topic, no personal information or flames.
One response to “Quick Tip: Using the Color Lookup Adjustment Layer In CS6”
Can you tell me why my 3D LUT menu isn’t clickable?