


How to overpower the sun and balance with strobes using ND filters
Apr 26, 2017
John Aldred
John Aldred is a photographer with over 25 years of experience in the portrait and commercial worlds. He is based in Scotland and has been an early adopter – and occasional beta tester – of almost every digital imaging technology in that time. As well as his creative visual work, John uses 3D printing, electronics and programming to create his own photography and filmmaking tools and consults for a number of brands across the industry.
Share:

Trying to overpower the sun seems to have become a popular thing again lately. The go-to technique for these results is a fast shutter speed and high speed sync. But the limited power available in speedlights often falls a little short. Now, with more powerful HSS-capable strobes on the market, like the Godox AD360II and AD600BM, it’s become a more common look.
This look has been available for a long time, though, with the use of neutral density. These would allow you to shoot wide apertures in the daytime while keeping your shutter speed below the flash sync. In this video from photographer Levy Moroshan of sector5films we see how that technique works. Balancing the bright daylight with the flash, to make our subjects stand out with a shallow depth of field.
While there are HSS capable strobes now, this is still a solid technique that’ll work with any camera and flash system. It lets you bring the environment under control at wide apertures while keeping your shutter below sync speed. This lets you get the most out of your flash’s power.
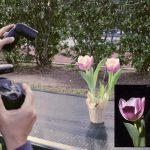
Levy is using a 6 stop ND filter in this video to achieve this. And his first shot is to get an ambient exposure without any flash. This lets him see how the natural light falls on his subject and how the background environment looks.

As you can see, it’s pretty dark. But any brighter and you’d lose colour and blow out the sun rim lighting the subject’s arm, face and hair. If Levy wasn’t using flash here, or was using strobes capable of high speed sync, he could dispense with the 6 stop ND filter. Keeping the aperture the same, 1/4000 at ISO200 would give the same result.
The next step is to bring in the flash. Using the neutral density filter, you don’t need to worry about high seed sync capabilities. Levy is using a 640Ws Paul C. Buff Einstein light, but this would work with anything that has enough power. He starts at a quarter power and takes a test shot.

And it looks pretty good right out of the gate. If the subject had been underexposed, simply dial up the flash power a little more. If she’d been overexposed, knock it down. It’s really that simple.

Until fairly recently, the neutral density technique has come with a few drawbacks. You might have to carry several filters with you. You’d need to swap out depending on how the light changes throughout the day. In some locations, switching filters in the middle of a session might not even be possible. The optical viewfinder of a DSLR, also doesn’t make it that easy to see and focus through with 5 or 6 stops of ND over your lens.
Variable ND filters solve two of these problems. You just keep one filter over your lens the entire time and simply rotate the dial to adjust intensity. The third is solved by electronics. You can set Live view in most DSLRs to automatically expose the scene, even if you shoot manual. This lets you see what the sensor sees, even if your eyes can’t see through the viewfinder. Mirrorless cameras with electronic viewfinders also offer this ability. These advances allow you to cut right through the neutral density to compose and focus your shot.
For DSLR shooters, high speed sync is often still the easiest route. But for mirrorless users, neutral density filters are just as convenient now. Neutral density filters also have the advantage of letting you capture some motion blur from the environment. If you want it. High speed sync will always freeze whatever’s in the frame.

John Aldred
John Aldred is a photographer with over 25 years of experience in the portrait and commercial worlds. He is based in Scotland and has been an early adopter – and occasional beta tester – of almost every digital imaging technology in that time. As well as his creative visual work, John uses 3D printing, electronics and programming to create his own photography and filmmaking tools and consults for a number of brands across the industry.


Join the Discussion
DIYP Comment Policy
Be nice, be on-topic, no personal information or flames.
14 responses to “How to overpower the sun and balance with strobes using ND filters”
Both are useful.
HSS ?
HSS.
HSS for convenience. the ND makes the viewfinder mostly unusable in my opinion.
EVF is your best friend ;)
-_- I’m stuck with Nikon for the moment.
your camera brand has nothing to do with HSS
as with any filter though using a cheap one just takes away the quality of the lens
Anyone know about that light stand? I want.
Wait until the sun goes down alternatively shoot before the sun comes up ?
HSS when possible. NDs mean I have to increase my strobe power too.
Hi, why use ISO 500 and a 6 stop ND filter?
Wouldn’t ISO 50 and a 3 stop filter give better results?
I have variable ND filter and a HSS external flash, with the ND filter I can use my camera built in flash at 1/160 sync speed, and the ND filter is so small I can place it in my pocket, very convenient. The HSS flash is bulky to carry around. The IQ of the picture are the same for both.
I use 400Ws and 600Ws strobes off-camera with a 4ft octabox. You’re never going to get the same quality of light with a popup flash. :)