


How to match the colors between different photos in Photoshop
May 26, 2017
Colin Smith

We love it when our readers get in touch with us to share their stories. This article was contributed to DIYP by a member of our community. If you would like to contribute an article, please contact us here.
Share:

What I’m going to do is I’m going to show you how to match the colors between backgrounds and objects once you’ve cut them out and combined the different photos or otherwise known as compositing.
So what I’ve done here is I’ve grabbed some photographs from Adobe Stock. So I grabbed the photograph here of the woman and then I’ve grabbed two different backgrounds because I’m going to show you two different scenarios with two different techniques. So you can find those, I’m going to link to those in the description so you can go to Adobe Stock, grab those photos and follow along.
So what happens when you are compositing or combining images from different sources such as your own photos you’ve stocked or photos from different stock sites and you’re trying to get the colors to match? So, for example, here I’ve cut out the lady, as you can see. And I’m not going to go through those steps because I’ve got lots and lots of tutorials on how to do that and I’ll link to those that I’ve already done. But what I’m going to do is I’m going to show you how to make the colors match.
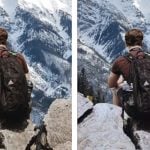
So we’ve got a simple one here, where we’ve got this kind of a little bit more monochromatic background. And I’m going to show you another one with a multi-color background, how to make this work and it’s actually quite simple. So what I’ve done here is I’ve just got the woman cut out and I’ve duplicated the layer so I can show you a before and after.

So we want to match her color with the background, so let’s go with the first technique. And all we’re going to do is make sure we’ve selected our person or our object that we want to change the color of to match that background, so we go to the Image. Now we go to Adjustments and we go down to Match Color.

So under the Match Color, what we want to do is choose the background or just the overall toning from this background and apply it to our woman. So what we’re going to do is we want to go to Source and we want to make sure we choose the right source, and you can see a roof top balcony with cityscape background. That is the document we’re working in.
And now we’re going to go to the layer and we’re going to choose the background layer. Now, immediately, it’s going to apply the color for the background. No, it doesn’t look good yet. Don’t worry, relax, we’ve got a few steps we’re going to take care of.

The first thing we’re going to do is _ fade slider all the way down and that fade slider is how much of that color is applied, so it’s kind of like a volume control–See that?–for the color. So let’s bring it up until we get to about the right amount. Don’t worry about the toning or everything right now, just the color.
And what I’m doing is I’m looking at the colors here in the white, and that’s why I chose this woman in the white dress. It makes it easy to kind of see the color toning, maybe a little bit more, so we’re just applying– There we go; just the right amount of that effect.

And the next thing we want to adjust is the luminance or just the brightness, so let’s just play around with this. Let’s bring it back a little bit. There we go, because we were losing all that details. It was getting blown out. So let’s just kind of play around until it’s matching. And I’m kind of liking it about there.
All right, so we can come back and we can adjust things later, don’t worry. But the next thing is the Color Intensity. This is kind of like a saturation. If I bring this down, notice it’s going to go completely black and white. If I go all the way up, it’s going to go very, very colorful. So what we want to do is just kind of match and I’m noticing that this scene is a little bit desaturated, so I’m actually taking this less than 100 because we want to kind of match that.
And sometimes, you may just tweak the luminance a little bit more, like I’m just going to turn it up, just a touch. And we can also play around with the fade a bit more, maybe not as much now that we’ve kind of played around with that. And there we go. So maybe you like that or maybe you might want to, you know, fade it a little less, make it a little bit more intense, but you get the general idea. So that’s how we can match the first one.
So let’s have a look at this. I’m just going to apply it and let’s see the before and the after. There’s the before, where she was much warmer than the background, and the after, where it matches. Now, you could adjust the brightness of her if you want to using Curves or do that on the next image, but this is not bad.


So let’s go to the next one. So let’s choose the image. If we go down to our adjustments, and we go down to match color, this is not going to work and I’ll show you why. So let’s go through the other steps, just so I can demonstrate this to you. So we’re going with the midtone and we’re going to grab that and we’re going to grab it from the background layer and this is what’s going to happen.

It’s going to get weird now because it’s selecting the blues. It’s selecting all the colors from the sky and the ground and it’s creating kind of an average color and it’s just not going to work. So here’s what we do, we grab our Marquee Tool and we’re going to make a selection around here where we’ve got this color.

That’s one way you could do it. Or if you want to be even more accurate, what you want to do is look for an area that would normally be neutral, say this building here, and just make a selection around there. And what that’s going to do is actually going to pick up that color. So look for something that would be gray that’s obviously being hit by the sunlight; not the shadow, otherwise, you’re not going to get the color.

So we’ve got that color right there and now we want to apply it to our objects, so you’re really going to see this start to take effect now. We’re going to go to our image. We’re going to go down to Adjustments and we’re going to choose Match Color. Now what we want to do is set up everything as before. At first it might look a little bit weird. We’re going to do this, we’re going to choose a background. Nothing is happening, why is that, because we want to turn on Ignore Selection when applying it. Notice it looks weird right now, that’s because it’s applying it to both the source and the targets. So we turn off the target here and, now, what it’s doing is it’s taking that color there and it’s applying it to our source, which is here, which is our person; so far, so good.

Now, what we want to do is we want to turn our Fade down and we’re just going to bring it a little bit of that color. There we go. See how it’s bringing that color in? And we can play around with this color intensity; maybe make that color a little bit more intense. And now we play around with that Luminance, so let’s take that luminance down to about where we want to match it.

Let’s play around a little bit more with that color intensity, maybe about there. And we’re going to play around with that Fade a little bit more now. You could go, you know, very subtle or however you want to do that. And once again, you may want to tweak your luminance and just go backs and forths a couple of times to get this kind of working, and you can see it’s starting to look a lot better now.
All right, so as you can see here, this is applied and we’re just going to click OK. Now there’s one more step we need to do after this. All right, so let’s add a little bit of contrast. What we want to do is apply a Curves Adjustment, so let’s make sure we select that layer right there and now we’re going to go under the Adjustment Layers and we’re going to apply a Curves Adjustment.

Now the Curves Adjustment is going to appear here. Now, I only want to affect the layer underneath. I don’t want to affect all of the layers, so I’m just going to click that little box. And by clicking that little box, it’s only going to affect the layer directly underneath, which is our lady.
So what we want to do is notice the shadows here. They’re much darker than what we have in our image, so let’s pull this down a little bit. We’re going to go into Shadows, pull it down to kind of match it a bit more. There we go. And what we’re going to do is go up in the highlights and give those a boost. And see what we’re doing now is we’re adding more contrast to this image. So, now, it’s going to more closely resemble our background. So let’s have a look. There’s our before and there’s our after.
And if you feel like the curves are just a little too much, you can always adjust the opacity of those and just give them just the amount you want. So, anyway, there you have it guys. That’s how to match the colors when you’re compositing between the foregrounds and the backgrounds.
About the Author
Colin Smith is a photographer and a founder of PhotoshopCAFE online community, a place for great Photoshop and Lightroom tutorials. To see more of these tutorials, visit PhotoshoCAFE’s website and subscribe to their YouTube channel. If you’d like to see some of Colin’s photographic work, you can check out his Instagram profile. This article was also published here and shared with permission.
We love it when our readers get in touch with us to share their stories. This article was contributed to DIYP by a member of our community. If you would like to contribute an article, please contact us here.


Join the Discussion
DIYP Comment Policy
Be nice, be on-topic, no personal information or flames.
One response to “How to match the colors between different photos in Photoshop”
So many so’s