


Learn how to get the perfect light on your subject with this light modifiers comparison
Jun 2, 2017
John Aldred
John Aldred is a photographer with over 25 years of experience in the portrait and commercial worlds. He is based in Scotland and has been an early adopter – and occasional beta tester – of almost every digital imaging technology in that time. As well as his creative visual work, John uses 3D printing, electronics and programming to create his own photography and filmmaking tools and consults for a number of brands across the industry.
Share:

When a photographer decides to use flash, it typically starts something like this. Photographer posts online asking which flash to buy, gets a lot of responses, and buys a flash of some sort. They go and shoot with it, and are then disappointed with the look of hard light. So, the next logical step is to post online again asking “Which modifier should I get?”.
The problem is, it’s not that simple. We’ve no idea what look you want to go for. It’s something only you can decide yourself. Your vision is your vision, not ours. But without seeing what they all do, knowing what to get is impossible. So, have a watch of this video from Jay P. Morgan at The Slanted Lens. Jay goes through a whole series of different modifiers to show what they do to the light falling on your subject.
For each of the tests, Jay used a Dynalite Baja A6 monolight strobe. Using the same light source is quite critical when comparing modifiers. It ensures that the light going into the modifier is consistent with each one. Of course, this means that the results won’t be entirely accurate for you if you try the same modifier with a different light, but it will still give you a general idea of what each modifier does.
To keep things consistent, Jay kept the front edge of the modifier 4ft from the subject. This distance consistency means that we’re focusing on the quality of light on the subject at the same distance. Distance on its own can greatly vary how a modifier performs. Using the same modifier at 2ft vs 10ft has a drastic difference on how the light hits your subject. Closer the light may be softer but with a more rapid falloff. Further away, you’ll get a more even spread, but harder shadows.

To help reduce the variables even further, Jay uses a light meter to ensure the exposure on the subject’s face is identical regardless of which modifier is used.
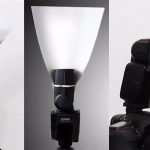
The first modifier they test is the one that comes standard with almost every studio strobe out there. That’s the 7″ reflector. In this case the Dynalite 7″ Reflector. Reflectors like this are typically used to help prevent wasting light. Bare bulb strobes throw a lot of light off to the sides. A reflector helps to aim that light toward your subject (or wherever you point the strobe). Here’s the full list of modifiers.
- Dynalite 7″ Reflector
- Dynalite 11.25″ Narrow Beam Reflector
- Dynalite 13″ Reflector
- Dynalite 17″ Beauty Dish
- Mola 22″ Beauty Dish
- Photoflex Small OctoDome
- Photoflex Medium OctoDome
- DynaLite 35″ Parabolic
- Dynalite 47″ Parabolic
- Photoflex Extra Small LiteDome
- Photoflex Medium LiteDome
- Photoflex Large LiteDome
- Dynalite Large Softbox
- Photoflex 72″ Shoot Through Umbrella
- Photoflex 72″ Silver Bounce Umbrella
It’s quite a varied list, although not completely exhaustive, because even Jay can’t be expected to own every modifier from every manufacturer. But it gives a good idea of how larger or smaller light sources affect the light. Silver vs white reflection. It also illustrates how the shape and overall design of the modifier can affect the light’s throw, falloff and other characteristics.
While they ended up being tested last, I’m going to mention the umbrellas, because that’s the modifier that many photographers start with. They’re easy to get hold of, relatively in expensive, and come in a range of sizes. The two that Jay uses are rather large, although you do get a good idea of how the two compare.

You can immediately see that the silver lined reflective umbrella offers more contrast, with slightly harsher specular highlights. The shoot through umbrella, on the other hand, is more even in tone and brightness. The specular highlights seem more diffused, and there’s less contrast overall. There’s no right or wrong, a lot boils down to personal taste. There are times when each may be better suited to a particular shot or subject.
The same goes for beauty dish vs softbox. Both produce great light on our subject, but you can see here that the much larger softbox produces softer shadow edge detail than the beauty dish. There’s also less contrast, and the specular highlights don’t stand out quite as much.

One thing Jay notes is that some modifiers did show a slight colour shift. It wasn’t enough to annoy him, but he did notice it. So, be sure to white balance when you switch out modifiers. There’s far too many comparisons in the video to show them all here. His point at the end is a good one. He’s not trying to say that one light is better or worse than another, but simply show the differences. Which works best for you for a particular shot will depend entirely upon your own tastes.
But if you don’t know your beauty dish from a bounce brolly, it’s well worth a watch.
For some more of Jay’s thoughts on these modifiers, you can check out his own blog post over on The Slanted Lens.
[via The Slanted Lens]

John Aldred
John Aldred is a photographer with over 25 years of experience in the portrait and commercial worlds. He is based in Scotland and has been an early adopter – and occasional beta tester – of almost every digital imaging technology in that time. As well as his creative visual work, John uses 3D printing, electronics and programming to create his own photography and filmmaking tools and consults for a number of brands across the industry.


Join the Discussion
DIYP Comment Policy
Be nice, be on-topic, no personal information or flames.