


Introduction to Kite Aerial Photography (KAP)
Sep 13, 2011
Udi Tirosh
Udi Tirosh is an entrepreneur, photography inventor, journalist, educator, and writer based in Israel. With over 25 years of experience in the photo-video industry, Udi has built and sold several photography-related brands. Udi has a double degree in mass media communications and computer science.
Share:
 Kite Aerial Photography (KAP) is something that has appealed to me for some time, and earlier this year I decided to build a KAP rig, buy a kite, and take some photos from up in the air.
Recently I posted my first KAP photos, and will be posting more in the future.
I intend to write post more information about my experiences with KAP over the coming months, but thought I would start off with a post describing what KAP is all about, and the equipment that is typically used.
Why KAP?
What is the appeal of KAP?

camera rig suspended from kite line
Why do people invest significant amounts of time (and sometimes significant amounts of money) getting cameras airborne?
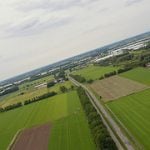
I think KAP is appealing because it provides the ability to achieve different and unusual camera angles that are not possible using ordinary photography techniques. Photos taken from a high vantage point allow familiar landscapes and buildings to be captured from a unique viewpoint, yet still allowing them to be easily recognizable.
For myself, KAP appeals to me because it combines multiple hobbies – photography, electronics, building and modifying gadgets (ie, KAP camera rigs), and kite flying is always fun!
KAP Overview
KAP is one form of aerial photography, where a camera is suspended from a kite line to allow aerial photos to be taken. Other options for aerial photography include mounting a camera on a pole, balloon, radio-controlled aeroplane or helicopter, but KAP is a relatively inexpensive way to get into aerial photography, and appeals to me because of its (apparent) simplicity.

KAP self-portrait (Southern River, Western Australia Canon PowerShot G5 @7mm, 1/1600 sec, f/4)
KAP Equipment
Here is a quick overview of the key items of equipment needed for KAP.
Camera
Any camera can be used for KAP, but to keep the size of the kite to something manageable, most KAP-ers use a point-and-shoot camera to keep the weight down as much as possible. However, it is certainly possible to hoist a SLR camera up in the air with a suitable kite.
Camera Rig
While the idea of hanging a camera from a kite is fairly simple, and some of the KAP rigs are quite simple, I have also seen some very complex rigs!
A KAP camera rig is a frame or structure that hangs from the kite line, and is designed to hold the camera. It can optionally provide pan and tilt functionality to change the direction and angle where the camera is aimed.

Early concept drawings for my first KAP rig
Camera rigs vary from the extremely simple, to rigs that are very complex, with remotely controlled pan and tilt mechanisms, multiple cameras, etc. Rigs can be constructed from almost anything, with aluminum being very common, as it is cheap, relatively light, and easy to work with. Wood, plastic, acrylic or fiberglass can also be used, and some people use carbon fiber.
Note that the camera rig is not normally suspended from the kite itself, but is attached to the kite line some distance down from the kite.
Remote Control and Camera Triggering Options
A simple camera rig will hold the camera in a fixed position, without offering any ability to rotate or tilt the camera once it is in the air.
More complex rigs use two or three channel radio controlled servos to remotely rotate and tilt the camera, as well as triggering the camera’s shutter button.

RC transmitter used to control the airborne rig (Bob Blackburn Reserve, Seville Grove, Western Australia)
Various other options exist for triggering the camera’s shutter button, including dedicated intervalometers, running custom firmware on the camera to periodically trigger the shutter (for example,CHDK on a Canon point-and-shoot camera),or using something like gentLED to trigger the camera via infrared or USB.
Some people even use a video transmitter on the camera rig to allow them to remotely view what the camera is seeing.
Kite

FlowForm 16 kite with 5m fuzzy tail
Not all kites are suitable for KAP. A kite needs to have sufficient lift to carry the camera and rig, radio control receiver and servos in the air. It also needs to provide stable flight, so it doesn’t move the camera around too much in the air, and to ensure it doesn’t unexpectedly fall out of the air.
In addition to stability, different types of kites have other characteristics that can offer further advantages or disadvantages, including flying angles and the range of winds in which it can be used.
The FlowForm 16 is a great starting point for a small camera and rig.
Picavet
A Picavet suspension is designed to keep the camera rig hanging level, no matter what angle the kite line is, and to damp any movement of the camera caused by movement of the kite line.
Picavets commonly consist of a cross, attached in two places to the kite line by a single length of string threaded through pulleys or loops on the Picavet and the line hooks, allowing the weight of the camera and rig to keep the rig level.
What’s Next?
To see some sample KAP rigs, have a look through the photos in the KAP Rigs group on flickr.
In the coming months, I’ll be posting some more information about my own KAP rig and kite, as well as my experiences with getting a camera up in the air for the first time.
About The Author
This post was written by Martin Pot, a photographer and an engineer based in Perth, Western Australia. You can follow his blog here, and connect with him on G+ here.
All photographs are by Ashley Pot/Martin Pot, and used with permission

Udi Tirosh
Udi Tirosh is an entrepreneur, photography inventor, journalist, educator, and writer based in Israel. With over 25 years of experience in the photo-video industry, Udi has built and sold several photography-related brands. Udi has a double degree in mass media communications and computer science.


Join the Discussion
DIYP Comment Policy
Be nice, be on-topic, no personal information or flames.
One response to “Introduction to Kite Aerial Photography (KAP)”
Probably getting a bit high tech , but could a computer (Ardupilot) such as those used in UAVs be used to pilot these kites to some degree ?
Another thought would be to use a gyroscope to keep the camera focused on a certain point , there would have to be a ‘tail fin’ to keep some directional integrity .