


How to make your own DIY HDMI teleprompter from an old laptop screen
Feb 10, 2020
John Aldred
John Aldred is a photographer with over 25 years of experience in the portrait and commercial worlds. He is based in Scotland and has been an early adopter – and occasional beta tester – of almost every digital imaging technology in that time. As well as his creative visual work, John uses 3D printing, electronics and programming to create his own photography and filmmaking tools and consults for a number of brands across the industry.
Share:
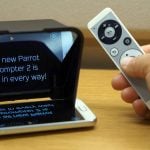
Since we posted about Manny Ortiz’s use of the Parrot 2 Teleprompter a few weeks ago, I’ve been developing my own that I can 3D print (more on that in a future post), but I’ve also been keeping an eye out on YouTube to see what others have done with their own DIY teleprompter solutions.
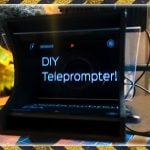
Then, this morning, I spotted this video from Electronoobs on my feed, where he builds his own teleprompter from scratch. It’s a pretty simple build that plugs straight into a desktop or laptop’s HDMI output, allowing for some level of easy remote control.
The basic principle of a teleprompter is straightforward. You have some type of display at the bottom facing up, a piece of glass at 45 degrees that the display can reflect off towards your subject, and then some kind of dark cover over the top to prevent any unwanted reflections from going back into the camera.

At the core of this build is an LCD screen with a controller board to give it an HDMI input. The screen used in the video is actually a 7″ LCD display module with an HDMI driver board designed for the Raspberry Pi. But you can also just recycle the screen from an old laptop you might have lying around. Matt at DIY Perks has shown us how we can repurpose laptop screens before.
The HDMI input allows the teleprompter to be plugged into a laptop via a long cable, giving you complete control over what’s on the LCD when the laptop is positioned nearby. The laptop powers the teleprompter screen using a website called Zacue, into which you can paste your text and adjust speed and size settings.
Around this, a wooden frame is built covering the bottom and sides, with supports to mount a piece of picture frame glass for the screen to reflect off back towards the subject. An old black t-shirt is then attached over the top to prevent light from reflecting on the top of the glass and bouncing back into the camera’s lens. A cheap ball head is attached behind the glass to sit the camera on.

The cost of the build will depend on what screen you use and whether you have to buy one or can recycle one. If you’ve got some picture frame glass you can use already, a few scraps of wood then you can probably make it for pretty much zero. Even if you have to buy parts, though, your total cost would probably come in at way under $100.
I won’t be using an HDMI LCD for the one I’m designing, but I might have to look into that in the future if I decide to scale things up.

John Aldred
John Aldred is a photographer with over 25 years of experience in the portrait and commercial worlds. He is based in Scotland and has been an early adopter – and occasional beta tester – of almost every digital imaging technology in that time. As well as his creative visual work, John uses 3D printing, electronics and programming to create his own photography and filmmaking tools and consults for a number of brands across the industry.


Join the Discussion
DIYP Comment Policy
Be nice, be on-topic, no personal information or flames.