


How to make a DIY portable product photography booth for under $10
Jan 1, 2019
Dunja Đuđić Kalinin
Dunja Djudjic is a multi-talented artist based in Novi Sad, Serbia. With 15 years of experience as a photographer, she specializes in capturing the beauty of nature, travel, concerts, and fine art. In addition to her photography, Dunja also expresses her creativity through writing, embroidery, and jewelry making.
Share:

If you need a light tent you can easily carry anywhere, Adam Rahn of DroiMedia has a fantastic DIY solution. In this video, he shows you how to make your own portable booth for product photography. It’s simple to make, easy to carry around, and it will cost you no more than $10 to build.
You will need two pieces of 20 x 30” white foam board and a piece of 22 x 28”poster board for the background. The poster board can be white or any other color you like. Other than that, you’ll need an X-Acto knife and a ruler to make the cuts.
For starters, cut both pieces of foam board in half so you have four pieces of 15 x 20”. Then, cut the two side pieces like this:

Cut the back side with the slits on the same side of the board:

Cut the front piece like the back one, adding a window through which you’ll shoot the product. And finally, cut the poster board so it’s 17” wide, it will be your background.
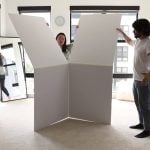
Setting up the booth is simple: just grab the pieces and let the little slits interlock with one another. Attach your background and place the product you want to shoot inside the booth. As for the lighting, add soft light facing the booth from above. And when you want to transport the booth, just disassemble it: it’s small, lightweight and easy to carry anywhere with you.

Adam notes that this photo booth is not perfect. However, at this price it can be a great solution for product shots on the go. Just add enough diffusion to the light and I think it should work rather well.
[TUTORIAL: DIY PORTABLE Product Photo Booth (for under $10!) | DroiMedia]

Dunja Đuđić Kalinin
Dunja Djudjic is a multi-talented artist based in Novi Sad, Serbia. With 15 years of experience as a photographer, she specializes in capturing the beauty of nature, travel, concerts, and fine art. In addition to her photography, Dunja also expresses her creativity through writing, embroidery, and jewelry making.


Join the Discussion
DIYP Comment Policy
Be nice, be on-topic, no personal information or flames.
3 responses to “How to make a DIY portable product photography booth for under $10”
I bought a portable (foldable) lightbox for product photography (complete with LED light strip) for $5.. it works
Cool, I want one, what’s the link?
I live in Indonesia, bought it online from the local shopping apps:
https://www.tokopedia.com/hot/mini-studio?keyword=mini%20studio
there are many size option, priced ranged from $3 (small) – $8 (large).. the products are made in china I guess