


How to edit in Lightroom using the “Dark Mode” technique for more contrast and drama
Feb 3, 2020
John Aldred
John Aldred is a photographer with over 25 years of experience in the portrait and commercial worlds. He is based in Scotland and has been an early adopter – and occasional beta tester – of almost every digital imaging technology in that time. As well as his creative visual work, John uses 3D printing, electronics and programming to create his own photography and filmmaking tools and consults for a number of brands across the industry.
Share:
When it comes to processing our images, there are all kinds of weird and crazy techniques out there. This is an interesting Lightroom one from Pye Jirsa over at SLR Lounge, which he calls “Dark Mode”. It allows you to quickly and easily draw a distinction between the lit areas you want to highlight, and the shadowy areas, without sending them to pure black.
It’s an approach I’d not seen before. It essentially involves bringing the exposure way down, the blacks way up to bring back the shadow detail and then controlling your contrast with the highlights. Some thought needs to be put into the shooting technique for this to work, but it looks to be quite effective if this is the final look you’re going for.
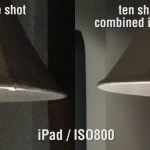
To make the image shown on the right above, Pye used a Profoto B10 Plus in a 3ft octabox. But in order to help create better separation between the subject and its environment, he needed to dim down the environment. To achieve this at the wide f/1.4 aperture Pye was shooting, several techniques are possible.
You could use high-speed sync, allowing you to shoot at faster shutter speeds if your lights support it and still give you enough power, letting you underexpose the ambient light. Another option is to do as Pye did and throw a neutral density filter (in this case, a 10-stop) on the end of your lens. Or, finally, you could try not shooting at f/1.4.
After having a brief play with this technique on a few of my own images, it’s definitely not a method which works with everything. Your images need to be shot and exposed in a particular way for it to have the desired effect. But when you do the results can be quite remarkable with this technique.
[via SLR Lounge]

John Aldred
John Aldred is a photographer with over 25 years of experience in the portrait and commercial worlds. He is based in Scotland and has been an early adopter – and occasional beta tester – of almost every digital imaging technology in that time. As well as his creative visual work, John uses 3D printing, electronics and programming to create his own photography and filmmaking tools and consults for a number of brands across the industry.


Join the Discussion
DIYP Comment Policy
Be nice, be on-topic, no personal information or flames.
One response to “How to edit in Lightroom using the “Dark Mode” technique for more contrast and drama”
Using Profoto B10 Plus is actually a big one for me. I find it very difficult separating the subject and the environment. I will take my time to watch this clip and apply it in my photography.