


How to add shine and depth to hair in Photoshop in under a minute
Jul 6, 2018
Dunja Đuđić Kalinin
Dunja Djudjic is a multi-talented artist based in Novi Sad, Serbia. With 15 years of experience as a photographer, she specializes in capturing the beauty of nature, travel, concerts, and fine art. In addition to her photography, Dunja also expresses her creativity through writing, embroidery, and jewelry making.
Share:

When editing portraits, especially in beauty photography, there’s a lot of work to do. But Unmesh Dinda of PiXimperfect will show you a quick editing process that makes a lot of difference. In this tutorial, he takes a minute to demonstrate how you can add shine and depth to hair with a pretty simple technique. It will take you just a little bit of time, yet it can make the hair of your model really “pop.”
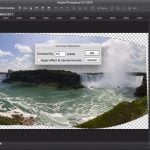
Open the portrait you want to edit, create a Curves adjustment layer and lift the highlights. Then, select the layer mask and press Ctrl/Cmd + I to invert it. Now your portrait looks like you haven’t made any changes, and from here you’ll add some shine to the hair.
Select the Brush tool and set the foreground color to white. Make sure that you use a soft brush and that the Opacity and Flow are set to 100%. Now, dab on the area of the hair that should have the shine.
When you’re done, you can readjust the curves layer to set the level of brightness. After that, open Blending Options of the Curves adjustment layer. Under the “Blend If,” go to the Underlying Layer, hold Alt/Option and split the shadows by dragging the black point to the right, to get a smoother and more natural look.
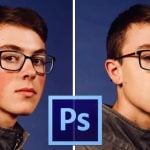
And that’s pretty much it. Here are the before and after to see what it looks like:


This is a pretty simple process and it won’t take you much time. Although the difference is subtle, it still adds a new dimension and life to the hair. And now I know how those ladies in posters advertising shampoo have such shiny hair. ;)
[1-Minute Photoshop – Add Shine and Depth to Hair | PiXimperfect]

Dunja Đuđić Kalinin
Dunja Djudjic is a multi-talented artist based in Novi Sad, Serbia. With 15 years of experience as a photographer, she specializes in capturing the beauty of nature, travel, concerts, and fine art. In addition to her photography, Dunja also expresses her creativity through writing, embroidery, and jewelry making.


Join the Discussion
DIYP Comment Policy
Be nice, be on-topic, no personal information or flames.
5 responses to “How to add shine and depth to hair in Photoshop in under a minute”
No.
No need to talk like walking on soap just to keep it in 1-minute. Besides, dodge and burn would do (using grey layer and overlay blend and painting on that)
Why not learn how to light portraits properly?
Maybe because you’re retouching someone else’s work?
Terrible tutorial. ‘Add shine and depth to hair by brightening random parts of it!’