


How I Created This Geppetto’s Workshop Photo Composite
Feb 4, 2016
Karen Alsop

We love it when our readers get in touch with us to share their stories. This article was contributed to DIYP by a member of our community. If you would like to contribute an article, please contact us here.
Share:

Geppetto’s Workshop is a precious image to me because it features my own father and my son acting the part of Geppetto and Pinocchio. When Child Photo Competition launched their ‘Father and Child’ theme for January, I knew this image was a perfect fit.
I was just awarded the winner of the competition with my fairytale themed photo and I’m thrilled! In this post I’d love to share some behind the scenes of the creation of the image.

I have noticed that some people may have been disappointed that a fantasy ‘photoshopped’ image won above a straight capture. I wanted to address this here. I understand the concern. Photoshop is a powerful tool and can warp reality. But without very carefully composed and lit elements, a composite will not as Joel Grimes says ‘sell the fake’. The photography aspect to me is as important as the photoshop aspect. Each part of my composition is carefully planned and photographed to fit together seamlessly.
The Story Behind Geppetto’s Workshop
The idea for Geppetto’s Workshop came from a desire to create something special for my son. Many of my personal projects in the past have featured my daughter. My son, Asher, now two years old, was wanting to be the star in one of his own Story Art images. As with most boys, Asher loves his grandparents. He has a particular connection with his Pa (my dad), so I wanted to capture the two of them together. I began searching for inspiration. I often find ideas for imagery by looking at fairytales and classic stories. Pinterest is a great tool for finding inspiration and saving pins in a methodical manner. When I came across some classic Pinocchio images I knew immediately that this story would fit my subjects. My dad fit the profile of Geppetto perfectly, and my son would make a very cute Pinocchio boy.
Once the theme was decided my next step was to locate a workshop. I had visions of light breaking through the cracks of a rustic timber shed. My method of locating a perfect background scene involves Googling (in this case I googled ‘blacksmith’), asking friends through Facebook and racking my brain for suitable places that I’ve visited before. My research led me to Mill Valley Ranch, a campsite in Gippsland, Victoria. After talking with the manager I decided to take a trip down there with my camera gear, hoping that the blacksmith workshop would suit the picture I had in my mind.
My research and drive was rewarded with the perfect space for my background plate. Beautiful light cascaded through the natural cracks in the timber walls. The workshop was full of historic rusty tools. The character of the space was exactly what I had been seeking.I rearranged the workshop a little and positioned my tripod facing the most interesting corner of the workshop. My reasons for choosing this angle were firstly due to the light breaking through and the tools on the wall. I also needed to consider where Pinocchio would be sitting, knowing that later we would replicate the angle and height in the studio with our subjects. The anvil was at the height I anticipated would work when interacting with Geppetto.
In order to ensure that the angles and perspective would match when I photographed the subjects in the studio, I took a reference shot with my husband standing where Geppetto would be. I then bracketed three images so that I had the potential to create a HDR image of the scene. I also took note of my approximate distance from the anvil and where the camera was positioned, as well as my lens length and aperture. For this scene I wanted to shoot on a wide aperture, throwing the background out of focus a little. This will only work if the scene is photographed with the point of focus being where the characters will be placed in the composite (hence the reference shot).

Pinocchio
Now I had my background scene I needed the perfect Pinocchio puppet, again Google to the rescue! My searching lead me to a toy shop in the Dandenong Ranges called, funnily enough, ‘Geppetto’s Workshop‘. Pinocchio had everything I envisioned in my mind when developing the idea. He was made of textured timber, was wearing material clothing and was an actual marionette on strings.

Costumes
The last piece of the puzzle was costuming. My favourite place to shop for costumes is ‘Savers’, a large Op-Shop (thrift store). I love Savers because of the store layout as everything is easy to find. Much to my father’s dismay, I ended up getting a lot of his Geppetto costume from the women’s section. I’ve learned to shop with an open mind when looking for particular costumes. I often find little girl’s costumes in the women’s section also. They may require a little pinning back, but they fulfil the look I’m after and that’s the important aspect. I’m also not afraid to use an outfit that is the wrong colour and change it in photoshop.

Initially I had hoped to capture the ‘real boy’ and Geppetto in one. I had Geppetto interacting with Asher in the studio, pretending to hold him up with invisible strings. The time of day for our young two year old model was not ideal however, and as he was due for his nap he did not cooperate for the camera. I’ve learnt to find flexible means of working with young children. We decided to capture Geppetto’s ‘surprised’ poses, and I later photographed Asher in a more flexible way by having him move around the general area, interacting with my husband, while I followed him with the camera at the right perspective. I really only needed his head at the right angle for this image. As long as the light was shining on Asher correctly, the rest didn’t matter.
We also photographed Pinocchio the marionette with the same lighting and angle. I also needed to capture the strings being held taut by Geppetto. All of these elements would be required to produce a convincing final composite.
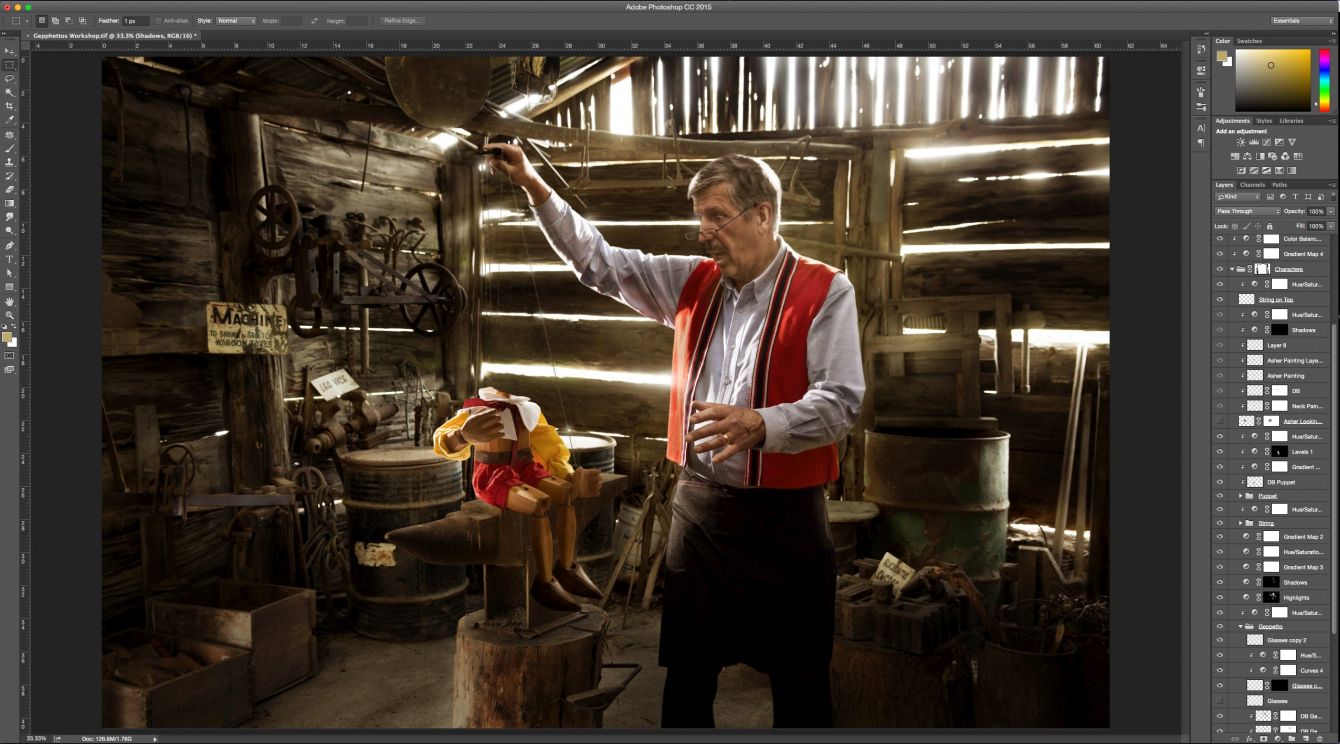
Putting the image together in Photoshop was reasonably straightforward due to the way I had captured all of my elements. My method of green screen extraction has increased the speed of my extraction process considerably.
Green screen photography need not be overwhelming. A lot of people shy away from a green screen as they are worried about colour spill. There are ways of eliminating spill.
- Ensure you have your model at least 3 feet from the green background.
- Light the green background separately
- If possible back light (hair light) your model to create additional separation from the background

- Don’t run the green underneath the feet. Rather place your subject on a white (or neutral) floor. In this case I used the timber floor as the background plate has the same tones, so this meant that the timber tones bounced back on the subject to match. It is better to cut this area out manually in photoshop later rather than try and eliminate the excess green spill that bounces back up when it’s directly underneath your subject.
- Use the colour range tool in Photoshop and the eye dropper tool to select the green area. Adjust the fuzziness to a point where it softens the hairline and edges but keeps the main subject solid.
- Use refine edge tool to paint over wispy hair areas and fine edges.
- Within refine edge, select ‘decontaminate colours’ and move the slider up as far as necessary to reduce the green spill around the edges.
- Once your mask is complete, create a Hue/Saturation Adjustment layer and clip it to your layer.
- Select the greens in the Hue/Saturation adjustment layer and pull up the saturation so you can see how much green is selected. Adjust the sliders to encapsulate all of the green.
- With the saturation slider all the way up so you can monitor the change, move the hue until the green changes to a colour that will blend with the background. I usually choose a yellow/orange.
- Bring the saturation level down to about 25%. You should now be free of any green spill.
- I have created these photoshop steps as my own action which really speeds up the process every time I extract someone from a green screen.
I completed the edit by painting with light, adding adjustment layers (including Gradient Map adjustment layers) and Dodging and Burning. Here is a speed edit timelapse of the process
The Speed Edit of the entire process can be viewed below:
About The Author
Karen Alsop is an award winning Australian, Melbourne based photographic digital artist and educator. Expanding on two decades of photographic and graphic design experience, Karen brings photography and art together to create stunning artworks that tell a story and take the viewer into another world. you ca see more of Karen’s work on her website, portfolio, and 500px. And you can also catch her on Facebook, Instagram and Youtube. This article was also published here and shared with permission.
We love it when our readers get in touch with us to share their stories. This article was contributed to DIYP by a member of our community. If you would like to contribute an article, please contact us here.
Related Posts
 Watch how I created this highly stylized composite portrait
 This guy wrote a piece of software to composite every photo he’s ever taken into a single image
 An open letter to photography workshop and conference organisers
 Andrew McCarthy reveals detailed texture of the sun in massive 150,000 photo composite
Join the Discussion
DIYP Comment Policy
Be nice, be on-topic, no personal information or flames.
3 responses to “How I Created This Geppetto’s Workshop Photo Composite”
So much attention to detail compositing the image but missed the biggest detail, wrong location. It should be a wood workshop, not a blacksmith. I’d be very unusual to find an anvil there.
This is the almost the equivalent of doing a little mermaid composite and using a dessert for location :)
Other thing that may be nitpicky is that there is some type of metal thing hanging on wall behind Geppetto’s head that looks like it’s sticking out of him. I would have took that out..but otherwise I’m very very impressed. Nice work.
Beautifully done.. thanks for the great post!