


How To Shoot Ethereal 360 Camera Moves With a GoPro (DIY / Commercial)
Oct 30, 2013
Udi Tirosh
Udi Tirosh is an entrepreneur, photography inventor, journalist, educator, and writer based in Israel. With over 25 years of experience in the photo-video industry, Udi has built and sold several photography-related brands. Udi has a double degree in mass media communications and computer science.
Share:
You know those GoPro movies where the camera seems to rotate in space around a cyclist or a skier? Ever wondered how there were made? (If you wanna know what I am talking about check out the GoPro Hero 3+ commercial at around 3:33.
")
Those are made with something called a GoPro Swivel adapter and I will feature two of them today. The first one is a completely DIY solution which will take you 20 minutes to make and the second one is a commercial solution that will set you back $125.
What’s In A Swivel Mount
As with any smooth camera move rig, a swivel mount is based on three elements.
- The first is a frictionless center that the camera can rotate around.
- The second is a pole that provides some distance from the center
- And the third is a counter balance that keep the camera level (similarly to a regular Jib).
Now here come the smart part. By placing a camera on one side of the pole and a counter balance on the other side the camera stays relatively stationary on the Y axis. The X axis on the other hand is fully free to rotate depending on the momentum it gathers.
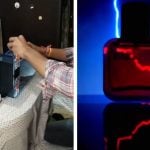
DIY Swivel Mount
")
This mount “invented” by DIY GoPro uses a 2″ swivel caster post to gain a frictionless center, a PVC pipe (our favorite DIY material) and a Handlebar Seatpost Mount for the pole and a ton of washers for the counterweight.
Here is a movie showing how to build one of those, followed by some sample footage.
Commercial Swivel Mount
")
Of course, in the “other corner” wearing red pants is the high end commercial version (it is shouting I have more money than time). While I have not personally tried a commercial mount, the Rhino Swivel Mount is the nicest commercial version I found (and there are quite a few.
It comes in a few parts – a helmet swivel mount which provides the frictionless center, two Pro-Poles which provide some distance from the helmet – you can actually mount two GoPros simultaneously – or use washers or a small ballast bag for counterbalance.

Udi Tirosh
Udi Tirosh is an entrepreneur, photography inventor, journalist, educator, and writer based in Israel. With over 25 years of experience in the photo-video industry, Udi has built and sold several photography-related brands. Udi has a double degree in mass media communications and computer science.


Join the Discussion
DIYP Comment Policy
Be nice, be on-topic, no personal information or flames.
9 responses to “How To Shoot Ethereal 360 Camera Moves With a GoPro (DIY / Commercial)”
I like the idea but have some comments:
The integrity of the helmet will be compromised by the drilled hole. Therefore never use it when you are going to need protection.
Be careful where you go because, even with a swivel, there is massive leverage should you hit something, and that’ll transfer to your neck
Good advice about safety glasses but they should be worn when drilling too.
They should make a quick release so in the event you do fall, then it will be like skiing, it pops of t prevent injury.
*to
It’s not a poll, it is a pole. A poll is a survey, a gathering of information.
I think you are confusing pedantry with nit-picking
thanks for the catch. Darn not-mind-reading-speller!
Going snowboarding in a few weeks… Do I dare wear this rig while riding down the mountain??? This is awesome, thanks for sharing.
PLEASE DO NOT DRILL YOUR HELMET AND PUT A NUT ON THE UNDERSIDE, this is absolutely crazy; more so as you don’t even mention the huge risks associated in doing it. Find a way of attaching it to the surface of your helmet without drilling; 3M tape for example. Other than the incomprehensible and dangerous advice on the bolt and drilling, this is a great tutorial…but do not drill in to your helmet and put a nut there #loveyourbrain
Check out the Kickstarter campaign for this… https://www.kickstarter.com/projects/rhinocg/rhino-gopro-accessories-360-swivel-and-poles-for-g?ref=nav_search