


DIYP Reviews The Lomokino Analog Movie Maker
Apr 22, 2014
Itay (ET) Galim

We love it when our readers get in touch with us to share their stories. This article was contributed to DIYP by a member of our community. If you would like to contribute an article, please contact us here.
Share:

What da!?
Here is the short answer (AKA straight to the point)
The LomoKino is a 35mm truly analogue movie camera. Using a normal 35mm roll of film (36 exp.), the LomoKino can shoot around 144 frames or 25 sec. of beautifully analogue cinematic masterpieces (well, the masterpiece part is kinda up to you and your creativity).
Long answer (AKA A brief history of film formats)
Being a bit old fashioned and a big film fan, I feel the need for some prior education on film formats. It will help you understand where the Lomokino “came” from.
Filmmaking (using real film) was always expensive. In the days before digital cinematography though – it was the only option. For the most parts in cinema history the two main formats were 16mm and 35mm (generally speaking of course), where the later one was preserved to big budget mainstream movies, leaving 16mm to the independent side of the industry. As the line between mainstream and indie blurred, the indie industry needed a format that was “projection ready” yet cheap as 16mm. That’s when the 2-pref 35mm format came to be. Also known as Techniscope. The format uses the same 35mm stock, but with a narrower frame spending only 2 perforations for each frame as opposed to 3 (Super35) and 4 (Anamorphic Cinemascope), giving twice the amount of frames for the same amount of film. Low budget anyone?
The format was mainly used in filmmaking between the 1960’s-1980’s but being a low budget alternative it’s still in use in recent days, most notably, David O. Russell’s 2010 The fighter and his 2012 The Silver Linings Playbook (With a $21m budget – pocket money in mainstream Hollywood).

What does it all have to do with the Lomokino you ask? The Lomokino is enhancing on that by shooting a super narrow frame of 24mm x 8.5mm (mind you that “real” 2-pref was 9.47mm tall), allowing you to capture about 144 frames from a regular 36 exposure roll of film and giving a super wide and beautifully cinematic aspect ratio.
I feel that other then being more economic, the 2-pref format is also historically and conceptually aligned with what lomography and the Lomokino is all about, re-creating and preserving analog for what it is, but mostly for what it was. (Take for example Lomography’s latest endeavor to recreate the legendary Petzval portrait lens).
Technicalities
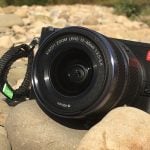
The Lomokino sports a 25mm lens with a f/5.6, f/8 or f/11 settable aperture (in theory everything in between f/5.6 – f/11 as it’s a linear type). It shoots at about 1/100 a sec. The manual crank mechanism will drive the film at about 3-5 frames per second. The 25mm lens is almost focus-free and will focus from 1m to infinity. Lomography did well when they equipped the Lomokino with a close-up mode that will focus from 0.6m. It is activated by a push button on the front face of the camera, right next to the lens.

An Inverse-Galileo foldable viewfinder is there to help you frame your movies. Surprisingly, the Lomokino has a hot-shoe connector (yup, it’s hot) to attach a strobe, a feature I’ve yet to try (or spot anywhere on the web), but is highly appreciated. Just make sure your strobe can reload fast enough. On the bottom there is a standard ¼” tripod mount. A strap can be easily fitted but not supplied with the Lomokino. Another great (and well implemented) feature is the film gauge, showing you when it’s time to replace your film.
The Unboxing
Design
As with most Lomography cameras, the Lomokino is also mostly plastic made, and also got that unique cheap plastic feeling that makes Lomography what it is.The entire plastic body is covered with retro-like faux leather; A quick image search for old cinema cameras will reveal what Lomography was aiming for, which was achieved, to my humble opinion, with great success. Both the cranking leaver and the viewfinder are retractable, where the viewfinder has a cool release lever that makes it POP.

The film loading process starts with removing the front face of the camera using the two push buttons on both sides, which I find kind of in the wrong place, as it happened more than once that I accidently pushed them mid-roll. Furthermore, the one on the crank side looks like it actually serves some other purpose.
All and all, twisting, loading, rewinding, shooting, clicking etc feels cheap.
The best part of the Lomokino design is that it’s like no other! You’ll get lots of people looking at you weirdly, asking you questions while you shoot your next 35mm film with that camera.
Pre-production
Artsy is the way to go with the Lomokino. The results are unique so make sure you are making something cool with it. (try not to shoot another one of those beautiful-hipster-running-on-the-beach movies please)
A good place I found for inspiration is the great all-things-lomokino tumblr blog.
I’m not gonna go into the technical aspects of loading the film into the camera, Lomography took care of that when provided the cool flip-book style instruction manual (though not so practical). With that said if you never (or didn’t lately) played around with analog and film, the process is not easy as 1-2-3, and I’ll recommend searching YouTube for some good video instructions.
Roll camera… Action
When you’re ready to roll, just flick the little viewfinder lever to make it pop out, set the cranking lever, aim and start cranking, sorry, shooting.
I found the viewfinder unusable and on all cases preferred to shoot from the hip, a quick look through the viewfinder to get the idea of what your frame is like, and you are good to go.
The Lomokino will film as fast, or as slow as you’re able to crank it. Lomography states 3-5 frames/sec in average. You can try and crank faster, but keep in mind that this will go through the 36 (144) frames roll faster.
On a personal note (or better yet, a personal confession) I can’t stop thinking of making a real 24fps film with the Lomokino.
Results (and the LomoKinoScope)
As expected (I hope you’ve been expecting this) the film from the Lomokino needs to be developed, not the easiest task in 2013, but still doable. When you do find a place that will develop the film, don’t forget to ask them not to cut the film, and if they are ultra nice, have them scan the film too.
This is the point to remind ya all that the Lomokino will shoot both Negative (C41) and positive (E6) film, the difference will be when viewing the movie on the LomoKinoScope.
The LomoKinoScope is in many ways resembling the Lomokino itself, mainly design and style wise. Where it differs is the experience. I found it to be, in general, too clumsy to enjoy. Starting with loading the film, a task that can take some time to master (I’ve yet to master the art). To be more specific, loading the film to the supplied film container is a task-out-of-hell. The container is smaller than your usual film container and you need to stretch the film as you wind it in so it will fit snugly, all that while constantly smudging the film with your fingers. It might be only me, but I love film too much to be able to handle it like so. Also, none of the above is explained in the text-only instructions supplied with the LomoKinoScope, I was pretty sure I’m doing something wrong with my first roll, so I immediately searched the web to see what’s the right way, only to discover, it was Lomography that’s doing something wrong.
After managing the task of rolling the film and installing the container into the LomoKinoScope, you hold it against the light, look through the eyepiece and start cranking. Where the Lomokino can run at 3-5fps, the LomoKinoScope can barely do 1fps, resulting in a very poor viewing experience.
Mind you, that the LomoKinoScope can show all kind of film, so if you shot a Negative roll, you’ll get a Negative movie.
It’s a shame that the LomoKinoScope’s experience is not in par with that of the Lomokino itself, actually looking through the LomoKinoScope is fun, and the image is beautiful, it’s just not… complete.
I’ll suggest to skip on the experience and have your local photo shop scan the negative / positive for you, since it’s going to be a “special” 144 frames roll, you need to be extra nice when asking for the scan (or extra generous, as it was in my case).
Post production (and the LomoKino Smartphone Holder)

So what do you do with a few 144 frame negatives? You edit them so you can show off your creativity.
The Lomokino is an analog toy in a digital world, so Lomography did right when they came out with the LomoKino Smartphone Holder – basically a smartphone adapter to your LomoKinoScope.
The actual device is well made and well thought off. I’ve tested it with and an iPhone 4, a Samsung galaxy S2 and my personal Nokia Lumia 920, and believe me, if something works with a Nokia Lumia, it’s a good sign it’s well thought off :)
Connecting the LomoKinoScope and the LomoKino Smartphone Holder is easy and straightforward. To “convert” to digital you simple press your camera rec button and start cranking. The results are, as expected very lo-fi, you’ll end up with a very small frame surrounded by lots of black and as I mentioned before, a sub-par experience of about 1fps. Here again, I’ll recommend taking the develop-and-scan road.
If you do end up with a good scan of your images, just import the image sequence into your editing-software-of-choice and create a masterpiece.
Conclusion
The Lomokino (and its friends) are not for everyone, and even for the analog at heart it might be something you’ll play around a few times. Still, with its great look and style, the pretty cool 144 frames stipe and a very reasonable price (89 Euro for the Lomokino & LomoKinoScope package + 19.90 Euro for the LomoKino Smartphone Holder), the Lomokino is a great impulse buy and an amazing gift to someone who is an analog geek like me. (Note to wife – I already have one).
Processing can be pricey, and scanning the unique uncut 144 frames film stripe is up to someone elses’ kindness and good heart (In some cases money helps). If you have a LomoLab around you or in your country, you might want to use the service, you’ll pay extra, but you’ll get the images on a CD.
|
What I like |
What I like less |
|
|
About Itay (ET) Galim
Itay (ET) Galim is a film maker, designer, and UX/UI expert based in Tel Aviv, Israel. You can visit him right here.
We love it when our readers get in touch with us to share their stories. This article was contributed to DIYP by a member of our community. If you would like to contribute an article, please contact us here.


Join the Discussion
DIYP Comment Policy
Be nice, be on-topic, no personal information or flames.
6 responses to “DIYP Reviews The Lomokino Analog Movie Maker”
This is the most pretentious camera I’ve ever seen. Why would anyone want their movie to look all jumpy and crappy. Lomo would be an awesome company if they focused on quality rather than light leaks and hipster crap.
The whole point of LOMO is light leaks and that ‘hipster crap’. Don’t comment on something that you don’t understand.
Lomo can be many things. Take a look at Lomography.com and you’ll see that it’s not all about light leaks and hipster crap, it’s all about keeping it analog.
When I made the “Jumpy-Crappy-Hipster-Crap” of a film for this review, I intentionally shot from the hip with out a tripod, resulting in the “JCHC” film above. But you can find other who took a different path and made “Steady-Beautiful-NON-Hipster-Crap” films.
I wouldn’t call it a pretentious camera, I’d rather just say it’s not your cup of tea :)
Just get a super 8.
A lot easier to find a local lab that still develops 35mm than Super 8.
If these worked well, this would be something really neat, but lomography and working well aren’t often both in the same sentence. I’ve had 4 of these. All of them skipped frames, and one in particular skipped more than 1/2 of them. Two were replaced under warranty, and one of the new ones was worse. Despite this I was able to get one or two really charming films, and absolutely enjoyed them, and if the lens quality was a tiny bit better, I would have been more thrilled. I would be the first person in line to buy one with a glass lens, and a more reliable transport mechanism. I’d play triple for better quality. In fact this was a gateway drug for my Zeiss 35mm kinamo purchase, which certain ones can be hand cranked in the same manner. It gives infinitely better results, but the format isn’t super wide like this is.