


DIY Photography Lighting – The DIY Speed Strap
May 4, 2008
Udi Tirosh
Udi Tirosh is an entrepreneur, photography inventor, journalist, educator, and writer based in Israel. With over 25 years of experience in the photo-video industry, Udi has built and sold several photography-related brands. Udi has a double degree in mass media communications and computer science.
Share:
 I really wanted a speed strap. Ever since the restrictive light post over at Strobist, I wished for one of those magical straps. If you are not familiar with them look at David Honl’s site, it is filled with goodies.
“Why do you need one”, you ask? Because they are A – Really good at blocking light. B – Small and can get in my small bag when I go out for a shoot and C – They are just too cool that I could not effort not having one.
I even designed a new one. (Not so good, more on that in a few lines).
Then I decided that I am going to get one from Amazon. Since I (like my eight months son) can not delay satisfaction, must take photos to live, I made a new one that really works (and inspired by the Thomas Schwenger Complete Two Seconds Lighting Kit).
Design One – The Ringy Speed Strap
(This is not the final design, if you want to see how to make a “real” speed strap go to The Neon Speed Strap).
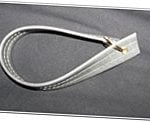
This was my first attempt at making a speed strap. And I mean just the strap. I thought I can re-use the foamy DIY Snoot that I already made and make some more accessories as I go.

The design is very simple. I used the loop side of a 4cm Velcro combined with a short 4cm wide elastic rubber.
This design was good as far sliding onto the flash. It was not so good at staying on the flash, it lacked the friction to hold it tight to the flash body (It was better for my monstrous Nikon SB26 but slid off really easily from my Nikon SB800).
Since it slided off so easily, I could only use it with very light corrective gel accessories.
This was the point where I ordered one strap and one snoot from Amazon.
Design Two – The Neon Speed Strap
So while I waited (overseas shipping is something that sounds like beach a great pleasure) for my gift to arrive, I decided to make a better model. It is called the Neon model because the only silicon I could find is beaming green.
Materials:
– Some loop and hook Velcro strips (I use 4cm, but 3cm will work as well)
– Glue
– Corrugated Plastic (AKA Coroplast)
– Precision knife
– Something Silicon (I used a 2 Dollar pot holder)

How to Make the Speed Strap:
1. Measuring and Cutting the Velcro
The first step is to get the measurements for your Velcro strip. I wrapped the loop side of the Velcro around my largest flash – the Nikon SB26 one and a half times.

For the hook side, I took the same length minus half of one time around the flash. I intended to leave exactly one half of the flash round for silicon.

For the silicon I measured what’s left on the loop side. See the diagram for more details.

2. Sewing is the next step.
Now here is a word of warning, sewing Velcro by hand is murder. After the first few stitches, I went to get some sewing help from a friend.
First “weld” the edges of the hook and loop (or hoop and look). You do this by velcroing the two strips and making a stitch at the end. This will cause the edge of the strap not to wither away.

Now reverse the Velcro and sew the two strips together.

The last step is to sew the silicon. This, by far, was the hardest thing to do. The sewing machine and the silicon thingy are not good friends.

Now you are done with the strap, the next post will be on the accessories one can make, and will feature some sample shots.

Conclusion:
I would say that for the price (about 1 USD) and time (about 15 minutes) it took me to make this speed strap it is definitely worth it. However, there are some points that are made far better on the original speed strap:
– So, my speed strap is nice and will work, but it is not looking like professional gear. If you need to use it with a client, I’d go with the original.
– The speed strap is quite thick. I don’t know yet, how the original strap, but I assume it is thinner and easier to handle. I guess that if I had found a better silicon surface, I could make it thinner, but there was non available at the time of creation.
– My accessories are, again, no so professional looking and no so durable. It is nice for a home studio and some external use, but I doubt they will survive a real round in the photo journalism kingdom.
I’m glad I made it, and I am also glad I got one from Amazon (along with the long snoot).
More Flash Accessories:
– Flash Mounted homemade DIY Softbox
– A Floor Lit Table Top Studio Project
– Homemade Cheap Flash Diffuser
– Just Fab’s Turkey Pan Beauty Dish
– The DIY Strip Light
Filed Under:
Tagged With:

Udi Tirosh
Udi Tirosh is an entrepreneur, photography inventor, journalist, educator, and writer based in Israel. With over 25 years of experience in the photo-video industry, Udi has built and sold several photography-related brands. Udi has a double degree in mass media communications and computer science.


Join the Discussion
DIYP Comment Policy
Be nice, be on-topic, no personal information or flames.