


DIY – Cheap Mini Monopod
Mar 2, 2007
Udi Tirosh
Udi Tirosh is an entrepreneur, photography inventor, journalist, educator, and writer based in Israel. With over 25 years of experience in the photo-video industry, Udi has built and sold several photography-related brands. Udi has a double degree in mass media communications and computer science.
Share:
 Looks like 1/4″ bolts are very useful. They have been attached to bottle caps and to wires to create several type of DIY tripods. here is another great project for an owner of 1/4″ bolts. Here is another idea by Christian Kahle:
Based on what the Pop bottle cap camera holder, I built the MiniMonoPod (MMP).
I found that it is just amazing useful when handling smaller cameras. As my Cannon XTi has little or no grip space on the left hand it made it hard to hold on to it securely, especially with cold fingers. Now with the MMP fingers are together so they stay warmer. It’s easier to hold on to the camera with a larger lens with the left hand. And right handed people can use their right hand to do stuff and still maintain a strong grip on the camera with the left hand.
What you need:
- 1 1/4″x20 1″ hex bolt.
- 3/4″ ID PVC tubing – your choice of size
- (2) 3/4″ PVC end caps (rounded work best)
- Gorilla Glue or a similar type glue.

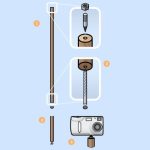
1. Cut the PVC tubing to length. I used 7″, take into account that you will lose 2″ with the end caps on. Sand the pipe with rough sandpaper so that it isn’t slippery. It isn’t too important to get the end straight as the end caps will cover it up.
2. Drill a 15/32″ hole in one End cap. You want to use a drill size just smaller than the ¼” bolt so that the threads will have something to dig into.
3. Drill a hole in the other end cap to allow air to escape, can be smaller than the other end if you want it to look good. Once glued together this may leak some glue so be aware of that.
4. Mark ¼” from the top of the bolt. Most equipment I’ve see uses ¼” or less stubs to connect to the camera. I used another ¼” bolt for a measuring device, that way it’s simple.

5. Use Gorilla glue on the threads below that mark. Only use a small amount but make sure that the threads the whole way around bolt are covered.

6. Screw the bolt into the end cap and screw it in until you get a ¼” stub coming out of the top. Again I used another ¼” bolt for measuring.

7. Put Gorilla glue on the inside of the end caps and put the end caps on. If you put the glue on the inside of the end caps then the end product won’t have glue trails.

8. Give it 4 hours or overnight to allow the glue to properly set.

9. If you want you can use rubberier compound to make the MMP look a little more professional and less homemade. The compound is available at most home improvement or paint stores. I recommend the spray on style.

You now have a MMP for less than $1.

Here is another variation – a Wood based MMP
This is a variation of the PVC MMP. It looks less homemade. I has a better feel to it but it doesn’t have the end caps on it to keep your hand from slipping off. You only need 3 things – Dowel rod, a 3″ x 1/4″ x 20 bolt and Gorilla glue.
1. Get wooded dowel rod, between 1″ and 1.5″ or whatever size feels good to you. Cut it 5″ – 6″ depending again on how big your hand is and how it feels.
2. Drill a 2″ or so hole in the top center of the dowel rod.
3. Put the bolt in the hole threads first. Use a second bolt to measure ¼” from the top of the rod. Mark it and cut it. Check it for height. If it is too short just throw a small wad of paper in it to get it to the right height. If it’s too tall cut it down again. It’s better to be a little short in this case.

4. Wet the inside of the wood dowel and put a small amount of glue in there. Insert the bolt cut end first. The glue will foam up a bit but that’s ok. You can use a small knife to clean it up.

5. I used some rubberier compound to give it a more professional look.

And there you go!

Another variation can be to make a full length monpod. Just follow the instructions for the PVC or wooden nimi-monopod but use a full length poll, instead of a short one.
This article was contributed by the great DIY-er Christian Kahle

Udi Tirosh
Udi Tirosh is an entrepreneur, photography inventor, journalist, educator, and writer based in Israel. With over 25 years of experience in the photo-video industry, Udi has built and sold several photography-related brands. Udi has a double degree in mass media communications and computer science.


Join the Discussion
DIYP Comment Policy
Be nice, be on-topic, no personal information or flames.