


Cosyspeed Camslinger 160 – One Awesome Family Photography Travel Bag
Sep 27, 2015
Udi Tirosh
Udi Tirosh is an entrepreneur, photography inventor, journalist, educator, and writer based in Israel. With over 25 years of experience in the photo-video industry, Udi has built and sold several photography-related brands. Udi has a double degree in mass media communications and computer science.
Share:

I think I found my new family photography travel bag. Oh, you know what this is, even if you’ve never heard that term before.
It’s that bag that you use to carry a camera when you are traveling with the family. And this bag has to be special for several reasons which I’ll outline below. But the essence of it is that it has to keep the camera safe & stashed away, while allowing for a quick draw. This is the life of a photographer family man on vacation: If the camera is exposed – prepare for backlash from the family. If the camera is hidden too deep, good moments are missed. This is why the Cosyspeed Camslinger 160 became my new friend after an 8 days family vacation in Austria.
What’s the deal with a family photography travel bag
As promised here are my requirements from a family/photography travel bag. Those were written in blood, sweat, missed shots and nights of sleeping on the sofa.
- It obviously has to be able to carry a camera. For me it is the Sony A7II.
- It has to be convenient for carrying a camera for a whole day.
- Quick draw is crucial – otherwise good moments are missed.
- Take camera out / place camera back should not be a biggie. Otherwise you think before getting the camera out and sometimes decide against it, just because it is too much of a ‘mess’
My family photography travel bag used to be the Lowepro Fastpack 350 mainly for its under the arm quick draw ability and for the extra storage. But being a big bag, it was not easy to handle and getting the camera in and out was OKish but not perfect. So for my last family trip I tried to test the Camslinger. I am not going back.
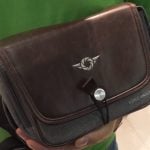
What is the Camslinger
The Camslinger is a belt-attached kind of bag. There is a belt that goes around your hips, the weight distribution is not unlike the Spider Holster and if you enjoy the spider, you will connect with the Camslinger immediately. The fact that the camera weight is distributed on the hips makes it almost unnoticeable in terms of fatigue. I was able to carry the bag for 16-hours days of hiking, driving and tending 3 kids and did not get sore shoulders or a sore neck.

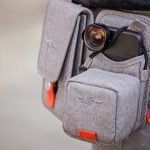
The bag is ractngalish in size and fits exactly an A7II with a 24-70 f/4 lens or a smaller mirrorless with 2 prime lenses. There is a clever mechanism that allows you to make the bag slightly bigger or slightly smaller if you need some extra space.

About Carrying a bag and quick draw
The promos shows three ways to carry the bag: at your side; on your tush; and as a messenger bag. I found the best way for me was on the hip or tush, and was not that convenient using it as a messenger bag, but horses for courses, maybe it’s just my crooked shoulders.


While the bag is located on the hip (or right tush) accessing the camera is super easy and it is just where you would it to be when resting your hand. In fact getting the camera out of the bag for a few shots and then putting the camera back is so intuitive that it became a habit to store the camera every time once I finished shooting.
If I needed the camera again, I just reached for it again. This was not the case with the Lowpro I had before. With the Lowpro, I always took it out happily, but always hesitated before putting it back it, just in case the next round of shot would not be that far away. With the Camslinger, this was never an issue. In or out in a few seconds and no second thoughts.

Having this versatility is like the holy grail of traveling with family: having the camera when you need it and storing it away in a safe place when you don’t.
The bag comes with a small finger strap, to secure the camera to your hand while it is out of the case. I think it can work for smaller cameras but for the A7II, I opted for a Peak Design wrist strap which felt more secure for me.


And so my routine was as follows: open bag, slide hand in wrist strap, hold camera. The entire routine only takes 3-4 seconds. And so does the it’s reverse side – getting the camera back to the bag.
Traveling and Security
When you are traveling you want your camera to be as safe as possible. There is no downer as having your camera stolen while traveling.
There are two security features on the bag, both are quite clever. The first one is that the buckle on the belt needs 3 points of contact to release. That means you need two hands. There is the usual action of pinching the buckle but in addition you also need to press a third button. That means that getting the belt off your hips is not an easy thing to do for someone who ‘bumps’ into you in a busy street. In fact getting the strap off without knowing about this button is impossible and it does not add any inconvenience to actually taking it off, just security.

The other feature is the way that the bag cover (or flap) closes on the bag. Most similar bags close with velcro contact between the bag and the cover. Not the Camslinger. The Camslinger has a clever little button that you need to pull to close the flap. You also need to pull it to open the flap. On the security end, this makes un-flapping your bag and reaching for its content impossible. It also does not take anything from opening the bag. When you close the bag, this is something you have to notice and guide the flap to its right position. There is a learning curve there. And it does add some time to closing the flap.


Eventually, I learned to use my index finger as a guide, I felt the male end of the buckle with it, and guided the flap on to it. It’s very secure, but needs some attention. That said I still love the extra security that it provides and will not remove it, even if I could.

Build Quality, Style & moving around
This is a FINE bag. I can tell, I really like bags and made a few myself. It starts with the big picture (like having velcro to the length of the belt, so there is never any extra belt flailing around, and ends with the quality of the fabric and stitching.

When it comes to bags, I am not a very fashionable guy, I care about function more. My wife on the other hand is a very fashionable lady, and she says that the bag looks fabulous. She likes the color, the overall design and the fact that it looks like a decent designers bag. I trust her.
So I feel fine walking around with the bag in terms of how we look. the only thing to notice is that the bag adds a few centimeters to your width. And this is something to remember when you walk through doors, crowded places and long corridors, there is a bump on your hip.
Conclusion
If you made it this far, here are my big likes and dislikes:
PROS:
- It’s a stylish bag
- Camera goes in and out really fast
- Camera is secures when not in my hands
- It feels secure to travel with and it feels that the gear inside is secure
- It’s made with care, durable and just the right amount of sturdy
CONs:
- I wish they made a decent wrist strap. I would love seeing the same attention from the same
maker, not that I have any complaints again the Peak Design wrist strap – it’s awesome. - You have to be aware to your ‘new’ hip width
- I wish closing the bag was a bit faster
You can get the Camslinger 160 at B&H, Amazon or direct (and uk direct) for $89.00.
P.S. Cosyspeed are running an Indiegogo for their next model now, I did not try it yet, but it is bigger and have a place for a smartphone which seems to be mandatory nowadays.

Udi Tirosh
Udi Tirosh is an entrepreneur, photography inventor, journalist, educator, and writer based in Israel. With over 25 years of experience in the photo-video industry, Udi has built and sold several photography-related brands. Udi has a double degree in mass media communications and computer science.


Join the Discussion
DIYP Comment Policy
Be nice, be on-topic, no personal information or flames.
3 responses to “Cosyspeed Camslinger 160 – One Awesome Family Photography Travel Bag”
Great bag system and can’t wait for the upcoming streetomatic. What made you chose the Paris Grey?
I think this one only came in black or grey, and black is too depressing :)
Got it. While black is a bit more stealthy I doubt that anything is stealthy hanging of the hip. I have both black and Paris grey and now will use the black only for formal occasions. :)