


How To Build A Linear Motorized Slider For Less Than $60
Mar 20, 2014
Udi Tirosh
Udi Tirosh is an entrepreneur, photography inventor, journalist, educator, and writer based in Israel. With over 25 years of experience in the photo-video industry, Udi has built and sold several photography-related brands. Udi has a double degree in mass media communications and computer science.
Share:
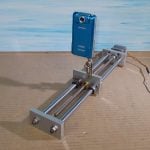
The team at ask design just release a full tutorial on building a DIY motorized slider. The design is good both for time lapses and “normal” video shooting.
They are pretty straight forward about the goods and the bads of building DIY gear. On the good side you obviously got the price, but also the fact that you can build it in less than an hour. A nice bonus is that it supports USB charging of other devices which ask uses to power a fan to stop lens condensation.
On the con side, it will be heavier than a bought unit and will not facilitate stepping action which is mandatory for low light time lapses. If you have more money that time and want a high end unit, they recommend Syrp as a turnkey solution.
You would need a slider, as unit only supports the motor and timing control. (Ask are using the Konova K2 slider, but any other slider will do)
The parts list is made from a mandatory and optional parts sublists, which depending on the functionality you need can be as little as $55 for a basic time lapse kit, or $85 to include a dedicated battery, a USB charging port and a faster motor.
If you have some soldering skill (or probably even if not), this tutorial is pretty basic stuff and it really goes into details so it can also serve as a good first project. Results are stunning, as you can see from the video at the beginning of the post.
Cool update from Gus: Want to do timelapse (or normal speed) panning shots with the same unit? Too easy! Flip the unit on its side and there should be a thread at the end of the drill chuck. Find a bolt that will go from the thread diameter of the outlet from the drill chuck to the 3/4″ (or whatever it is) on your tripod head, screw your tripod head on, put on your camera and…. voila! Panning at timelpase speeds, and it’ll spin indefinitely
[DIY Dolly / Slider Motor via ISO 1200 Magazine]

Udi Tirosh
Udi Tirosh is an entrepreneur, photography inventor, journalist, educator, and writer based in Israel. With over 25 years of experience in the photo-video industry, Udi has built and sold several photography-related brands. Udi has a double degree in mass media communications and computer science.


Join the Discussion
DIYP Comment Policy
Be nice, be on-topic, no personal information or flames.
4 responses to “How To Build A Linear Motorized Slider For Less Than $60”
plus the $250 slider …
You can do a DIY slider as well… be smart, use google ;-)
And a visit to the ER..
You can get a DIY slider pack from TurnsPro which has all the brackets and the motor, but can be adjusted to most sliders. It probably only works out slightly more expensive than doing it the way shown here.