


How To Build A DIY Eyelighter
Nov 7, 2014
Udi Tirosh
Udi Tirosh is an entrepreneur, photography inventor, journalist, educator, and writer based in Israel. With over 25 years of experience in the photo-video industry, Udi has built and sold several photography-related brands. Udi has a double degree in mass media communications and computer science.
Share:

I’m always looking to add new light modifiers to my home studio but name brand products are often too expensive. I still cannot justifies a big expense for a single look so $300 for the Wescott Eyelighter was not a reasonable purchase for me. Plus looking at the components I felt it could be made for pennies on the dollar, look almost as nice and most importantly give me similar results. Being the handy man type I’m prone to DIY just about anything and as long as my wife doesn’t complain about the look or build quality. She’s happy, I’m happy; such is life. And since I’m the spender in this family keeping her happy is my path to more gear.
Materials:
- 2 ½” x 60” pvc pipe (pre-cut length)
- 1 ½” x 2ft pvc pipe (extra piece from garage)
- 3 ½” T joints
- 2 ½” 90° joints
- 4 ½” caps
- 2 ¼” threaded rod 24” length
- 8 nuts
- 8 washers
- 4 lock washers
- 4 teflon lock nuts
- 1 ¼” wing nut .75” length
- 1 yard of black material
- 1 yard of reflective material
Tools:
- sharpie
- scissors
- Basic Sewing Machine
- Hand Saw
- Drill
- 2” drywall screws
- ¼ drill bit
- Plyers
- butane torch
- box fan
How To Build It

First and foremost, if you can’t sew you’re dead in the water before you start. I’ve made my kid’s Halloween costumes for many years and I hardly consider this sewing. Four straight lines in a sewing machine couldn’t be any easier. Cutting the pattern is the trickiest part and can only be done after you make the frame so let’s move on to that.
Never bending pvc before I turned to YouTube. Following a method of heating sand to 500° I then poured it into the pvc through a funnel with the other end capped. The sand does two things; softens the pvc to allow it to bend but also keeps it from creasing. I bent the pvc into shape around a mold I created on my workbench – screws I put into the bench in a semi circle pattern. While in the mold I used a torch to keep it hot allowing it to shape perfectly. Keep it on a low flame and always keep it moving back and forth.
Use the box fan to draw air away during this process as pvc can release noxious fumes under heat. 5 minutes or less of heating should do it and when done use the fan to cool the pvc. Bend the second piece, make sure they match in shape, and you’re done.
I now have two curved 60” pvc sections that I cut in half, putting a T joint at each cut. I put the end caps on and then drilled holes for the rods. Assembling these pieces now allows me to take them to the sewing station to make the pattern.
I’m not going into full detail about making and sewing this pattern because if you can’t sew you won’t be able to do this project. But if you can sew, read on. I laid the black material on the floor, silver on top of that, and then the frame on top of both. Using a sharpie I traced an outline of the pattern onto the silver material. I cut out the pattern with scissors, sewed the two pieces together, and then inserted the pieces into the pattern. Very basic pattern and sewing. Using all the hardware and 24” threaded rods the frame is assembled.

Final Touches
Now that it’s assembled the last item can be made, the mounting bracket. For one T joint I cut a 2” piece of pvc to hold one 90° joint and a 12” piece for the other T/90° joint pairing. The final T joint will hold the bracket together and allow you to mount this onto a light stand. I chose to offset this joint forward, rather than centered, because it’s center of gravity seems to require it. I drilled two holes in the last T joint, one on the side for the wing nut and the other on top to accept the ¼” post from the light stand, which will help to stabilize it on the stand.


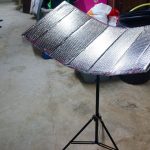
Done! As for the pic samples, I’m no model and getting my 9 year old to use back button focus and take a worthy pic is frustrating so you get what ya get. You can see it does a great job and I’m happy with the results. Can’t wait to use it on a real model.


About The Author
Jay Knickerbocker aka dbthump is a crossfit athlete (nutcase) and his specialty is shooting crossfit events and product photography. Based in Tampa he travels across the US shooting major crossfit events and products when in studio. You can follow his work on his webpage and on Instagram, and if you’re ever in Tampa and want a good workout drop into his gym.

Udi Tirosh
Udi Tirosh is an entrepreneur, photography inventor, journalist, educator, and writer based in Israel. With over 25 years of experience in the photo-video industry, Udi has built and sold several photography-related brands. Udi has a double degree in mass media communications and computer science.


Join the Discussion
DIYP Comment Policy
Be nice, be on-topic, no personal information or flames.
13 responses to “How To Build A DIY Eyelighter”
Quality work. Thanks for posting.
Thank you.
You didn’t waste any time, wow!
I would recommend a heat gun or paint stripper gun than a torch. They both get more than hot enough but the torch will burn the PVC easier than the gun. Experience.
Agreed for a first timer a heat gun will be fine. I don’t own one and I have a lot of experience with a torch.
Thank you for posting this, My question is what is the difference photographically between this and a 1/4 inch piece of foam core? Just asking.
I imagine the main difference would be the amount of light wrapping around the face. With a flat piece of foam core the light source would be from the front. With a curved reflector the light on the sides of the face hits straight on. If you can bend the foam core you should get similar results. There’s curved foam core DIY online, I just wanted to copy Wescott for 10% of their price.
The difference is supposed to be in the catchlights of the eyes. His was not angled properly to get the effect for the eyes but it lit his face great with no dark spots.
Got pix w a real model anywhere?
What? I’m not model enough for you? :P I don’t have any I can share; child model/portrait. I haven’t done much with it since I made it. I primarily shoot sports events so building this was simply following one of my DIY whims after gasping at how much the real thing cost. That said, if was a portrait specialist I’d be likely to get the real thing vs spending the time to DIY anything these days. One extra shoot would pay for it so…
Know what the total cost of this was?
Nice job! Where did you get your reflective material?
Where did you get the reflective material?