


How To Build Your Own 3D Stereo Camera
Jan 25, 2015
Paul Richters

Udi Tirosh is an entrepreneur, photography inventor, journalist, educator, and writer based in Israel. With over 25 years of experience in the photo-video industry, Udi has built and sold several photography-related brands. Udi has a double degree in mass media communications and computer science.
Share:

If you ever thought about taking 3D photos or video you are going to love this tutorial. It is based around the oldish Ricoh GX8, but you can adapt it to any camera you desire, as long as you can trigger them remotely. The general idea is quite simple, and here is the outline for it:
Take a two digital cameras which can be triggered remotely. Make a frame for the cameras with two compartments, so they are parallel to each other. Make/buy a Y splitter so you can trigger both left and right camera simultaneously. Put the left and right image together using StereoPhoto Maker. Make your own stereo viewer and enjoy your own 3d images.
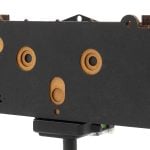
The Dimensions of the frame
- For the outer dimensions I used my own hands and two Ricoh GX8 and a CA-1 remote control.
- The frame is 260 mm wide and almost 175 mm height.
- The spacing between the camera lenses is around 85 mm, and this is the distance you would have to use no matter which camera couple you are using.
Building Instructions for the frame

- The dimensions of the upper and lower parts A are 12 x 27 x 260 mm.
- The dimensions of the four standing parts B are 18 x 27 x 150 mm.
- The inner dimensions are: aa = 28 mm, bb= 68 mm and cc = 92 mm.
- In the two inner standing parts B need a hole for the two ¼ inch camera screws.
- The height for the two camera screws (“tripod plates”) ab = 80 mm
Now here are some more tidbits to explain the photo to diagram relations
- The outer-left frame (part B) also have some room for the camera release CA-1.
- To hold everything together I used eight furniture bolts barrel nuts M6 x 45mm.
- To actually enjoy holding the wooden frame you’ll have to round the edges. For this I used a router.
- The mini USB port is on the side of the camera and it’s close to the lower part A. Room has to be made for the two mini USB connectors of the Y-splitter.

Further improvements to the frame can be made (though they are not in my build)
- A level can be added for getting horizontal horizons.
- Four rubber feet can be added to protect the cameras when the frame is lying on a table.
- Two angle hooks can be added for easy alignment of the cameras after changing the batteries or the left and right SD-cards.
- Adding a third ¼ inch camera screw at the bottom of the frame the camera can be fitted on a tripod.
- Adding a camera strap for carrying on the shoulder

The Building Instructions for the Y-splitter
The building of the Y-splitter is trivial:
- Cut the two cables in two.
- The cable length on the two mini-USB connectors should be around 10 cm.
- The cable length on the female USB-connector can be around 5 cm.
- Remove the inner parts of the female Din loudspeaker connector.
- Drill a hole in the female loudspeaker connector part where the two mini-USB cables fit through.
- The female USB-cable fits through the other side of the connector.
- Assemble the Y-splitter by connecting the wires with the same colour together and isolating them with tape. The two parts of the female loudspeaker connector can now be put together again.

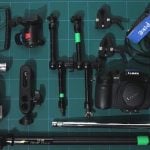
Assembling
By adding the cameras, the frame, the remote release, the Y-splitter and the female mini-UB Male USB – connector together you should get your stereo camera.

It should look something like this.

Creating the stereo images
With this camera you get left and right images. In order not to get confused you better mark the SD-cards with L (left) and R (right). You can use StereoPhoto Maker to create the type of 3D-image you want. I’m rather lazy so I just put them together as a 10 x 15 cm print.

Viewing stereo print
For viewing I use a plastic “Lorgnette” Stereo-Viewer. They are really cheap, about € 2,50.

To make viewing easier I put the Loregnette on a frame, which can hold 10 to 20 pictures.


Here are some of the photos I made:


We love it when our readers get in touch with us to share their stories. This article was contributed to DIYP by a member of our community. If you would like to contribute an article, please contact us here.
Join the Discussion
DIYP Comment Policy
Be nice, be on-topic, no personal information or flames.
7 responses to “How To Build Your Own 3D Stereo Camera”
nice way to recycle oldies though the final thing is not quite as handy as a loreo cap for my markII ;)
Great, I had no idea about the Loreo company. They also make a shift lens, I’m going to take a look at that :-). Personally, I use an old Pentax Stereo Adapter. It’s roughly the same principle I guess.
Loreo are a PITA. They are hard to get hold of and of varying quality. The much promised new version never seemed to materialise and the reduced dimensions of the image along with fixed Stereo gap make them of limited use.
I love mine, but the times I can use it are few, using two cameras allows for much more variation and full frame images.
One of the possibilities of these Ricoh cameras (GX8, GX200) is to add a wide angle conversion lens (DW4 or DW6). It expandes the standard 28 mm to 21 mm. This makes it ideal for photographing in small space or indoors like churches etc.
They are not all that and a box of chocolates. A true stereo camera is better than that.
cool! imho, I think animated gifs are easier to view and share 3d. then you can do more cameras!
They are easier to share but, having done some myself, I’m not sure they are all that pleasant to look at. All this is making me think about getting my NIMSLO going again though.