


Anthotypes for Beginners: Create Prints Without a Darkroom; Just Turmeric, Alcohol, and Sunshine
Nov 24, 2025
Dunja Đuđić Kalinin
Dunja Djudjic is a multi-talented artist based in Novi Sad, Serbia. With 15 years of experience as a photographer, she specializes in capturing the beauty of nature, travel, concerts, and fine art. In addition to her photography, Dunja also expresses her creativity through writing, embroidery, and jewelry making.
Share:

Alternative printing methods are a fun and creative way to explore photography beyond the camera. I’m currently obsessed with cyanotypes, but you can also make anthotypes with an ingredient you probably have in your kitchen – turmeric. Spices and beverages aren’t just for the kitchen, as artists have been using everything from coffee to tea (and even beer) to develop film and make prints.
In her latest video, Lindsay Adreon shares a sunny twist on that idea by showing how to create beautiful prints using just turmeric, alcohol, and a bit of sunlight. It’s a simple method and the results look absolutely gorgeous and wonderfully organic.
What You’ll Need
The core ingredients for anthotypes are simple: turmeric and isopropyl alcohol. Ta-daaa! Lindsay uses 91%, but notes that anything from 70% and up will work fine. I was someone in the comments writing that they even did this with vodka. I know it has a smaller alcohol percentage so I don’t know if it works – but it doesn’t hurt to try.
Other than your alcohol and spice (and everything nice), you’ll also need:
- A jar or container to mix and store your solution
- A coffee filter (optional but recommended for smoother results)
- A cheap brush (turmeric stains, so skip the fancy ones)
- Rubber gloves if you want to avoid yellow-stained hands
- Thick paper that can handle being dunked in water – think cardstock or watercolor paper. You can also try with old book pages and fabric, just make sure to use something made from natural fibers like cotton or linen.
- Sun-blocking objects you want to print (dried leaves, pressed flowers, die-cuts, or even coins, keys, doilies…)
- Glass, Plexiglas or acetate sheet
- Painter’s tape or bulldog clips to hold everything in place while outside
Making the Turmeric Solution
Start by placing a coffee filter over a jar or small container. Add about a tablespoon of turmeric powder, breaking up any clumps. Slowly pour in about 1/4 cup of alcohol. Let it drip through – this might take some time. If your filter breaks (like it did for Lindsay), just re-filter the mix into a new jar.
You’ll be left with a vibrant yellow liquid that goes a surprisingly long way. Lindsay notes that even this small batch covers plenty of paper. Similar to cyanotype, if you’ve ever done it.
Prepping Your Paper
Apply a single, even layer of the turmeric solution onto your paper using your brush. Don’t worry about streaks – they settle as the solution dries. Just make sure you don’t overdo it, and avoid puddles of liquid. One thin coat is enough.
This is very important – work in a dim space! The turmeric begins reacting to light right away, and unlike cyanotype, it’s not just UV light. Lindsay turns off her overhead lights and sometimes uses a black light nearby. After coating your paper or fabric, you can let them dry in a dark cabinet.
Planning Your Design
Before placing anything onto your paper, Lindsay recommends planning your layout in advance. She cuts her paper ahead of time and arranges dried leaves or flowers on it, then takes a photo to reference later. This saves time when you’re working with light-sensitive paper and need to move quickly.
Sun Printing Time!
Once your coated paper is fully dry, place it on a piece of cardboard. Use your reference photo to lay down your leaves, flowers, or whatever it is that you’re printing. Cover the entire setup with your transparent sheet (I use Plexiglas) and add painter’s tape or bulldog clips to keep everything in place. I personally prefer bulldog clips, just make sure not to place them over your coated paper so they don’t print onto it.
Now, bring the setup outside into full, direct sunlight. The printing process will take some time – around three hours, or even longer if you want a darker result. So, it’s best to do this in summer months… Or you can just wake up earlier and start around noon so it’s all done before it gets dark. With cynotypes, I usually prep my paper the evening before, and then it’s all dry and ready for sun printing in the morning.
Stopping the Reaction
About 10 minutes before you’re ready to bring your prints inside, mix your rinse solution. Once again, pretty basic stuff – just some baking soda (or borax) and water. I don’t think there are exact measurements; Lindsay is just eyeballing it straight from the box. When the time’s up, gently dunk your prints in the solution for a few seconds, then rinse and let them dry.
This halts the reaction and deepens the colors. While the prints start off bright yellow, Lindsay’s eventually shift into warm golden browns that give a vintage, botanical feel. I just love the final result!
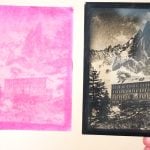
The Results and Creative Uses
The finished prints are absolutely stunning – leaves with delicate textures, hydrangea blooms, wildflower die-cuts, and even test strips on old book pages. Lindsay turns her favorites into journaling pieces and card fronts.
If you use polka dot plant leaves, for example, the dots come through subtly, while eucalyptus leaves create soft outlines. Die-cuts also work incredibly well and give you endless design options.
One tip Lindsay shares: if your plant material has leftover moisture, it might bleed onto the paper. Dried leaves and flowers work best for clean outlines. I also love using old crochet doilies for cyanotypes, and it’s a great way to give them a new life. I know I’ll surely use them when I try this technique, too.
This turmeric sun printing technique is fun, simple and an incredibly affordable way to make unique art with natural elements. Lindsay’s video shows how creative and beautiful these prints can be, and it definitely sparked my interest to add this to my arsenal of sun prints. Watch the full video below to see how it turns out for Lindsay and get more inspiration for your prints. And once I test this myself, I’ll be sure to share my results as well. Now I just gotta wait for a sunny day! :)
[Sun Printing with Turmeric – DIY Turmeric Anthotypes | Crafting While Caffeinated with Lindsay Adreon]

Dunja Đuđić Kalinin
Dunja Djudjic is a multi-talented artist based in Novi Sad, Serbia. With 15 years of experience as a photographer, she specializes in capturing the beauty of nature, travel, concerts, and fine art. In addition to her photography, Dunja also expresses her creativity through writing, embroidery, and jewelry making.


Join the Discussion
DIYP Comment Policy
Be nice, be on-topic, no personal information or flames.