


How to stabilize your camera even in horrible light conditions
Dec 19, 2016
Dunja Đuđić
Dunja Djudjic is a multi-talented artist based in Novi Sad, Serbia. With 15 years of experience as a photographer, she specializes in capturing the beauty of nature, travel, concerts, and fine art. In addition to her photography, Dunja also expresses her creativity through writing, embroidery, and jewelry making.
Share:

Working in low light conditions can be very frustrating for photographers. If you have a tripod and shoot a steady scene – well, you basically don’t have a problem here. But the conditions are often far from ideal. First, you don’t have a tripod. The light is horrible to say the least, yet you must shoot from hand. Naturally, this can drive you insane because it’s hard to get sharp photos, even with the steadiest hands. But fortunately, you can stabilize the camera, reduce shake and make sharp images even in crappy light. David Bergman will show you how.
The basic rule of sharp images is that the denominator of your shutter speed should be two times higher than your lens’ focal length. In other words, if you use a 50mm lens, you will need at least 1/100s shutter speed to keep the images shake-free. Sounds like science fiction if you shoot a blues gig at a dark local bar (trust me, I know). If you get in a situation where high ISO and wide aperture don’t do the trick, you can use lower shutter speed and apply these tricks:
Body posture
Put your left hand underneath the lens to stabilize the camera. Make sure to keep the elbows tight to your side, because it gives you additional stability. Spread your feet a bit, because it gives you a more solid stance. If there’s something to lean on, like a wall or a tree – go for it!
Breathing
I know, it’s hard not to hyperventilate when the unsharp photos drive you mad. But taking slow, deep breaths will help you stabilize the camera and make the images sharper. And it’s good for stress relief, too. As you breathe slowly, take shots at the end of each exhale, because that’s when your hands are the steadiest.
OVF or EVF?
Bergman suggests looking through the optical viewfinder rather than through the LCD screen. Why’s that so? It’s because the additional contact of the camera with your face improves stabilization further. I’d also add that it’s because looking through the OVF makes it possible for you to keep the elbows tight to the side.
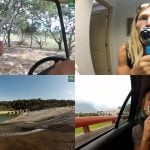
Let me show you some examples:


If you really must use the LCD (if you are shooting a video, for example), you can hang the camera strap around the neck and hold the camera as far from the body as possible. This works sort of like a string tripod, and it really does wonders.
Additional tip
If none of this works, Bergman humorously suggests that you switch the camera to “Burst Mode” and shoot like crazy, even in low shutter speed. Out of 100 photos, 1 will turn out good for sure and make you look like a genius. You can delete all the blurry photos. No one will know.
Do you use these tricks? What are your tricks for stabilizing the camera in poor light? I’d like to hear your thoughts in the comments (and use them for my next blues gig :)).
[Steady As She Goes: Two Minute Tips with David Bergman via The Phoblographer]

Dunja Đuđić
Dunja Djudjic is a multi-talented artist based in Novi Sad, Serbia. With 15 years of experience as a photographer, she specializes in capturing the beauty of nature, travel, concerts, and fine art. In addition to her photography, Dunja also expresses her creativity through writing, embroidery, and jewelry making.


Join the Discussion
DIYP Comment Policy
Be nice, be on-topic, no personal information or flames.
8 responses to “How to stabilize your camera even in horrible light conditions”
I use my viewport EVF, which is the same as a OVF as far as stance and elbow positions are concerned, and I get as steady shots as when I used to used OVF.
Also stand with your feet at a 45 degree angle, so you don’t sway back and forth, or side to side.
I only have the LCD screen, and I rarely use it. I sometimes switch to it when I need to raise hands far above my head and still want to see what I’m capturing. But in low light, it doesn’t work for me very well.
Oh, and thanks for the additional tip for the feet position. :) I’ll keep that one in mind. :)
Great tutorial! Tried it out and still got good results at 1/3 c:
Cool! I have quite a steady hand, but I don’t think I could pull it off with 1/3. Good job!
Obviously brace either the camera or your own body against something stationary if possible. Keep the camera strap tight and use it as a brace. No reason to hold at arms length, just tighten the strap. Besides 45 degree angle to your feet’s position but lean into the front foot to increase stability.
I’ve shot in Carlsbad Caverns NP using the “ambient” light. The D7000 that I was using at the time was unacceptably noisy at above ISO 1600 and the subject really didn’t work with the shallow DoF that a wide aperture would have given. The result was shutter speeds in the range of 1/4 – 1/2 second. And of course tripods didn’t really work (or were prohibited) for many of the shots I wanted.
I was using the usual stabilization techniques for bracing and breathing, but that doesn’t really get you to where you need to be for slow shots like those. I got reasonably good results by attaching a monopod and holding the monopod against my body as I was shooting and also by shooting 3-4 shot bursts and keeping only the best of the lot. I’ll note that about 1 in 10 of the setups didn’t give a decent shot among the batch in the burst, and it was essentially impossible to determine that until reviewing the take on a computer.
The very act of pressing/depressing the shutter button introduces vibration. This is why (in addition to everything), shooting bursts will help reduce shake. E.g. if you shoot a 3 picture burst, the middle one is taken without vibration added by either pressing or depressing the button.