


6 tips for photographing brown food
Nov 12, 2016
Daniela Bowker
Daniela Bowker is a writer and editor based in the UK. Since 2010 she has focused on the photography sector. In this time, she has written three books and contributed to many more, served as the editor for two websites, written thousands of articles for numerous publications, both in print and online, and runs the Photocritic Photography School.
Share:
One of the highlights of my Sunday is reading Jay Rayner’s restaurant review in The Observer. I have to say that the photography that illustrates the articles isn’t always fantastic, but that’s not what I’m interested in. In fact, I barely look at it. But Sunday 6 November’s review of Jaya in Llandudno, the photography generated quite a few reader comments. You see, the restaurant was outstanding, but because most of the food was brown, the photos didn’t do it any favours what so ever.

Brown food is notoriously difficult to photograph. It’s dull and comes across as unappetising. Consequently, many people recommend avoiding taking pictures of it at all. But, brown food is a reality and that means there will need to be photos of it. The good news is that all is not lost. It can be done, and done well.
The secret to photographing brown foods is very much in the styling. Yes, there are some photographic tips to be implemented, too, but before you get to your light and your lenses, it’s all about how the food is presented.
1. Complementary colours
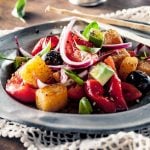
Photographing food against its complementary colour or colours will bring it life. Think strawberries still on the plant enveloped in green leaves, salmon photographed on pale duck egg blue plates, and blueberries with a yellowy background. But with brown it isn’t so simple. Brown doesn’t really have a complementary colour. It’s pretty much a mix of primary colours.
However, this doesn’t mean that it cannot be done. You will often find that deep down, browns are based on red, oranges, and yellows. In which case, look to contrast them with blues and greens. Think about using pale blue, blue-green, and pale green pans, crockery, and linens to complement your soups, stews, and roasts.
If you’ve some fantastically rare beef or lamb, though, try it with pale pink. You’ll find that they enhance each other tremendously.
2. Garnishes
Never underestimate the power of a very good sprinkling of parsley. Or Chives. Or spring onions. Or chilli. Take a quick look through a magazine, any magazine that includes recipes, and you’ll notice that the soups and stews all feature liberal scatterings of verdant accompaniments.

When it comes to sweet things, switch parsley for mint. Or introduce some fresh fruit. Brownies always look better with a dusting of icing sugar. And a shiny ganache is always more appetising than a dull brown crumb.
3. Spoons, forks, and knives
Have a rib of beef waiting to be carved? Don’t forget the carving knife. Shooting pasta with a dark coloured sauce? Twirl some around a fork. Got a bowl of brown soup? Put a spoon in it. Even better than just putting a spoon in your soup, stew, or sauce is to lift some out of the pan or bowl to break up the textures, too.

4. Add height
If you’re photographing a bowl or pan of soup or a casserole cheat a bit to raise up some of the contents. Photographing a mostly flat surface won’t do it any favours. Put some of whatever you’re photographing in a smaller bowl inside the larger one to create a mound. Much better!
5. Think about texture
I’ve already mentioned breaking up your food, whether with implements or trickery, to introduce some texture to it. This will help to increase its appeal enormously. But think carefully about how to emphasise the textures of the food that you’re photographing. In particular, consider the angle of the light as it hits your subject. Side-lighting is terrific for moulding and shaping and bringing textures to life. And, just like any other photo, mix up your angles.

6. Less is more
You don’t have to show an entire chocolate pudding. Instead, frame your shot so that just a sliver of it is showing in a corner of the scene. Make the most of the plate on which it has been served, the jug in the background, and the table on which it is sitting.

Similarly, you don’t have to have just the brown food in question in the shot. Are there side dishes or accompaniments that help to alleviate the brown-otony? Custard? Mashed potato? Salad? Sure, the lentil curry might be the focus of attention, but a bowl of steaming rice and a mutter paneer alongside it aren’t at all out of place and aren’t brown!

Daniela Bowker
Daniela Bowker is a writer and editor based in the UK. Since 2010 she has focused on the photography sector. In this time, she has written three books and contributed to many more, served as the editor for two websites, written thousands of articles for numerous publications, both in print and online, and runs the Photocritic Photography School.
Related Posts
 Professional food photographer debunks myths of nasty food styling hacks
 Here’s what food photographers need to have in their food styling kit
 The first AI food photo generator has launched for restaurant menus – should food photographers be worried?
 What’s a food stylist and why you need one for food photography
Join the Discussion
DIYP Comment Policy
Be nice, be on-topic, no personal information or flames.
2 responses to “6 tips for photographing brown food”
Nice tips. I followed the link to the review. Are those photos typical for his reviews? Even ignoring the brown colour, they look very unappetizing.
No matter how nice a spoon may be, if you give a restaurant owner a photo of his soup and the soup isn’t the hero of the shot, and even worst, not even in focus, they’d be well within their rights to request a reshoot.
All the examples in this article are just as bad as the original it is mocking. Neither show any understanding of light except maybe the first cake shot and the nuts (which isn’t a food shot, texture fill)