


Here are 5 ways to change the color of anything in Photoshop
Sep 20, 2017
Dunja Đuđić Kalinin
Dunja Djudjic is a multi-talented artist based in Novi Sad, Serbia. With 15 years of experience as a photographer, she specializes in capturing the beauty of nature, travel, concerts, and fine art. In addition to her photography, Dunja also expresses her creativity through writing, embroidery, and jewelry making.
Share:

There are several ways to change colors of objects in Photoshop, and plenty of different objects you may want to change: clothes, hair color, light color, furniture and so on. Nathaniel Dodson from Tutvid has created a fantastic video that shows you five techniques for changing the color of different objects. You can choose the one you like best or the one that suits the type of the object you’re changing.
In this video, Nathaniel changes the color of a dress, background light, and a car. He also matches the color of the object with a sample color, and also adds color to a white dress. He uses different techniques, and they’ll get you prepared for any color changing task that may be ahead of you.
1. Hue/Saturation adjustment layer
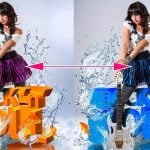
This is the simplest and a pretty common technique. Nathaniel used a model in a red dress and changed the color of the dress.

First, make a selection of the object you want to change (in this case, the dress). Then, add a new Hue/Saturation adjustment layer. From here on, you can play with hue, saturation and luminosity until you’re satisfied with the result:

If you want to mix the original color with the one you added, you can reduce the opacity of the Hue/Saturation adjustment layer. Since the dress in Nathaniel’s photo is red and he turned it into blue, by decreasing the opacity of the adjustment layer, the dress will become purple.

2. Solid color adjustment layer
Another method is to use the Solid Color adjustment layer. To illustrate this, Nathaniel used a photo of a red car:

Again, make the selection of the car using your preferred method. Then, add a new Solid Color adjustment layer. This will look pretty bad, but don’t worry – changing the blending mode will fix it.
Change the blending mode to Color or Hue. The Hue blending mode will look more natural, but you can also select the Color blending mode and adjust the color to reduce some of the saturation.

You can also use the Eyedropper Tool to select the color from the environment. Using this method, Nathaniel matched the color of the car with the green surroundings. It’s not the best color for a car, but it illustrates how this method works:

3. Add color to a white object
Adding color to a white object is a bit tricky because it will likely look unnatural. But it’s not undoable. Nathaniel uses a model in a white dress and changes the color of the dress just like in the first example.

Select the white object first, and then add a new Hue/Saturation adjustment layer. It’s similar to the first example, but this time, select the “Colorize” feature.
Then, pick the color you want to add to the object by adjusting the Hue slider. Make sure to adjust the saturation and luminosity as well, and don’t worry if you’re not quite there yet.
To make the change look more realistic and add some contrast and details, hold Ctrl/Cmd and click on the layer mask. Add another adjustment layer: Levels. Play with the levels to add some more contrast and make the colorized object look more realistic.

4. Target specific color in the photo
For this technique, you’ll use Hue/Saturation adjustment layer again, but without making the selection. It will affect the entire photo, and you will mask out the parts you want to leave unchanged. For the illustration, Nathaniel chooses a photo where he wants to change the color of the background lights

So, add the new Hue/Saturation adjustment layer. From the drop-down menu, pick the color you want to change. In this case, it will be yellow, because the goal is to change the color of the lights. Then, adjust the Hue slider until you get the color of the lights you want.
Since this change will affect the model’s skin, hair and the shirt, you can mask out these parts to preserve the original, more natural color. here’s what it looks like:

You can also do this by selecting a scrubby tool, and then clicking and dragging over the color you want to adjust. Just clicking and dragging changes saturation. But if you want to change the hue, hold Ctrl/Cmd key and then click and drag.
5. Changing the color of the object to a specific color – matching colors
This approach seems a bit complicated, but it’s super-useful if you need to match the color of the object with a color swatch from the catalog. Nathaniel’s photo is an interior with two chairs, and the white one needs to be matched to the orange color.

First, to create the color sample, make a small selection anywhere in the photo. Go to color picker and select the color, or you can type in the specific name of the color. Hold Alt/Option + Delete/Backspace to fill the selection with the color.

Now, grab the Eye Dropper tool and click on the color to drop the first sample point. Do the same on the object you’re changing to add the second sample point.
Now, in the Info Panel, change the readout from RGB to Lab Color. Right click on both #1 and #2, and select the Lab Color. Think of “L” as the lightness, “A” as the tint slider, and “B” as the Temperature slider in Camera Raw.
Make the selection of the object, and add a Curves adjustment layer. Hold the Ctrl/Cmd key and click on the pinpoint #2, which will add a control point on the curves. From here on, adjust the curves so the numbers on the right (the chair) match the numbers on the left (the sample color).

Here’s the final result

I hope these techniques will help you deal with any situation when you need to change the color. Make sure to watch the video to see the examples and the entire workflow, and check out more tutorials on Tutvid’s YouTube channel.
[5 Ways to Change the Color of ANYTHING in Photoshop | Tutvid]

Dunja Đuđić Kalinin
Dunja Djudjic is a multi-talented artist based in Novi Sad, Serbia. With 15 years of experience as a photographer, she specializes in capturing the beauty of nature, travel, concerts, and fine art. In addition to her photography, Dunja also expresses her creativity through writing, embroidery, and jewelry making.


Join the Discussion
DIYP Comment Policy
Be nice, be on-topic, no personal information or flames.
5 responses to “Here are 5 ways to change the color of anything in Photoshop”
Super je! :)
Useful stuff, particularly the LAB color shifting, which I hadn’t seen before.
But I’ll note that in the first example, there’s a fairly strong red reflection in the shadow of the dress on the pavement. You would want to address that in your color change as well.
well explained, thank you for taking time to record and share!
is there any way to change that black sofa color to a lighter color or no?
I’m trying to work this out also. Did you find a way of changing the color of a black object?