


Very Cool Optical Slave Unit
Aug 19, 2007
Udi Tirosh
Udi Tirosh is an entrepreneur, photography inventor, journalist, educator, and writer based in Israel. With over 25 years of experience in the photo-video industry, Udi has built and sold several photography-related brands. Udi has a double degree in mass media communications and computer science.
Share:

This guest post was made by Rolf Randby, the same person who wrote the Hot Shoe Adapter article. In fact, This slave trigger was the “trigger” (pan intended) for building the hot shoe adapter in the first place.
There are some Gazillion optical slaves out there. We even one optical slave unit published on this site. So what is so special about this circuitry? Rolf used a PIC (Programmable Interrupt Controller) to give this unit some very nice features: 1. No setup 2. It will work with a red eye setting in your camera. Yep, those annoying red-eye pre-flashes will not trigger the flash, it will “magically know” when the main slash if fired and activate the unit. 3. It will work with all point and shoot cameras.
Those three nice features accomplished with PIC hex code written by Evan Dudzik, from a algorithm by Rolf, make this unit an optimal optical slave unit for P&S cameras. It is the reason I call it the “Very Cool Optical Slave Unit”. Rolf, for some reason, insists on the boring name “STF 1”. I’ll stick with my name – “Very Cool Optical Slave Unit” or VeCOSU :).
The instructions, code and schematics included in this article are for personal use only. That means that you can build the unit, use it as a photographer, but you can not mass produce it. If you want to mass produce it, contact Rolf.
Here are the complete specifications if the VeCOSU:
- No setup required, ready to use seconds (3) after turn ON, , works with all P&S digital cameras and all flash settings, including Red-eye. Fires the slave flash exactly when the main flash occurs. Some flash settings on digital SLR’s are not compatible.
- High sensitively with no chance of false triggering. The reflected light is sufficient in many cases to trigger the unit.
- This SFT VeCOSU is designed to be used with all flash units including commercial units with up to 400V triggers.
- The triggering event is indicated by a flash of the LED, useful as an indicator of slave flash unit failure.
- Long battery life, 300 hours of use or more. If not turned OFF after use , the unit will shut down after 15 minutes of inactivity. Battery life, with limited use, is around 10 months.
Here is how it looks like assembled

Sounds cool, right? Not so fast! first you will need to learn how to program a PIC. you can start learning here, or here. You can also take the easy route, and contact Rolf for a pre-programmed PIC for a low fee.
So here are the instructions for Building Your Own Very Cool Optical Slave Unit
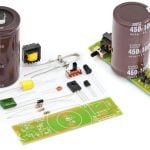
Step one – Get your materials:
- Read the circuit schematics below and ge your resistor, capacitors, LEDs and other electronics shiz (don’t forget the PIC).
- Use a photo transistor with a clear window, they have much better flash sensitivity. I have even used photo diodes, but hey have less sensitivity.
- Somewhere to place the circuit in. Rolf used an empty mint candy box. Now he has both fresh breath and cool slave housing.
- Hex code for programming the PIC. get yours here.
- Elastic band with small Velcro strip, slips around the flash unit to hold the SFT VeCOSU. This is not mandatory, but really helps to get everything neat and tidy.
Here is the rubber band thingy:

Step two – program the PIC:
Use the code posted here to do so. You can also look here for some PIC beginner links.
Step three – assemble the circuit:
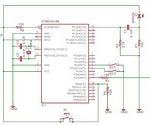
Here are the schematics:

you dont see the 100K resistors because they are under the PIC to save space:

Step four- installing battery:
This is a little tricky, because in order to save power we had to start up the PIC in a mode that doesn’t automatically ensure proper start-up, after battery change, the rest of the time it works flawlessly. I it doesn’t start properly, one blink when battery is inserted or one or two blinks when the switch is momentary pressed then disconnect the battery and short out the battery terminals briefly to discharge the capacitor. In some cases this has to be done several times, so don’t panic.
Step five- test:
Attach the VeCOSU to a flash, press the button to activate the unit. fire a flash. Everything works? Great!
Step six- encase:
You can follow the great idea from Rolf, and use a American Value Peppermints dispenser, 7/16″ cut off from the open end. see picture below. Note how the ON / OFF switch is mounted on top of the PIC. When you press on the
red dot the plastic case gives a little and activates the switch

Finally, here are the operating instructions for the optical slave flash trigger
- Press the switch briefly and the LED blinks once.
- The unit is now ON and will be for 15min after the last flash it detects.
- Make a test shot, the LED should blink.
- If you want to turn the unit OFF before the 15min is up, press the switch again and the Led will blinking twice.
- Pointing the sensor towards the camera flash give you about 25′ operating range indoors in rooms with a white ceiling. It will also trigger at much closer range from reflected light.
Rolf’s newest unit, with completely new code, in order to be compatible with ALL cameras and ALL settings, will be reviewed here in the near future.

Udi Tirosh
Udi Tirosh is an entrepreneur, photography inventor, journalist, educator, and writer based in Israel. With over 25 years of experience in the photo-video industry, Udi has built and sold several photography-related brands. Udi has a double degree in mass media communications and computer science.


Join the Discussion
DIYP Comment Policy
Be nice, be on-topic, no personal information or flames.
3 responses to “Very Cool Optical Slave Unit”
Is there still any way to get the programmged PIC from Rolf?
I just built the v2.0 circuit using the updated diagram and values from Rolph at http://www.pbase.com/image/101245322. I wanted to use this with a Sony NEX digital body to trigger my Speedotron flash. Although the code was written for the PIC 12F675, I was able to get the hex code to work on the more modern 12F683. The pinouts are identical. When programming the chip, the configuration bits are slightly different between the two devices. There is an extra “brown out detection disable bit” on the 12F683 that should be set in the programmer. Also, some programmers may not verify correctly because of some old bits that are unused on the 12F683. Just tell the programmer not to verify and all works great!
I also used a high-voltage N-Channel MOSFET instead of the triac for triggering. Works perfectly with the 60-75 volt trigger voltage on the Speedotron packs.
I modified the hex file data and checksum (not the source) directly to change the fuse bits for compatibility with the newer PIC 12F683. The modded file programs and operates without error (with my MiniPro programmer). Copy and paste below dashed line
Pinouts and schematic are identical.
Note there is an updated schematic and component value changes at:
http://www.pbase.com/sinoline/image/101245322
I built two of theses and they work great.
Regards,
Don
===============================================
:02000000DF28F7
:08000800DF00030E8312A000CB
:0E0010000A0EA100040EA2008A110A12E528B1
:10002000AE08031D14280800F930FF3E031D1528F3
:10003000AE0B14280800FA30AE001020FA30AE00E3
:100040001020FA30AE001020FA30AE001020AD0BB8
:100050001B280800AB0B2D28080000000000000042
:100060000000000000000000AB0B2D2808008312E8
:100070009F149F1839281E08AD00080037202D0A4C
:10008000A6000130260203180800FF30A600080071
:100090000D309F00083083169F00073083129900AF
:1000A000DA30831685000230950081130230960005
:1000B000C83083128B0030309000AC08031D05154A
:1000C000FF30AE001020FF30AE0010200511851665
:1000D0000330AD001B203E20A301A40108008312C1
:1000E0000515C830AE0010200511C830AE00102034
:1000F0000515C830AE0010200511850185120508D0
:10010000AB000B108B1563008B110130AC00482045
:10011000080001308312AC004820A801A901053075
:100120002902031D9528FF3028020318D3288518BB
:10013000A02805153230AE001020851C9D286F20A8
:1001400037202D08A50026020318CF28A301A401FB
:100150003230AE0010203E20AA0104302A020318DB
:10016000CE2885308F00ED308E000C1010140C1846
:10017000CB2837202D08A50026020318B728051420
:1001800005150530AB002A2005109630AE00102072
:100190000511FF30AA001010AA0AAD280511A80AFF
:1001A0000319A90A8F28A30A0319A40A2408513C99
:1001B000031DDC282308403C031C6F208D2883127C
:1001C0002710A7108A110A12892883120B1CEB280A
:1001D0000508AF000B10220E8400210E8A00200EAD
:0801E0008300DF0E5F0E090031
:02400E00043C70
:00000001FF