


Using A Cooling Honeycomb As A DIY Gridspot
Oct 13, 2008
Udi Tirosh
Udi Tirosh is an entrepreneur, photography inventor, journalist, educator, and writer based in Israel. With over 25 years of experience in the photo-video industry, Udi has built and sold several photography-related brands. Udi has a double degree in mass media communications and computer science.
Share:
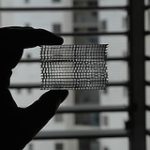
 I just love gridspots. The amount of light control that a gridspot will give you is incredible. So, a while back I ordered some honeycomb grids from saxonpc. It is with two of those gridspots that I took the image on the left, but first thing first. In fact Saxon PC is specializing in making computer cooling solutions, little did they know that their honeycomb is just perfect for light control. OK, they knew, they made a site for it. Yet it was fun to say “little did they know”.
One of the first projects on DIYP was a coroplast made gridspot, which totally rocked, but getting those nice black honeycombs tickled so much and I caved in.
In fact this solution is very similar to HonlPhoto’s 1/4″ and 1/8″ gridspot solutions. If you are willing to settle a bit on the looks and spend a few minutes modding, you can save a few Dollars. Not that a few dollars will take you anywhere today.
Build & Feel
 I got two types of gridspots – the plastic ones and the aluminum ones. I thought that the aluminum gridspots will be stronger, but I was surprised that the aluminum caved in kinda easily when applying pressure. This is not to say that they are bad, but they require more attention and if you are going to be carrying those around, you’ll have to pay attention.
The plastic gridspots were strong and more durable and quickly made it into my photography bag. They were more like, throw in the bag and forget about it.
On the left you can see the gridspot with a foamy hosing attached to my SB 800.
Attaching The Gridspot To The Flash
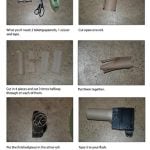
 Each gridspot is wrapped in a foamy. The foamy constructs the housing for the flash. Saxon will also supply some adhesive foamy to wrap around your flash so the housing will fit tightly. I attached a small piece of Velcro to the inner housing and used a Honl Speedstrap and its DIY version to attach the gridspot to the flash. Perfect! I did this since I don’t like taping stuff directly on my flash. Yea, I am anal perfectionist in this way and hate the residue from any tape on the flash
 The other option is to order the gridspot without the housing and to place it inside a Beer Holder Snoot. It looks professional and it says “improving” how can I pass on this fun?
This is where the plastic honeycomb really rocked and the aluminum one kinda caved in. So this is 2 to Nill for the plastic flavor.
Light Spread
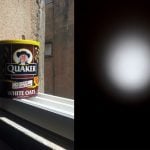
I took three pictures, all with my Nikon SB 26 pointing at a wall about three meters away. The first picture was taken without the gridspot at an 85mm zoom settings. The second shot was taken with the small holes / 10 mm thick (I think it is 30 degrees), and the third with the small holes / 20mm thick (I think it is the 20 degrees grid).

No gridspot at all – everything is splashed with color

A “shallow” Gridspot – light is restricted

Deeper Gridspot (50 degrees) – Holy cow! That is a nice circle
Gelling
 The housing is perfect to use a Rosco or a Lee Gel. You just place the gel inside the gridspot – no Velcro, no adhesive. The gel will be held by the grid on one side and the flash on the other. This method will allow you to quickly replace gels. On the left you can see how the gel sheet fits in the housing. I did not cut the sheet and let the spare width, and let it lie on the side of the housing.
If you are using one of the bigger strobes like the Vivitar 285, you may need to place some Gaffer’s tape on the edges of the gel to block the light that leaks where the gel ends.
Setup for the Shoes Image
For the image of the shoes, I wanted a nice halo effect. The first thing was to get some nice clean backdrop. I used some white A0 paper. The first sheet went on the wall. The second sheet went on my living room table. I really love A0 heavy papers. They are both cheap and available.
The next step was to prepare the halo effect. I gelled one gridspot and placed it on my Nikon SB800. I placed the flash very close to the backdrop sheet. (Click the image below for setup notes).

I wanted to light the shoes with a softbox, but I could not figure out how to place it directly over the shoes, so I did a small trick. I set the camera to a 5 seconds exposure and zapped a few flashes while the shutter was open. The gridspot made it possible to light the shoes and not contaminate the backdrop with white light.
 There is a price to be paid using that technique – if you look closely on the image (and you can do this by clicking on it), you’ll see that there are several shadow lines. So my next purchase / project will be to make a boom stand.
In a similar image with just one splash of light. The shadows here are better defined and the key light is restricted to a nice circle.
More Info
Here is the link for the Saxon PC store on the internet – this is where you get those babies. Check out the four gridspot shipping saver combo.
If you are interested in gelling your flash I strongly recommend visiting Strobist gel articles (1, 2), and FYI you can get the Rosco gel pack for close to nothing when ordering anything from B&H. Or you can get a very nice pack of gels over at photogels.com.
If you are wondering how gridspots work, take a look on the video below. It is true that light and smoke behave very differently, but the demonstration will give an idea on what happens when passing light (or smoke) through a gridspot does.
Lastly, if you want to spend even less – check out this tutorial for coroplast gridspots.
Filed Under:
Tagged With:

Udi Tirosh
Udi Tirosh is an entrepreneur, photography inventor, journalist, educator, and writer based in Israel. With over 25 years of experience in the photo-video industry, Udi has built and sold several photography-related brands. Udi has a double degree in mass media communications and computer science.
Join the Discussion
DIYP Comment Policy
Be nice, be on-topic, no personal information or flames.