


Gel Caps – DIY Light Painting Gels For Your Flashlight
Oct 15, 2008
Udi Tirosh
Udi Tirosh is an entrepreneur, photography inventor, journalist, educator, and writer based in Israel. With over 25 years of experience in the photo-video industry, Udi has built and sold several photography-related brands. Udi has a double degree in mass media communications and computer science.
Share:
 Zeke K. is the guest author of this post. Of course, you’d probably figure this out yourself after getting to the “Nice!” at the end of the post.
Ah, light painting. Thanks to digital photography, light painting has never been easier to get the kind of effects you are looking for. Lock that shutter open, mess around with your flashlight, check the results on the screen. Didn’t work? Adjust and repeat. Lovely!
But maybe you want more than just lovely. Maybe you want color! That’s where gels come in. Next time you are in a photo store or making an order from an online shop, pick up a pack of the Lee or Rosco sample gels. You’ll have access to every color in the rainbow, even “Cosmetic Silver Rose.” Did you even know that color was in the rainbow? I didn’t.
So now you’ve got your gels and your flashlight it’s time to introduce them to each other. Just like many first dates, it’s going to be a bit awkward at first, lots of fumbling as you try to make things fit. Well, with this handy dandy little DIY you can make all those awkward moments a thing of the past with interchangeable Gel Caps that are custom fit to your flashlight of choice.
WARNING: Most flashlights get hot with extended use, wrapping tape around the hot end is only going to make that happen sooner. So use care not to leave the light on longer than you need it to make sure you don’t trash your flashlight or set your face on fire. Another option is to use a LED based flashlight.

The ingredients:
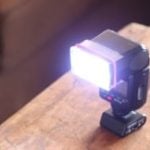
Flashlight – I like the powerful, but small LED lights that I can slap rechargeable AAA NiMh into. Almost any kind you already have should work.
Gaffers Tape – You can use duct tape, but I think black gaffers looks a little more pro.
Gel – You’ll want to make as many different color Gel Caps as you think you’ll need. You can always make more later though, so don’t go crazy and lock yourself in your basement for 30 days making one for each in the Lee sample pack.
Grab a marker and some scissors, too while you’re at it.
The recipe:
First trace the business end of your flashlight onto the gel. Cut out the circle of gel but MAKE SURE to leave 4 tabs around the outside of the circle like so (you can make the tabs as long as you like):

Now tear off a piece of gaffers tape that is long enough to go around the head of your flashlight 1¼ times or so. Tightly wrap the tape around the head of the flash STICKY SIDE OUT. If you do it sticky side in, you’re just going to mess up your flashlight. So wrap it sticky side out, sticking the tape to itself like so:

Bend the little tabs you made on your gel disk 90 degrees. Put the gel circle on top of the flashlight with the tabs stuck to the gaffers tape like so:

Take a new piece of gaffers tape long enough to go around the head of your flash two or three times. Stick the tape to the sticky side of the tape that is already around your flash, trapping the gel tabs in between the first sticky side out gaffers tape and the new sticky side in gaffers tape. If you wrap the tape so it’s just slightly higher than the gel you can make sure no white light squirts out of the sides.


That’s it. Pretty simple. Now you have a little cap you can slip on and off of your flashlight nice and quick to paint your image with as many colors as you like.
The photograph “Fire Hand Reaches for Phone” was shot with one flashlight and three Gel Caps: 1 red, 1 green, 1 blue in a single long exposure.

Nice!

Udi Tirosh
Udi Tirosh is an entrepreneur, photography inventor, journalist, educator, and writer based in Israel. With over 25 years of experience in the photo-video industry, Udi has built and sold several photography-related brands. Udi has a double degree in mass media communications and computer science.
Related Posts
 Here Is A Clever System For Labeling Your Lens Caps, Body Caps And Rear Lens Caps
 The Strobist Corner: Super Simple Gel Holder For “Strobist” Gels
 Cross Section Light Painting is to Light Painting What Holograms Are To Photographs
 This $20 DIY ring light isn’t the kind of ring light you think it is – it’s for light painting
Join the Discussion
DIYP Comment Policy
Be nice, be on-topic, no personal information or flames.
One response to “Gel Caps – DIY Light Painting Gels For Your Flashlight”
This is an excellent guideline for me or the photographer. I learned this superb technique and found it very helpful. By the way, I think a tactical flashlight review can be an excellent source for your reader as they need a flashlight to make this incredible thing. Here is the flashlight review link.