


The Origami Studio (An Extrapolation to The $0.02 Macro Studio)
Apr 21, 2007
Udi Tirosh
Udi Tirosh is an entrepreneur, photography inventor, journalist, educator, and writer based in Israel. With over 25 years of experience in the photo-video industry, Udi has built and sold several photography-related brands. Udi has a double degree in mass media communications and computer science.
Share:
 This post on a 2 cents macro studio got me thinking. Firstly because it is a great idea, it employs the same technique as the super simple light tent and the flash diffuser. Secondly it is cheap. So cheap in fact, that it really does only cost two cents. The thing that I was thinking is – “I want a BLT Sub”, and right after “This is great for small objects, what if I want to shoot something bigger? For this I came up with an improvement – The Origami Macro Studio. It is not as cheap – approximately 20 times more expensive – but for 40 cents, it is still a heck f a deal. And as the macro studio, it is cheap, takes 2 minutes to prepare, and very simple.
Here is what you are going to need:
1. A big block of paper – I used sketching paper, but baking paper will also do.
2. Some very basic Origami Skills (Origami is a Japanese art of folding paper, like folding a bird).
3. An off camera strobe or flash (see how you can make a flash stand for it here)
How to fold a macro studio
1. Start with a big sheet of paper – as I said, I used a sketching paper – half a sheet. Fold the sheet in half.

2. Fold into quarter. This time fold in the opposite direction. So now you should have a three-folds zig-zag


3. Spread the middle fold, keeping the two flaps in place. You should get something that is half in size of the original sheet. (two layers – one full and one with a crease)

4. Now, fold the two ends to the middle crease, to form a new crease, and fold the ends to that crease. Or in other words the crease in the quarter of the paper goes to the crease in the 5/8 of the paper.


5. Now comes the fun part – making the accordion. Make one horizontal fold at the the bottom of the sheet. make sure the overlapping places stays neatly creased.

6. continue until you have made a nice accordion

7. Now comes the fun part, slowly pull the overlapping zig-zags to form an angle. After you have pulled them all, pull some more to form a 90 degree angle.

8. do the same for the other side. you should end up with something like this


Taking a picture
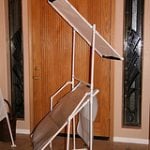
Once you have the origami “table” or “light tent” in place you can place objects inside. I shot this nut cracker. I also used some paper as seamless backdrop.

I set the flash on a lighting stand aimed at the top of the light tent. About half a meter above the ceiling. I used an Nikon SB-28 for taking the shot set at 1/8 power. Camera set to manual mode, and aperture set to 8. Now this is the reason I used sketching paper, the light loss is minimal. As you see this setup works best with off-camera flash. I just used a PC-Sync cord to attach my Nikon D70 to the flash, but you can also use eBay radio triggers or optical slaves.
Here is how the setup looks:

Good luck with your studio works.

Udi Tirosh
Udi Tirosh is an entrepreneur, photography inventor, journalist, educator, and writer based in Israel. With over 25 years of experience in the photo-video industry, Udi has built and sold several photography-related brands. Udi has a double degree in mass media communications and computer science.


Join the Discussion
DIYP Comment Policy
Be nice, be on-topic, no personal information or flames.