


DIY Wax-Fen Flash Diffuser – Yet Another Bouncy Thingy
Dec 14, 2007
Udi Tirosh
Udi Tirosh is an entrepreneur, photography inventor, journalist, educator, and writer based in Israel. With over 25 years of experience in the photo-video industry, Udi has built and sold several photography-related brands. Udi has a double degree in mass media communications and computer science.
Share:
 This guest post by Rick S. (aka therickman), Pittsburgh, PA. features a stofen like device for no money at all. (OK, 2 cents, if you get really pecky). It’s foldable and it’s cheap and it’ll give you a bare bulb type of lighting. To learn more about bare-bulb lighting visit the strobist.
Here is a quick and easy way to make a “professional” flash diffuser without shelling out twenty or so dollars at your local camera shop. In fact, the cost of this homemade pearl is… well, nothing! Just your time making it, which should take less than ten minutes. Ready to start taking better images with softer lighting? Let’s go!
Here are the items you will need to
make the Rick-Man’s DIY Flash Diffuser:
- Standard kitchen wax paper
- Scissors
- Tape
- Thick matte paper

Now that you have your materials ready, let’s get going…
Step 1
Cut a strip of matte paper about 1.25″ down the long length (ex. 1.25″ X 11″)

Step 2
Wrap this strip around your flash head. Be sure to wrap it tight so it molds to the shape of the flash. Then tape the end. Keep it on the flash.

Step 3
Fold a sheet of wax paper in half, then fold in half again, making a four-ply semi-square.

Step 4
Lay your flash on top of this wax square for measurement. Cut out the four corners aligned with the size of the flash head. Make sure the middle rectangular section is roughly the same width and length as the top of the flash.

Step 5
Tape along the cut sides. Keep as straight and plush to the wax paper as possible.

Step 6
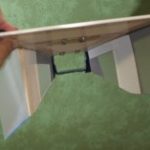
Fold each wing over making a crisp fold mark, then shape into an open box form.

Step 7
Tape the sides of each wing to each other. Trim the uneven botom with scissors.

Step 8
Slide the open end of the wax box over the flash head and tape to the paper strip.

Step 9
Cut another strip of matte paper like in step 1 and wrap this around the flash and tape like in step 2. Apply extra tape along the bottom edge to secure.

Step 10
Cut off the excess paper points from the bottom side to give the diffuser a nice clean shape. Slip back on the flash and you are done!


As you can see from the two sample images, the flash unit alone gives the subject very harsh lighting, over exposed highlights, and a flat look; whereas, the diffuser produces more even lighting across the image and more accurate color. (Sample images are untouched other than resizing for this article.)
| No Wax-Fen |

|
| With Wax-Fen |
 |
Enjoy!!
Also – shadows assignment is still running until tomorrow. we have six great Flickr submissions so far. Post your images to the pool and tag them with “DIYP” and “shadow” to show on the search.
Related Links:
– Homemade Flash Mini-Bouncer
– Instant lightsphere – the emergency diffuser
– Flash Mounted homemade DIY Softbox
– Lighting 101: Bare-Tube-Style Lighting

Udi Tirosh
Udi Tirosh is an entrepreneur, photography inventor, journalist, educator, and writer based in Israel. With over 25 years of experience in the photo-video industry, Udi has built and sold several photography-related brands. Udi has a double degree in mass media communications and computer science.


Join the Discussion
DIYP Comment Policy
Be nice, be on-topic, no personal information or flames.