


This guy made his own DIY speedbooster lens adapter from scraps
Aug 7, 2024
John Aldred
John Aldred is a photographer with over 25 years of experience in the portrait and commercial worlds. He is based in Scotland and has been an early adopter – and occasional beta tester – of almost every digital imaging technology in that time. As well as his creative visual work, John uses 3D printing, electronics and programming to create his own photography and filmmaking tools and consults for a number of brands across the industry.
Share:
There was a time when it felt like the term “DIY” was a bit of a dirty word in photography. Everyone just wanted to buy the solution and new manufacturers popped up every few minutes to satisfy their needs – no matter how weird. But there was also a time when DIY was the norm.
We had to build things for ourselves because a commercial option didn’t exist a lot of the time. I don’t know anyone who built their own speedbooster lens adapter, though. At least, not until I spotted this video from Evan Monsma.
To boost or not to boost
I’ve seen quite a few DIY lens adapters pop up over the last few years. Usually, they involve recycling parts from a dead camera and lens (or a regular, cheap, dumb lens adapter) along with a 3D-printed tube to hold them in place the correct distance apart. Never have I seen one that’s also a speedbooster.
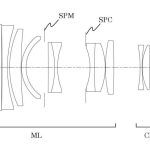
Speedbooster adapters are like regular adapters except that they contain an extra element. This element helps to claw back some of that field of view you lose when mounting full-frame lenses on APS-C and Micro Four Thirds cameras.
I own several of them myself, like the Viltrox NF-M43X speedbooster adapters ($78.50). I have a couple of these so that I can use my Nikon F mount lenses on my Panasonic bodies for video. I also have a couple of non-boosted adapters ($34.99), and both types are extremely handy in different situations.
Good speedbooster adapters can be quite expensive, and some are better than others, which is why less expensive ones like those from Viltrox exist. But the cost alone wouldn’t drive most to have a go at building their own.
Keeping it simple
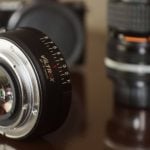
Evan’s DIY speedbooster adapter allows him to mount his Canon EF lenses onto Micro Four Thirds cameras – Yes, Viltrox makes one of those ($149), too. But he’s actually shooting on Sony cameras, so he uses an off-the-shelf MFT to Sony adapter. Using an MFT mount on his adapter allows him the option of using it with either MFT or Sony cameras. Putting an E mount directly onto it limits it to only Sony.
It’s a project that Evan says has been floating around in his head for a while. In principle, it should be quite simple. Create a tube of a given distance, install an element to correct the field of view, and stick the appropriate mounts on each end. But Evan’s “element” was simply an old magnifying glass.
This presented some interesting challenges. It’s an interesting video to watch. To hear Evan’s commentary and see how he troubleshoots certain steps is quite interesting.
Even if you’re not interested in building your own adapter, it helps to explain flange distance and why adapters are needed in the first place.

John Aldred
John Aldred is a photographer with over 25 years of experience in the portrait and commercial worlds. He is based in Scotland and has been an early adopter – and occasional beta tester – of almost every digital imaging technology in that time. As well as his creative visual work, John uses 3D printing, electronics and programming to create his own photography and filmmaking tools and consults for a number of brands across the industry.
Related Posts
 Canon is working on their own “speedbooster” style adapter to use EF lenses on M bodies
 A review of the $95 Viltrox Nikon F lens to Sony camera speedbooster adapter
 After a fall in his workshop, this creative builder shows us how he made his own DIY light stands
 This tinkerer built his own 18650-powered DIY battery grip for his Canon EOS M
Join the Discussion
DIYP Comment Policy
Be nice, be on-topic, no personal information or flames.
2 responses to “This guy made his own DIY speedbooster lens adapter from scraps”
Wow….
very nice!!
If you’re into the DYI thing for photography, you should chk out a YouTube channel called :ALT CINE
These guys have some kool stuff!
A camera mount that that let’s you use a Canon lens and a Sony lens on the same mount. No need for an adapter. Also, transform an EOS M (Canon) camera, into a box cine camera. How to build a Bolex D16 digital camera replica. And other kool things.
Here’s a link:
https://youtu.be/motde4WVrKY?si=fgDpJa15IujxNrXA
Nice article by the way.
Thanks for sharing!!
I actually covered that one, too, the same day of your comment, haha.
https://www.diyphotography.net/build-your-own-digital-bolex-d16-replica-using-todays-camera-tech/