


The Simplest, Fastest and Most Effective One Light Setup I’ve Ever Used
Feb 21, 2016
Jake Hicks

We love it when our readers get in touch with us to share their stories. This article was contributed to DIYP by a member of our community. If you would like to contribute an article, please contact us here.
Share:

Sometimes, getting a sweet lighting setup is a matter of pure luck and this is the case with this setup. I’ll collect setups like tools, so this one is just another tool in my toolbox now. Anyways, back to the story.
Here is my issue, taking a portrait whist using a single key light and reflector and fighting with the reflector in one hand and the camera in the other cant be something unique to me. You know what I am talking about, super quick and clean ‘clamshell’ lighting with the key just above the models eyeline and the reflector just below the chin bouncing some well needed light back up to fill in the shadows. This means micromanaging the reflector with your left hand (assuming you are a righty) while trying to bounce just the right amount of light back into the shot. There is really no way out of this not-enough-hands-mess: you’re scooping, flapping, bouncing and bending the damn thing around the key-light stand with one hand desperately trying to look professional. The result? I wish I could say that I mastered it but when I load the images up on the laptop I find that half the damn shots have an annoying reflector part peeking in the bottom of the frame! Not good.
A while back I found myself in a pinch. The setup included a model, and two hair lights positioned behind her and a reflector bouncing light back into the shot. I placed the reflector on a stand and I was literally holding the camera up in front of it so that the viewfinder was pressed against it and taking pictures using the blessings of autofocus alone because I couldn’t look through the lens.
I then had an epiphany. I cut a very rudimentary hole in the middle of my reflector so I could see what was actually going on, standing behind the reflector and having only my lens poke through.
I did change the lights a bit and replaced the two hair lights with a big softbox behind the model and having the reflector double duty as both the key-light and the fill-light. In actuality this super simple setup produces such a flattering light that its got to be one of the cheapest ring flashes you’ll ever find. (diagrams courtesy of set.a.light)
Step one

Pick yourself up a super-cheap reflector of a decent size. The one that I got was a 32inch/80cm diameter one. I wouldn’t go much smaller than that as you want to bounce back as much light as possible. I was fortunate enough to get a reflector that had both silver on one side and white on the other. That means that I can use the silver side to get more of a contrasting look but I can also flip it over to get a far softer look to. I managed to find mine on ebay for about a fiver.
Step Two

Grab yourself some real simple hobby tools like a craft knife, a thick pen, something circular to draw around (I used a roll of gaffer tape, yet another reason why you should always keep some gaffers tape around) and something like a cutting mat or cardboard so that you don’t also slice a digestive biscuit sized hole in your lino!
Step Three

Hopefully you’ve found something of a decent size to draw a circle around in the middle of your reflector. This should obviously be larger than the diameter of your largest lens and I used a roll of gaffer tape as that seemed large enough. In actuality I might go back and find something larger and cut a larger hole so I can stand back a little and still shoot through the hole without getting the reflector in shot. Maybe a cornflakes bowl.
Step Four

Once you’ve found something of a suitable size to draw around its time to cut that hole. It’s worth mentioning that I just plonked the hole roughly in the middle of my reflector and drew around it. I did think about placing the hole off centre so that when I shot through the reflector I could rotate it to adjust the amount of light I had coming from the top or bottom. It’s probably worth an experiment at some point but for these shots I just had it in the centre. Place the cutting matt/cardboard underneath and simply cut the hole tracing the line you drew previously.
Step Five
That’s it, you’re pretty much done! All that’s left to do is to set up your one light. I had a big softbox placed behind the model and then hung the reflector on a light-stand in front of her. You don’t even need to hang the reflector though really and it’s pretty easy to just hold it in your other hand. Also your lens is poking through the hole so the reflector is never getting in the shot anyway so it makes it really easy to control.


Check out some of the shots I got in literally a few minutes, I was genuinely shocked as to how stunning the lighting looked on the back of the camera straight away. The reason for this is simply just how flattering the lighting is and how that single light wraps around the model and bounces back into the shot giving the impression of the light coming from everywhere. The softbox light bleeds around the model and cuts into her which has a visually slimming effect (especially noticeable with a shallow depth of field) and then bounces light back into her face from a source that is relatively large to her. This reflected light is coming from everywhere equally so it gives the appearance of very soft, flattering light.
Key Points to Remember
- Use a silver or white reflector of a decent enough size to cover a half body shot. A 80cm/32in size is a good place to start.
- Cut a hole in the centr of your reflector large enough to take the diameter of your largest lens.
- Don’t cut a hole in your carpet.
- The bounced light of your reflector is your key light. To adjust the exposure of this light you will have to move the reflector closer and further away until you’re happy.
- Use an Neutral Density filter on your lens to reduce any unwanted power from your strobe and shoot as wide open as your lens will allow.


You may have noticed from these shots here that they are all shot with a very shallow depth of field which works particularly well with this type of lighting. I was able to shoot at low apertures with my 500w strobes because I also had a LEE Filters ND filter on my lens. A lot of studio strobes are so powerful it’s sometimes difficult to shoot wide open when using them but by using neutral density filters you’re able to reduce the amount of light entering the lens and shoot at f1.8, f2 etc to get some beautiful looking shots. This one was a ND 0.6 which stopped 2 whole stops of light from entering the shot. If you’re a studio strobe user and want to start using faster lenses to get these effects then an ND filter is smart accessory to get. LEE Filters Neutral Density Filters
Instead of an Neutral Density filter for your lens you can also purchase ND filter gels for your strobes to. This gives you greater flexibility with individual lights rather than reducing all light entering the lens. If you’re interested in getting some then Neutral Density gels then they are included in my ‘Utility’ Gels pack. Scroll down to the bottom of the product page to check the contents.
About The Author
Jake Hicks is a Editorial and Fashion photographer and an educator at Amersham Studios based in the UK.
You can see more of Jake’s work over on his webpage or training page, and interact with him over at Facebook, Instagram, 500px, Twitter and flickr. This article was also published here and shared with permission.
We love it when our readers get in touch with us to share their stories. This article was contributed to DIYP by a member of our community. If you would like to contribute an article, please contact us here.
Related Posts
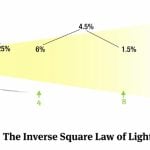 The Inverse Square Law of Light, Explained in the Simplest Way Possible
 The Simplest DIY Photography Wall Display
 This photographer is capturing childhood at its simplest, sheltered from TV and electronic devices
 The first ever recording of light’s “sonic boom” was made with the fastest high-speed camera in the world
Join the Discussion
DIYP Comment Policy
Be nice, be on-topic, no personal information or flames.
22 responses to “The Simplest, Fastest and Most Effective One Light Setup I’ve Ever Used”
this is cool.i’ll give a try later.
Well done. The first article for months that was not a rehash of ideas already covered by others for years and hundreds of times. I was sure that eventually you will publish something original and you have done so. Was very happy to read it.
This is something we’ve done in our commercial product studio for years – take a sheet of card or polyboard, cover one side bright aluminised foil and cut a hole in the centre. This is also a rehash of a pricey product from a “name”, so kudos to Jake Hicks for creating a cost effective alternative:)
Well first you have to have that big ass softbox.
not really i do this with a photoflex 60 ” umbrella or a 7 footer… both with diffussion.
try it its simple.
White background paper evenly lit by a couple of cyc. lights will work fine, and needs less front-to-back space too.
How about cutting just a straight line along the diameter? You could stick your lens through and still be able to move it.
my concern would be – how wide of a lens are you using, and do you have any problems with distortion? if your subject has a big nose, you’re in trouble.
Jemma worth a try
Interesting. Also easy enough to change the reflector shape for different catch lights. Nice.
Great idea and super results. I’m trying to use less and less equipment taking portraits and this is a move in that direction. Thanks
You seem very close to the subject which would add some wide angle distortion. How far away are you really. I usually shoot 100mm or more for this type of work.
I do not agree with you: If you examine the face, particularly the nose, of the standing figure, you could reasonably come to the conclusion that the configuration of her face must have that fine, slimline, sleek nose! It is a perfect part of the physical anathomy of her face, like the formation of veins, muscles, etc., on one’s body. The lens used is not a wide-angle: I reckon it is a long-focus lens which has that particular effect of drawing out the face so very close to one’s vision withou any distortion! I love it.
Look at the camera and the modifier setup. That distance would be very close for a long lens and not result in the shown photos. Also the photos. The chin is really long, and her arm is huge in when it is close the camera. Clear signs of wide angle.
“Most effective “…??? If you want a picture, you think of it first, then plan it, then take it. Else you’re just spray andpraying
What am I seeing reflected in the model’s eyes? If you are shooting her through a big reflector, I would expect to see a round, white, reflection in her eyes…?
It could possibly be her reflection off of the, well, reflector. It looks like someone standing in front of a soft box, which is exactly what she is doing.
Beautiful! What were your strobe and camera settings?
Gary Berstein had a simlar idea by making a window in a folding piece of Foamcore in the 80’s. Sue Bryce and many others did something similar in the last few years on Creative Live and that really expensive version that was produce last year by that Jerry guy.
However, all this aside, since you are using a light stand, to hold the reflector anyway, you could have used the Wescott arm or the new LumaGrip by Kevin Kubota and not had to do any of this.
I, too, am curious about the catchlight reflection in the models eyes that doesn’t appear to match the lighting set up.
I know this is a very old thread, but I just found it for the first time. I am not 100% sure, but I think the strange pattern in the reflection in her eyes may be a result of her body blocking a long strip down the middle of the strobe that is behind her. This would also create a long dark strip down the middle of the reflector. That’s why there is a kind of upside-down horse shoe look to the reflection in her eyes.
Crap this is cool. Nice article.
bro, check your page. i woke up to whirring sound of my computer fans, cpu was 80C. checked task manager – chrome, checked chrome processes – this page tab was eating all cpu. i dont know if its the ads or disqus code or something else.