


Quick Photoshop tip: how to remove unwanted color cast in only a few clicks
Aug 3, 2018
Dunja Đuđić
Dunja Djudjic is a multi-talented artist based in Novi Sad, Serbia. With 15 years of experience as a photographer, she specializes in capturing the beauty of nature, travel, concerts, and fine art. In addition to her photography, Dunja also expresses her creativity through writing, embroidery, and jewelry making.
Share:

There are times when your photos can get an unnatural-looking color cast. You can fix it in post and fine tune it so it looks more natural. In this video from Adobe Creative Cloud, you’ll learn how to neutralize unwanted color cast in only a couple of clicks, in literally a few seconds.
Start by opening the image you want to edit and add a Levels adjustment layer to it.
Now, within the Properties panel, go to the eye droppers and click on the middle one (for setting gray point).
When you’ve selected the eye dropper, go to the image and click on something that you think should be neutral gray. If you don’t get the result you like with the first click, try it out in several other spots of the photo. Also, you can always tone down the adjustment by reducing the layer’s opacity.
This technique works best if there’s a gray object in the scene. But if there isn’t, you can also click on something that should be black or white.
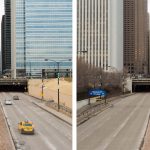
Here’s an example from the video:


And I used this technique in one of my photos I recently took:


How do you fix unwanted color cast in your images? Do you use this method, or you prefer other techniques?
[Correct An Unwanted Color Cast Using Photoshop | Adobe Creative Cloud]

Dunja Đuđić
Dunja Djudjic is a multi-talented artist based in Novi Sad, Serbia. With 15 years of experience as a photographer, she specializes in capturing the beauty of nature, travel, concerts, and fine art. In addition to her photography, Dunja also expresses her creativity through writing, embroidery, and jewelry making.


Join the Discussion
DIYP Comment Policy
Be nice, be on-topic, no personal information or flames.
3 responses to “Quick Photoshop tip: how to remove unwanted color cast in only a few clicks”
I use this method in addition to black and white droppers. Another way is to use Photo Filter layer, knowing some gray or white object in the scene.
Really ??? This is basics.
What, no gray card?