


Photographing Ontario’s Largest Indoor Rock Climbing Gym
Share:
When I recently got a call to go photograph Ontario’s largest indoor rock climbing gym, my first though was:
Yes, of course I’ll do it!
My second though was: How the heck am I going to do it!
Do you know that feeling when you are watching a sit-com on TV and you start thinking…I swear the Simpson’s already did this…? That is basically what I feel like when I am facing a tough lighting challenge…I swear David Hobby already did this…!
And yep – he did – back in 2010 in the Strobist article “On Assignment: Earth Treks, Pt. 1″.
I totally admit that I basically stole appropriated David Hobby’s approach to lighting a giant indoor rock climbing gym, but I think the approach to lighting a huge, dark indoor space using a combination of studio strobes, small strobes (speedlites) and ambient light is still worth further discussion.

The Assignment – Promotional Photos for Gravity Climbing Gym
The owners of Gravity Climbing Gym in Hamilton, Ontario recently left their old location and built a brand new indoor climbing gym from scratch. Everything in this place was custom built by hand with the sole purpose of providing an indoor route climbing and bouldering space that approaches the experience and scale of climbing outdoors.
Of particular interest is the sheer scale of the five story high climbing walls, the extensive overhead lead climbing routes, and the massive bouldering cave.
With so much work and money invested, the owners wanted a series of promotional photographs that show off the scale and quality of the space they had created.
We want people to see these photographs and immediately realize that we have the biggest and best indoor climbing gym around.
With that in mind, I started work planning how I could best photograph this huge space.
Lighting Option 1: Ambient Light
My first though was to keep it simple stupid (K.I.S.S.) and just go with full ambient light.
In the daytime, the gym is lit by three small overhead skylights.
At night the gym is lit by a series of high pressure sodium vapor spot lights.
Day or night, the ambient light is in the range of f/2.8, ISO 3200, 1/30th – so it is very dark.
The big difference is that in the day with the only light source being three overhead skylights, the light is very uneven. At night, the sodium vapor spot lights provide a much more even light (even if it is much more ugly than daylight), although there are still a number of awkward shadows and highlights.
In the end, I decided that I just couldn’t do it – shooting full ambient would have saved me a whole lot of work, but my photos would not have looked much different than the crappy snapshots they were already using on their website.

Lighting Option 2: Strobes
After deciding that I was going to light the space with strobes, the question then became – how exactly?
I own a total of six speedlight strobes (four Nikon SB-800s and a couple older analogue Nikon flashes) and three studio strobes (one Elinchrom BXRi 250 and two Elinchrom BXRi 500s).
I knew from experience that even at the lowest power setting, the 500 Ws studio strobes would overpower the small speedlite strobes, so that essentially removed them from the mix.
I ended up using all six speedlite strobes (although I could have easily used a few more) plus the 250 Ws studio strobe.
All of the strobes were gelled with a full CTO gels (color temperature orange 3200K) in order to match the ambient light from the high pressure sodium vapor spotlights. Even with full CTO gels, the color of the strobes did not quite match color of the spotlights, but they were close enough to work with.
To illustrate exactly why I chose to go through all the time and effort to light the space with strobes – the first photo below is ambient light, the second is strobe.
The exposures are technically slightly different – in the first photo I was exposing for ambient only, in the second photo I was underexposing the ambient and exposing for the strobes – but the overall exposure is the same.
Both photos are from the exact same location with the same camera and lens – but you can see how much more depth and texture the second photo has when the space is lit by strobes.


Camera Gear
To maximize the impression of size, I photographed the entire shoot with a Canon 5D Mark II and a Canon 20mm f/2.8 lens and a Nikon D300 with a Vivitar / Samyang / Bower / Rokinon 7mm (possibly 8mm depending on who you ask) f/3.5 manual focus fisheye lens.
I used three Flex TT5 Pocket Wizard receivers to trigger the strobes with a Pocket Wizard Mini TT1 transmitter on the Nikon camera and a Pocket Wizard Plus X on the Canon.
I should also mention that this required 32 fully charged eneloop XX AA batteries to power all those flashes and triggers, which before I upgraded my battery charging system, would have been a major workflow bottleneck.
Photography Lighting Plan
Although I could have photographed the entire climbing gym with just ambient light, the ambient light was totally flat and boring, so the whole purpose of adding strobes was to add texture and depth to the finished images.
This is an important point – I was not trying to light the entire humungous space with only strobe light – my goal was simply to use the strobes to accentuate the forms of the climbing walls, while the ambient light filled in the rest.
In order to add the texture and depth I was looking for, the strobes were set up relatively close to the walls and aimed to project directional light along the facets of the walls back towards the camera.
This led to two pretty significant issues.
First, it took a lot of tweaking to get the strobe lighting to be as even as possible. This involved a number of flags taped to the strobe heads, and adjusting the zoom to suit each strobe location.
Second, firing light towards the camera in a wide open space like this left limited locations to hide the strobes. I ended up deciding to arrange people in front of each strobe to block the brightest part of the strobe flair. The “strobe blockers” were told to stand still about ten to fifteen feet in front of each strobe and then I tweaked their positions from my shooting locaiton. Its not perfect, but the remaining glow is much less distracting than the full strobe flairs and is pretty small in the finished photos, so I am ok with that.
The studio light was placed behind the balcony standout, so it was not visible in any of the shots.
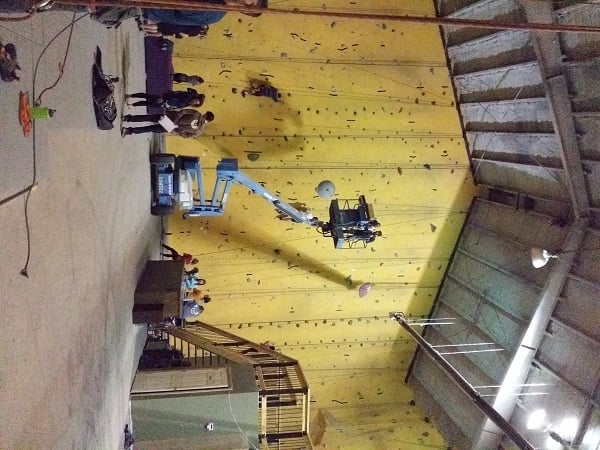
In the following photo you can see the locations of all seven strobes. There are three strobes sitting on the floor, aimed high along the wall to camera left (Group A – Red), there are three strobes taped to the railing, aimed into and along the bouldering caves to camera right (Group B – Green), and at the back, the studio strobe is lighting the back wall from the bottom right hand corner (Group C – Black).

Triggering 7 Lights
Going in, I knew that I only had three Pocket Wizard Flex TT5 recievers to trigger seven lights.
The studio strobe is kind of hidden and not in a direct line of sight in the bottom right hand corner (and the built in Elinchrom optical slave sensor is not always that sensitive), so I put the first radio trigger on that light.
Next, I had two small speedlight strobes that did not have built in optical slave sensors, so I put the other two radio triggers on those lights.
I placed the two small speedlight strobes with radio triggers at the back of the gym. Then the next two small speedlight strobes (Nikon SB-800s) along each side were set to optical slave (SU-4 mode) and were arranged so that the optical sensor was facing the strobes with the radio triggers.
Throughout the entire shoot, I only had a few instances when some of the flashes didn’t trigger – but I am pretty sure that was because of recycle times and not because of the triggering system.
Camera Settings
Setting the Canon 5D Mark II and 20mm f/2.8 lens for this shoot took a number of steps.
The first step was to set up the camera for a full ambient expoure – f/2.8, ISO 3200, 1/30th.
Next, I dropped the ambeint by about 2 stops – f/2.8, ISO 1600, 1/60th.
Then, I set all of the small speedlite strobes to 1/4 power, and the studio strobe to minimum power. From my scouting test shots, I knew that this would put me in the ballpark.
Then, I used my light meter to tweak the strobe settings. The bouldering wall is physically closer to the strobes than the big climbing wall, so I had to drop the power on that set of lights to about 1/8 plus 1/3.
At this point, everything looked pretty good in camera, but the overall image was just a touch too dark, so I raised the ISO to 2000 to increase the global exposure of both the ambient and strobes, while keeping the lighting ratio the same.
The settings on the Nikon D300 with the f/3.5 fisheye lens were slightly different because the maximum lens aperatures are not the same. On the Nikon, I ended up with f/3.5, 1/30th, ISO 1600.
Shooting
We used a man (or woman) lift to access the corners of the gym and to provide a stable platform for shooting with a tripod.
Being an active climber myself really helped to identify with the goal of the photography and to concentrate on the aspects of the gym that would appeal most to other climbers.
For example, you would think that the gym would look the most impressive from as high up as possible. But that turned out not to be the case. From the very top, the shot was mostly floor – which might look scary and cool to non-climbers, but to a climber the focus is the wall, not the view of looking down.
In the end, we took most of the shots from about mid-height, which gave the best impression of the the climbing walls.
Post Production
In Lightroom I applied lens corrections (but I did not remove the fisheye effect), exposure and white balance adjustments, increased the contrast and popped the blacks. I also added gradients with lower exposures from the edges to improve the composition.
Then in Photoshop I applied Topaz DeNoise to remove some of the noise that resulted in shooting at high ISOs, and Topaz Detail to better show off the details and contrast in the images.
Time Commitment
This is exactly the type of job that may seem simple on the surface, but turns into a major draw on time and resources.
I spent a good hour or two pre-scouting, looking at locations and elevations. Then, the day before the shoot, I spent several hours testing lighting locations and power with a single strobe to make sure that my lighting plan was feasible.
Using nearly every single strobe I own meant charging the batteries and packing up all that gear too – which took a few hours.
The actual shoot took 3 hours and then there were a few more hours of post processing.
In total I spent at least 12 hours on this assignment – so if you attempt something similar – remember to bill accordingly!
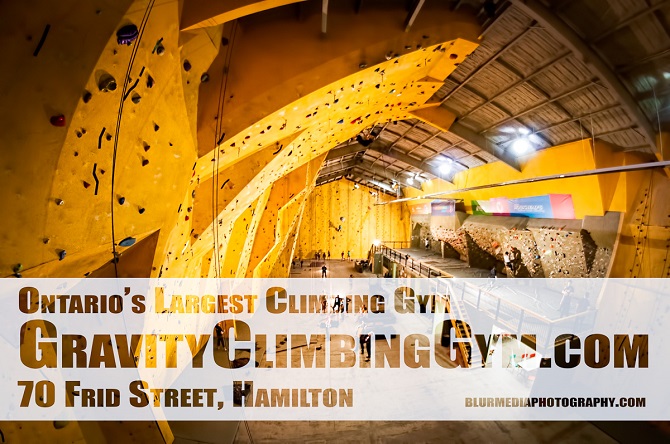
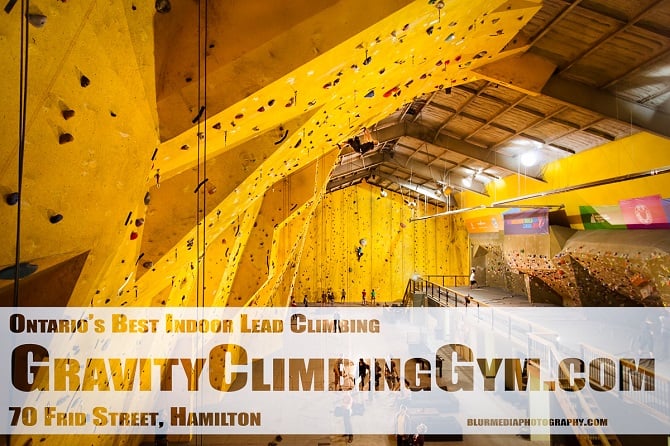
Finished Images
The following are two of the finished promotional images from this shoot:
Questions or Comments?
If you have any questions or comments about photographing a very large indoor space, leave a comment below!

JP Danko
JP Danko is a commercial photographer based in Toronto, Canada. JP can change a lens mid-rappel, swap a memory card while treading water, or use a camel as a light stand.


Join the Discussion
DIYP Comment Policy
Be nice, be on-topic, no personal information or flames.
3 responses to “Photographing Ontario’s Largest Indoor Rock Climbing Gym”
Thanks for this, very useful to see your process here with a difficult lighting situation.
Wow, so much work only to have the designer obliterate it with copy. Without the people, you lose the sense of scale, and all your work is pointless (except for the paycheck, of course).
I agree. The designer did a crap job of working the text with the image. The photos were otherwise good.