


Light Falloff Cheat Sheet Card
Aug 7, 2008
Udi Tirosh
Udi Tirosh is an entrepreneur, photography inventor, journalist, educator, and writer based in Israel. With over 25 years of experience in the photo-video industry, Udi has built and sold several photography-related brands. Udi has a double degree in mass media communications and computer science.
Share:
 As part of my ongoing exploration of portrait photography in general and flash studio photography in particular, I wanted to examine the effect that a large light source will have on light fall off. This was a great chance for me to produce a new cheat sheet to companion the portrait lighting cheat sheet and reflector cheat sheet that are already out there. (And this time we have a special guest, read on…)
What is Light Falloff ?
When ever we use a light source to illuminate an object, that object is being hit with multiple “rays” of light. Some of those rays are hitting the object in the place which is nearest to the light source, and some of the rays are hitting the subject where is furthest from the light source. OK, nothing new until now.
As a crude generalization one can argue that the light that falls on the closer side to the light source will be brighter then the light hitting the furthest side. This is because the light will scatter more when it makes it long journey to the far side. (This is not true for focused beams and laser, but this thumb rule can be applied to most studio lights and strobes).
The effect in which the light is dimmer on the far side is called light falloff. The simplest way to see this effect is to take a picture of a road at night with a strobe as a light source. The area close to the strobe will be well lit and as the road gets further from the strobe it will get darker and darker, until it will become totally black.
This effect is also true in portraiture. When you are taking a portrait using only a key light (i.e. a single light portrait). Your subject will be more lit where the light is close and darker where the light is far.
In the picture below you can see how light falloff looks like. Notice that the light is bright on camera left and it falls off to camera right.
 Image cc by Meredith Farmer
What Effects Light Falloff?
The distance of light from the subject:
The closest the light source is to the subject, the stronger light falloff you’ll get. The Strobist uses this fact to discover if the light source was close to the subject when discussing how to reverse engineer lighting.
The size of light:
The larger the light source the more diffused the light it produces and the less light falloff you will experience. For example, a large softbox will produce less light falloff then a small softbox; a bare flash will produce more light falloff then a flash shot through an umbrella.
 (Click here for a bigger size, and here for a super size)
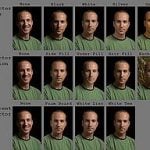
Using The Light Falloff Card
When making this cheat sheet card, I wanted to explore the effect that a large light source will have on light falloff. The beautiful model on the picture is my wife, who kindly agreed to rid herself from two weeks of doing the dishes help with this exercise and.
The idea is simple, I took four lovely images, each one with a different flash to subject distance. The first image was taken with a very close flash to wife distance: 80 cm, I increased the distance 80 cm more for each shot.
You can also see the effect that a close by silver reflector had on the portrait.
On the top, you’ll find the distance of the light from my wife’s head. Distances are 80 centimeters, 160 centimeters, 240 centimeters and 320 centimeters. Under those columns you’ll find a portrait done with a single light source, a companion portrait done exactly the same but with a reflector on the left, and a picture of the setup.
I hope it will help you plan your next shot.
Here are my conclusions:
– I have a beautiful and photogenic wife (no, offense, Yossi, your cheat sheet cards are OK too)
– As the book says, the further one takes the light source, the less light fall of one can expect.
– How far should you place the light source? That depends, but here are some ideas and thoughts that may lead to an answer:
(1) The furthest the light the less light falloff and less drama.
(2) If you increase the distance of the light source from your subject the light is getting “smaller” and harsher. This effect is only slightly shown in this exercise, but it will be more noticeable if you are using a smaller softbox.
(3) To create a really even light, you can use a close reflector. Then the reflector will provide softer light if the light source is closer.
The Making of the Light Falloff Cheat Sheet
Below you can see the setup I used to take the shots. At camera left, you’ll find my wife facing an overwhelming softbox. (about 1 meter X 1 meter) the flash I used is a local brand called vLen 400, but it is quite similar to the older alien bees.
The image does not show it, but I places Gaffer Tape “X”s to mark the locations of the flash – this helped me to create repeatable results. (I got this tip from Pro Photo Life, see 1:05)

Another thing I have notices is that my ceiling is not high enough. This is why I went with side lighting and not classic Rembrandt lighting. I could have done Rembrandt lighting for the first two pictures, but as I got further and further, I had to raise the flash higher and higher, until I met the ceiling and could not keep proper lighting.
Spreading The Word
Like my other cards, I placed the Portrait Lighting Reflector Cheat Sheet Card under CC license. Feel free to download it, print it and spread it around. The idea is that you can use the collection to build better lighting.
If you have ideas on how to use this card differently, of you just want to say something about it hit me in the comments.
Related:

Udi Tirosh
Udi Tirosh is an entrepreneur, photography inventor, journalist, educator, and writer based in Israel. With over 25 years of experience in the photo-video industry, Udi has built and sold several photography-related brands. Udi has a double degree in mass media communications and computer science.


Join the Discussion
DIYP Comment Policy
Be nice, be on-topic, no personal information or flames.
3 responses to “Light Falloff Cheat Sheet Card”
In reference to Matt Haine’s comment, I was at first a little surprised to see more somewhat soft light as the light source was moved further away when I realised that it must have been from the bounced ambient light from your white walls.
As a newish enthusiast, I’ve read that you want to get your light source close to the model to keep it relatively large and soft so I’ve always kept my umbrella or softbox as close as possible for portraits.
Thanks for sharing.
-Raphael
I’m sorry but it looks like you made other compensations when moving the light back.. They all seem to have relatively the same luminescence values… there should have been several f-stops difference from closest to furthest
Light falloff has nothing to do with exposure level. It’s irrelevant. It falls off at the same relative rate regardless of the light’s power setting.