


Is this the perfect portable and versatile key light setup for video?
Feb 8, 2023
John Aldred
John Aldred is a photographer with over 25 years of experience in the portrait and commercial worlds. He is based in Scotland and has been an early adopter – and occasional beta tester – of almost every digital imaging technology in that time. As well as his creative visual work, John uses 3D printing, electronics and programming to create his own photography and filmmaking tools and consults for a number of brands across the industry.
Share:
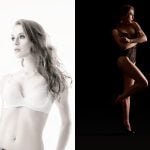
Whether you’re shooting stills or video, the key light is arguably the most important part of your lighting setup. Getting it looking just right can be challenging, especially if you’re regularly switching between different setups for different shooting angles. But what if you could have one single setup that worked for everything? Wouldn’t that be great?
In this video, Caleb Pike at DSLR Video Shooter walks us through the ultimate video key light setup he’s been using for the last couple of years. It’s a complete setup that allows Caleb to shoot a bunch of different angles and lighting setups with ease and efficiency. He explains how it’s made, how he uses it and the kinds of shots you can get with a setup like this.
To be able to build one of these stands for yourself, Caleb has provided a list of parts. Some of them, like the model of the light and softbox, are going to be variable. After all, everybody has personal preferences and existing gear collections to pick from, but this video should get you started. Just a little forewarning, the whole setup will cost you a few hundred dollars (even without the light) if you create Caleb’s exact setup. There may be less expensive alternatives to some of the items mentioned, but obviously, the capabilities of alternate gear may be a little different.
The main keys to the system are the rolling light stand, Kupo offset arm and the Cheater adapter. These allow you to quickly and easily roll the light around to any position you need, adjust the height and control the angle of the light and modifier. The Kupo offset arm moves the light itself away from the central column of the light stand, allowing you to point it straight down – great for those overhead lighting shots – but still allows you to position the light the way you would on a straight regular stand without the offset arm.
Towards the end of the video, Caleb also shows us his portable fill board stand to go along with it. Sure, you could go with a second light to add fill, but this is less hassle to set up, and you don’t need to power it. To make this, you’ll need a few more items.
It’s a great solution for when you’re regularly swapping lighting setups around in the studio, especially if you’re regularly switching between the same lighting setups. This lets you very quickly and easily bounce between them with a minimal amount of fuss. All you need to do is wheel it over to the location, position the box, lock everything down, power it up and you’re ready to go!

John Aldred
John Aldred is a photographer with over 25 years of experience in the portrait and commercial worlds. He is based in Scotland and has been an early adopter – and occasional beta tester – of almost every digital imaging technology in that time. As well as his creative visual work, John uses 3D printing, electronics and programming to create his own photography and filmmaking tools and consults for a number of brands across the industry.


Join the Discussion
DIYP Comment Policy
Be nice, be on-topic, no personal information or flames.