


How To Win The “I Have No Studio” Challenge
Nov 17, 2011
Udi Tirosh
Udi Tirosh is an entrepreneur, photography inventor, journalist, educator, and writer based in Israel. With over 25 years of experience in the photo-video industry, Udi has built and sold several photography-related brands. Udi has a double degree in mass media communications and computer science.
Share:

Having dealt with all kinds of spaces to shoot in, I can say that having to deal with a small space to shoot portraits is one of my worst fears. (This is why I conquered the basement in our new house).
Seeing the huge studios of folks like Zack Arias or Scott Kelby can have a paralyzing effect and send you on a the road to Im-never-gonna-make-anything-good-with-my-space trip.
A few weeks ago I started talking with photographer Matthew Shalaby who is doing some amazing work with a very confined space. Actually Matthew has been shooting for a very short time and not only dealing with the lack of a “decent” studio (shoots in a 8 feet by 10 feet room) but also the lack of a crew. So most of his work is done in a TFx (Time For Prints/CD/Other) form.
Matthew makes some great use of the inverse square law and pulls the lighting modifiers very close to his models. Which maximizes the available space, but also makes some very soft light.
I asked Matthew if he could tip the rest of us on how to win against the limits of living-rooms, small garages and the likes.
First lets describe the spatial challenge that Matthew has to overcome (here it is in Matthews words):
“The challenge I face is my studio space. Right now, it’s not in the cards for me to own a large studio, so I converted the largest room in my home into my “studio”. Its 8ft wide x 10ft deep (with a 10ft ceiling). As you can imagine, this opens a whole bundle of joy in terms of trying to produce professional quality photo’s in such a tight space.
“I strive to mask the fact that my space is so small in my work by light placement, angle, direction, model placement and distance from background. Given only 10 feet of distance to work with, and my personal taste is to keep the model as far away from the backdrop as possible, I face the challenge of pushing the limits of wide focal lengths as well, always striving to get the most of the model I can without lens distortion.
Matt uses a nice tool box when it comes to getting the max out of his small room, here is how he describes it.
Working in a tight space teaches you the inverse square law quickly! For this, and the looks I wanted to go for (shadows for added drama), light modifier placement was extremely close to the models… sometimes as close as 18 inches! Also grids on each modifier was essential as well to cut down on the spread of light. Most of my studio shots were done with a 35″ Octabox with Grid, or a 14×55″ Stripbox with Grid – again, always placed very close to the model to get the look I wanted. I found pulling back the modifier would spread light throughout the entire room, and the look just didn’t come off as professional. So close modifier placement is the key to getting the look I get within my small studio space.

Here are some examples of either an octabox or strip box placed within 2 feet of the model. As you’ll see, all of them are side it, or 3/4 side lit, again, all in an effort to keep as much light off the backdrop as possible.


For beauty shots (head shots), I felt more at ease. Having a huge studio isn’t mandatory for these. In this pull back shot, you can see a 47″ Octabox behind the model. I would shoot this as the same aperture as my main light, or 1 stop higher depending on the look I wanted, but mainly to have a perfectly white background.

Here are some example shots of this basic setup:


Lastly, I use the Molla Setti Beauty Dish against a bi-fold door. The doors are pretty versatile, They can act as flags, GOBOs or V cards. (and they are usually flat which saves lots of storage room). This set up pretty much stretched through my entire studio.


As far as gear goes I shoot with a Canon 1Ds Mark III body along with the Canon 24-70L (most used lens in studio), 35L, 50L, 85L, 70-200L f2.8
My strobes are all PCB Einstein units triggered by PW‘s
My modifiers are: PCB 35 & 47″ Octaboxes, Photoflex 14×55 Stripbox, Kacey Beauty Dish, Mola Setti Beauty Dish – all with grids to control light.
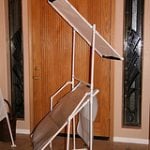
I use 3 seamless rolls, all had to be cut down to 7ft wide for backdrops. They are mounted from the ceiling as there is no room for stands.
I use a set of bi-fold doors painted black on one side and white on the other to help control light spread.
Finally I asked Matthew for some general tips
“I find the following tips to be extremely helpful with small spaces
Grids are a must to control light spread. In such a small space, light will bounce off of everything so bi-fold doors painted black, or black curtains or foamcore all help control light spread.
Also I give extra attention to modifier placement. For the look I wanted to achieve, I found close placement to my subjects worked best (with 1-2 feet). Also, the direction the modifier was placed was critical. Too much to the side and you have a half lit model. Too much out front and your backdrop is splashed with light. I found a 3/4 approach, facing downward onto the model works well.
Matthew hold a great flickr stream which you can follow here, and a great blog here.

Udi Tirosh
Udi Tirosh is an entrepreneur, photography inventor, journalist, educator, and writer based in Israel. With over 25 years of experience in the photo-video industry, Udi has built and sold several photography-related brands. Udi has a double degree in mass media communications and computer science.


Join the Discussion
DIYP Comment Policy
Be nice, be on-topic, no personal information or flames.
2 responses to “How To Win The “I Have No Studio” Challenge”
This guy takes some good assed photos in a small space, but with a great eye and excellent equipment! I love the beauty shots with the Octa in the background.
I LOVe the light on his models, a look I sometimes get, sometimes not. I usually place my lights close to the model, but it gets in the shot!
I like the grid ideas; I need to work with them more. This makes me want to get out there and do somethin better
Thanks for the advice AND showing the setup!