

















How to make your own DIY wearable RGB LED Light
Dec 5, 2024
Vlad Moldovean

John Aldred is a photographer with over 25 years of experience in the portrait and commercial worlds. He is based in Scotland and has been an early adopter – and occasional beta tester – of almost every digital imaging technology in that time. As well as his creative visual work, John uses 3D printing, electronics and programming to create his own photography and filmmaking tools and consults for a number of brands across the industry.
Share:

I think by now we are all familiar with the term practical light. But have ever wanted to have a light in frame attached to your model in your creative portraits? Well, buckle up, because we’re diving into how you can put together a custom LED light using some affordable components from AliExpress and a dash of DIY magic.
Think dynamic lighting effects, endless color options, and total control—all wrapped into something you can wear in your next photoshoot all under 20$. Whether you’re into creative photography, light painting, or cosplay, this project will light up your next photoshoot in style!
What You’ll Need:
- WS2812B IP67 LED strip (5V) 144 leds/m – https://s.click.aliexpress.com/e/_DnsaTJ3
- D1 Mini Microcontroller (ESP8266) – https://s.click.aliexpress.com/e/_okBQ2JF
- USB-C PD module – https://s.click.aliexpress.com/e/_oEVURZF
- Wires, connectors, and a heat-shrink tube – For assembling and securing connections.
- 3d printed enclosure for for the D1 mini (optional)
Assembly
First of all, you have to connect the usb C on your microcontroller to your PC and install the WLED firmware onto the D1 Mini using this website: https://install.wled.me/ WLED is a free, open-source platform for controlling addressable LEDs. And after it’s installed, you will be able to connect to your light via Wi-Fi and customize the LED effects, colors and brightness using your phone /table or computer.
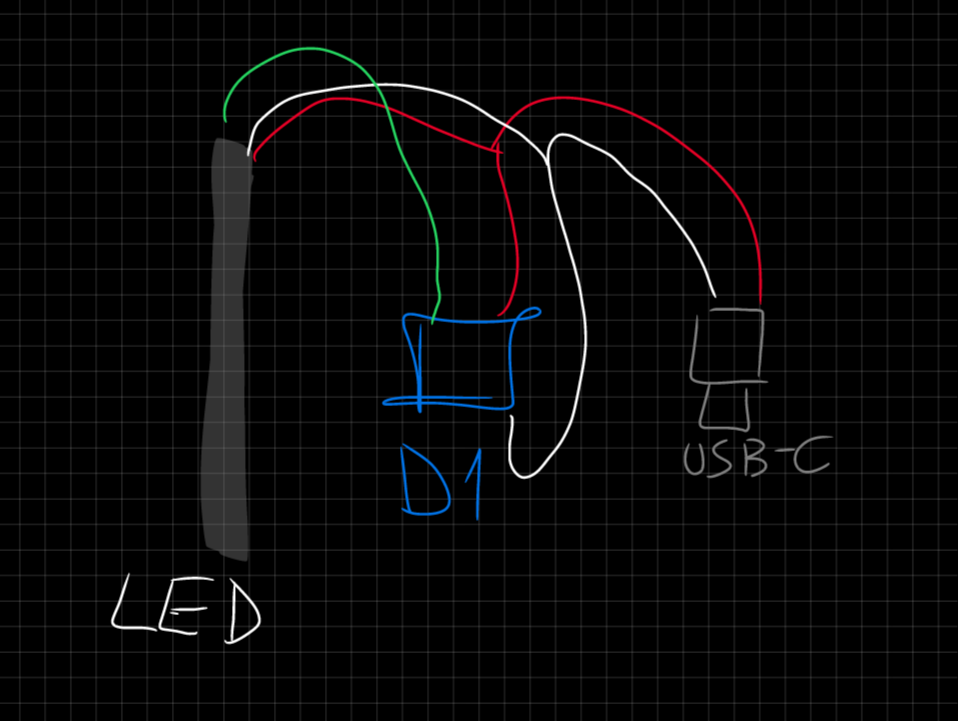
Putting everything together is straightforward. The USB-C module provides two wires: 5V and ground. Connect the 5V wire to the 5V pin on the D1 Mini and the red wire from the LED strip. Similarly, connect the ground wire to the G pin on the D1 Mini and the white wire from the LED strip. Finally, attach the green wire from the LED strip to the D4 pin on the D1 Mini. It’s adult LEGO—simple and satisfying!
And if you or a friend happen to have a 3d printer you can make a nice little enclosure for the microcontroller as well since there are a tone of files out here for it.
Of course, you can customize this however you see fit. Some cosplayers even build LEDs inside hats or other props. For mine, I chose to have around 1.5 meters of wire between the LED strip and the USB C so I can easily have the power bank in my back pocket while the RGB light is somewhere on my body.
DISCLAIMER: This is an overview of the process that aims to encourage photographers to build their own lights to use as props and not a step-by-step detailed guide. There is ample documentation out there for every step of the process so for safety reasons, make sure to Google proper wiring techniques and take all the necessary precautions —nobody wants a short circuit during a photoshoot!
Conclusion
And that’s about it. You now have a flexible LED strip that you can wear under white clothes to get a diffuse sci-fi effect in your next photoshoot. Or even just post with it across your body as i did in the images below.
Want to take it further? Experiment with LED matrices to display small animations or icons under clothing. Picture a glowing heart beneath a white T-shirt—perfect for dramatic effects!
You can use your DIY wearable LED light in several creative ways. For portraits, wear it as a glowing belt or sash to produce dynamic lighting effects that enhance your subject’s appearance. In long-exposure photography, move it around to create stunning sci-fi-inspired visuals through light painting. Additionally, it’s perfect for product photography, where you can wrap it around props to generate unique highlights and reflections that make your shots stand out.
Seriously, with this DIY photography light the possibilities are endless—so go wild and let your creativity take over!
See more from DIYPhotography.net on Google
Add DIYPhotography.net as a trusted source. This makes
our stories more likely to appear in your Google Search results.
 Add as a preferred source on Google

About Vlad Moldovean
Vlad Moldovean is a visual artist from Brasov, Romania. He mainly shoots portrait photography but also experiments with various techniques and technologies and the ways they can be used to create art. You can find out more about Vlad on his website and follow his work on Instagram. This article was also published here and shared with permission.
We love it when our readers get in touch with us to share their stories. This article was contributed to DIYP by a member of our community. If you would like to contribute an article, please contact us here.


Join the Discussion
DIYP Comment Policy
Be nice, be on-topic, no personal information or flames.