


How to make a giant DIY softbox on a budget
Sep 29, 2020
Dunja Đuđić Kalinin
Dunja Djudjic is a multi-talented artist based in Novi Sad, Serbia. With 15 years of experience as a photographer, she specializes in capturing the beauty of nature, travel, concerts, and fine art. In addition to her photography, Dunja also expresses her creativity through writing, embroidery, and jewelry making.
Share:

We’ve seen and shared our fair share of DIY light modifiers. But how about making a really huge softbox? And it’s not only huge – it’s cheap to make, lightweight, sturdy, and gives you splendid results? In this awesome video, Shane Hulburt of Hurlbut Academy will show you how.
You’ll need some wooden boards to make the frame for the softbox. You’ll then line it with black foam core on the outside and white foam core on the inside. If you don’t have foam core or you live somewhere where it’s not produced, you can easily go with bedsheets.
You’ll need to fix the foam core to the wooden boards using drywall screws. The trick to making it sturdier is screwing it through a fender washer. Now, if you want to make the softbox with built-in lights, make the frame and add foam core on the sides. Then screw in the wooden boards on the back and mount the lights of your choice. Alternatively, you can mount the lights onto wall spreaders, and then add the softbox, as Shane did.
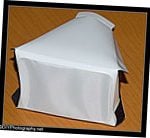
Whichever mounting option you choose, you’ll need the black cloth in the back and white on the front. You can use some black duvetyne cloth in the back so the light doesn’t spill outside the lightbox. Alternatively, you can even go with a black table cloth. For your diffusion, you’ll need something white on the front side of the softbox. White shower curtain should do the trick just fine, but I guess you can also go with a bed sheet or a table cloth.
I personally like it how professional this softbox looks, yet it’s pretty simple and cheap to build. It’s also lightweight (around 5 lbs), yet it’s rigid at the same time. Shane mounted it onto a ceiling for the scene he was filming, but I guess it can easily be used elsewhere in the studio. And of course, you can use it for both photography and video, depending on the lights you use with it.
[How To Build A Soft Box via ISO 1200]

Dunja Đuđić Kalinin
Dunja Djudjic is a multi-talented artist based in Novi Sad, Serbia. With 15 years of experience as a photographer, she specializes in capturing the beauty of nature, travel, concerts, and fine art. In addition to her photography, Dunja also expresses her creativity through writing, embroidery, and jewelry making.


Join the Discussion
DIYP Comment Policy
Be nice, be on-topic, no personal information or flames.