


How to get perfect long exposures the easy way with a 10 stop ND filter
Jan 26, 2022
Alex Baker
Alex Baker is a portrait and lifestyle driven photographer based in Valencia, Spain. She works on a range of projects from commercial to fine art and has had work featured in publications such as The Daily Mail, Conde Nast Traveller and El Mundo, and has exhibited work across Europe
Share:
One of the things I was a bit confused by when I first started out in photography was the subject of filters. What, when and how to be precise. When should I choose a polarising filter over a neutral density filter? What grade of neutral density filter do I need? Circular or square? And don’t even get me started on those gradient neutral density filters. It all seemed so confusing! Luckily I had the sense to enrol in a landscape photography workshop when I was travelling around New Zealand and all became clear. It really isn’t so complicated after all.
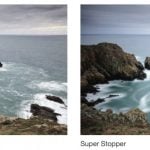
One of the things I enjoy about using filters is the ability to get it right in camera. There are some effects and techniques that you simply cannot do in post, and long exposure photography is one of those. In this video, Mike from Perea Photography takes you through his process of creating beautifully smooth long exposure landscapes using a 10-stop ND filter.
As Mike says, shooting long exposures adds a sort of fine art ethereal feel to your images. It’s something that you cannot see with the human eye so takes the image into a new realm. With this method, you can show both movement and imply the passing of time. So what elements do you need to create a great long exposure landscape image?
Conditions
Mike says that he prefers to shoot very long exposures when the clouds are either moving directly towards you or away from you, rather than from side to side. This creates a greater feeling of movement and streaks in the clouds. Not only does this look cool, but has the additional advantage of creating leading lines towards your subject. To get those streaks you need to make sure there is enough texture and contrast in the clouds to create depth.
Obviously moving water is a classic scene as well, whether it’s a waterfall, ocean shoreline, or a lake that you want to make look smooth.
Set up
Obviously, you’ll need a sturdy tripod for this. You can’t shoot 30-second exposures handheld. Another really good point is to fine-tune your composition and focus before adding the filters. This is actually where using a filter holder or magnetic attaching filters is going to be a lot easier than a round filter that you have to screw on. 10 stop filters are dark and a bit like shooting night photography you really do benefit from setting the focus in advance. Try to arrive a little early to scout the location and find your favourite composition.
Mike also recommends shooting in Manual mode to get maximum control over your images and either using a remote trigger or cable release or using the 2 seconds delay timer on the camera to minimise camera shake. You also may want to use the mirror lock if using a DSLR (of course with mirrorless cameras there is no need).
Base exposure
Mike recommends dialling in the base settings first before even applying the filter. In this video, he uses the example of shooting at f/8, with his lowest ISO of 64. Now many cameras won’t go lower than ISO 100, that is fine, use the lowest setting you have. Mike starts with a shutter speed of 1/10 sec. Now place the filter in front of the lens, and it’s time to do some maths!
Calculations
Our base exposure is going to be 10 stops too dark now that we have placed the filter on. So what do we need to do? Open up the shutter by 10 stops (time to learn those light stops!). Depending on how your camera is set up, one click of the dial is one-third of a stop. So to go 10 stops you’ll need to shift by 30 clicks. Probably not the best method if you’re like me and lose count!
Another way is to multiply your base stop by 1000. That gives us approximately 100 seconds (or 1 minute 40 seconds) of exposure time. You can also use the PhotoPills app, go to the exposure panel and dial in your base exposure. You can then select which level of filter you have and it will calculate the correct exposure settings needed.
Or you can try trial and error and see what you like, there’s nothing wrong with that in this day of digital photography. Except that you want to be aware of changing light conditions and wasting time, and also of the relatively small screens on the back of the camera not being able to give you the information you need. This method can often result in disappointing images when you get home, you’ve been warned!
So that’s all there is to it. What are your best tips for shooting long exposures?

Alex Baker
Alex Baker is a portrait and lifestyle driven photographer based in Valencia, Spain. She works on a range of projects from commercial to fine art and has had work featured in publications such as The Daily Mail, Conde Nast Traveller and El Mundo, and has exhibited work across Europe
Related Posts
 A first look at the new 15 stop Irix Edge ND32000 filter and square filter holder
 Think 10 stops of ND is a lot? How about 17 hour exposures with Lee Filters’ new 15 stop Super Stopper
 How To Take The Perfect Coffee Shot (With Multiple Exposures)
 Five techniques to calculate long exposure times with a 10-stop ND filter
Join the Discussion
DIYP Comment Policy
Be nice, be on-topic, no personal information or flames.