


How To Create A Wall Of Fire
Jan 14, 2013
Udi Tirosh
Udi Tirosh is an entrepreneur, photography inventor, journalist, educator, and writer based in Israel. With over 25 years of experience in the photo-video industry, Udi has built and sold several photography-related brands. Udi has a double degree in mass media communications and computer science.
Share:
When Barry Elder first approached me with this tutorial I have to admit that I was kinda scared to put it online. I mean, it is not just dangerous, it practically defines danger. But… involving both fire and an Ultima GTR, it was too cool to give up on.
So here is the tutorial. Please use your head if you are going to try it out. Make sure you are safe, have a fire extinguisher close by and alert the near fire station on your plans. It will save you both a huge headache. You can head over to our steel wool light painting tutorial and safety is pretty much similar.

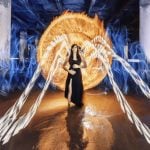
I have been asked on a number of occasions how I created the firewall shown in the above image, in this guide I will show you the basic concept from which you can let your imagination go wild!
What you will need as a basis are the following item
- Camera with 30″ (or bulb) Exposure
- Tripod
- Colemans Fuel or other flammable fluid, this must however be contained within an approved container
- Old Jug (or something similar)
- Strap/Rope and stick
- Lighter
- Assistant
Before I continue, please let me remind you that playing with fire and flammable fluid is very dangerous, add to that an open container of flammable fluid and things could get very nasty, very quickly! – Please make sure you follow some basic safety advise before you continue.
- Never light the strap close to the open container of fuel – Fuel will be dripping off the strap when you remove it from the jug which will leave a trail of flammable fluid on the ground – this WILL catch fire.
- Always ALWAYS close your flammable fluid bottle and move it far away from where your jug/starting point will be.
- Stay clear of ANYTHING that can catch fire, bushes, trees, grass and cars!
- Keep a Wet Towel close by, wrap this around the strap to kill the flames
- Keep a CO2 extinguisher close by, just in case!
- Once you have completed the pass you will extinguish the flame by wrapping the strap/rope in a wet towel, ensure this is prepared and ready!
- Use your common sense, I have warned you! You do this at your own risk and that of others around you.
Now that we are safety first minded, let’s continue!


- Set up your camera, pointing to whatever your subject is.
- For the composition determine where the start and end points should be for your firewall, then mark them on the road with stones so you can remember where you have to walk between.
- Camera settings vary really, but a good starting point is 100ISO, F8.0, Shutter as long as you need.
- Place your strap into the jug, bearing in mind that it needs to come out untangled.
- Leave enough strap overhanging, this will be what you are going to hold on to :)
- Pour petrol into the jug ensuring all of the strap has been doused in petrol – with exception of the section you will be holding onto! – Try not to spill any.
- Close your Petrol Can, move it several meters away!
- Leave the strap to soak for about 3-5 minutes.
- Remove the strap from the Jug, holding it up in the air so that the end just about touches the ground.
- Ask your Assistant to light the strap, it is important to light it from the middle to ensure even burn.
- Open your shutter using a remote release or ask your assistance to open shutter once the strap has been lit – If you don’t have a remote trigger you may require a 3rd Assistant – One to light and one to manage shutter – I use a wireless remote and control the open and closing whilst walking.
- Now walk quickly from the starting point to your end point.
- Close your shutter.
- IMPORTANT: Your strap may still be alight at this point, ensure you extinguish it correctly, place the strap on one half of the damp towel and cover up with the other side, removing all oxygen and killing the flame – failing that stamping on the flames should kill them – now leave it to cool, it will be very hot.

Review your image, re-adjust settings if required – You may have to close the aperture a bit more if parts are over exposed. Now rinse and repeat until you have achieved your desired image. As a little extra I’ve put together a video to show you some BTS Footage, I hope this helps!
I hope this guide has helped you understand the basic concept of the firewall, why not try different types of rope or straps, or maybe soak parts of the strap in petrol so only certain areas burn?
I now hand over to you, try to be creative and show us what you can do with your firewall!
Stay safe and FLAME ON!
About The Author
Barry Elder is a Manchester based long-exposure photographer. You can follow his work on 500px and facebook.

Udi Tirosh
Udi Tirosh is an entrepreneur, photography inventor, journalist, educator, and writer based in Israel. With over 25 years of experience in the photo-video industry, Udi has built and sold several photography-related brands. Udi has a double degree in mass media communications and computer science.


Join the Discussion
DIYP Comment Policy
Be nice, be on-topic, no personal information or flames.
3 responses to “How To Create A Wall Of Fire”
Instead of using any old rope use kevlar wick rope found here http://www.homeofpoi.co.uk/shop/listItems/KEVLAR-Wick-Rope
It’s designed to be set on fire and can be used more than once.
This is very interesting. Thank you for the tutorial. I’ve worked with digital light sticks which was cool, and I notified the local police just incase somebody complained. Ya never know. And once I had to produce a scene for a video that contained a combat scene using pyrotechnics and flares. This was before 911 and a little easier to do back then. Anyhow the township connected me with a local quarry to work in because they didn’t want my project visible from the highway causing a distraction. Plus I recruited the local fire department and allowed them to shoot off the flares while I set off the pyro. If I do this project, maybe I could encourage the fire department to assist. But these are the photos that get noticed.
This is very interesting. Thank you for the tutorial. I’ve worked with digital light sticks which was cool, and I notified the local police just incase somebody complained. Ya never know. And once I had to produce a scene for a video that contained a combat scene using pyrotechnics and flares. This was before 911 and a little easier to do back then. Anyhow the township connected me with a local quarry to work in because they didn’t want my project visible from the highway causing a distraction. Plus I recruited the local fire department and allowed them to shoot off the flares while I set off the pyro. If I do this project, maybe I could encourage the fire department to assist. But these are the photos that get noticed.