


How to Build A Big Axx 4 Meters Homemade Camera Crane
May 28, 2013
Guest Author
We love it when our readers get in touch with us to share their stories. This article was contributed to DIYP by a member of our community. If you would like to contribute an article, please contact us here.
Share:
Not a long way back we shared a cool tutorial on a homemade Travel Jib (kinda like this Portable Mini Jib). But for those times that you need to carry heavier cameras and you want to trade portability for stability you may want to use a crane.
Charlie Mac created this wonderful tutorial for building a the Travel Jib big brother – a camera crane. It is not as portable, but way sturdier and can handle bigger loads.

Sample Footage
Parts list
- 1 x Speaker Stand
- 1 x Speaker Top Hat
- 1 x camera tripod head
- 1 x steel right angle bracket
- 2 x 12mm threaded rods
- 4 x 12mm bolts
- 4 x 12mm rounded cap bolts
- 2 x 20mm square, three meter length steel square tube
- 2 x 20mm square, one meter length steel square tube
- 2 x 16mm square, one meter length steel square tube
- 1 x 10mm u shaped, one meter aluminium rod
- 3 x 8mm nuts, bolts and washers
- various 6mm nuts, bolts and washers
- This all cost less than £100 (even considering I had some of the nuts and bolts in my garage anyway).
Building Steps

The Raw Materials. 2x3m, 2x1m and 1x1m thinner steel square tube and 1x1m u-shaped aluminum rod.

I cut the 1x1m thinner tube in half and bolted one each into the ends of the 1m thicker tube. This would be where the pivot point was and so I classed these two 1m sections as “the handle”

I think I meant to measure out 25cm into the thicker steel tube….oh well, it worked.

drilling the holes to bolt the thinner steel tube into the thicker one.

So, once the thin tube is bolted to the shorter thick tube, take that and put the other end of the thin tube into an end of the longer thick tube and bolt them together. Repeat with other thicker tube etc.

Had to cut down some of my bolts

Two completed arms with the handles on the end. Total of 4m

Bought a simple speaker stand and speaker hat from amazon. Wish I’d spent a bit more money here. The stand isn’t that sturdy, and the metal is really weak. Was tightening the hat onto the top of the stand and the damn bolt went straight through! oh well…still holds.

Drilled a hole in the longer thick tube about an inch or two infront of the join between “the handle” and the main arm. This is to be the top arm.

Kept forgetting to take pictures….by now, I have used that 1m aluminium bar and cut it into about 6 inch lengths to use as strutts between the two arms placed about every half meter

…I then went back to the local hardware store and bought a meter of 20mm wide flat steel bar to create a handle at the pivot point. I have made sure to be able to lock this into place so I can either hold the camera level throughout the movement of the crane, or i can unlock it so i can control the tilt angle of the camera (quite proud of that bit)

Painted! Simple black spray paint. Wish I had washed it down slightly though as the steel was slightly oily and so the paint didn’t stick as nicely as I was hoping.

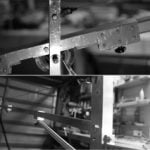
Paint’s still wet…I found this bracket lying around and so just bolted it to the top hat, and then to the top arm. Later on, I added a piece of thick wood between the bracket and the top hat as the plastic was flexing way too much.

In the top left of the image is the bolt that I use to lock the arm in place to keep the camera level. just need a spanner to tighten it or remove it.

This is the head from an old p.o.s tripod i had lying around. Would cost around 20 quid from amazon though at it’s cheapest.

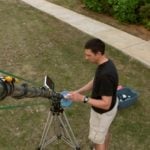
FINISHED!! all balanced with some weights.


Charlie is going to release a video tutorial on how the crane was build so keep an eye on his YouTube channel.

Guest Author
We love it when our readers get in touch with us to share their stories. This article was contributed to DIYP by a member of our community. If you would like to contribute an article, please contact us here.
Join the Discussion
DIYP Comment Policy
Be nice, be on-topic, no personal information or flames.
5 responses to “How to Build A Big Axx 4 Meters Homemade Camera Crane”
“In the top left of the image is the bolt that I use to lock the arm in place to keep the camera level. just need a spanner to tighten it or remove it.”
I suggest using a wing-bolt instead, to eliminate the need for a spanner. If one is not available, fix/weld a wing nut on the bolt, it works just as well.
Really amazing. Can’t believe that it is homemade when it looks more like it was made in factories or industrial plants. Very clean and well-organized work that can be so useful too. – http://www.non-ferrousfastener.com/
Hi, can this hold a larger dslr eg a canon eos 5d mkII with 24-105?
Thanks
Wow! I love the sample footage. It’s like at the end of the video I still want to see more. That is just how amazing a crane could do on your videos. It can get ranges of angles that would be possible hard when you are holding your camera by yourself. Thank you also for sharing those tutorials above. -http://www.varizoom.com/
Hello. I followed your tutorial. I have a problem, how can i cuild a mechanical pan/tilt head for the camera so i can do object tracking with the crane