


Here’s a tutorial on how to get great studio results with just one light
Jan 10, 2018
Dunja Đuđić
Dunja Djudjic is a multi-talented artist based in Novi Sad, Serbia. With 15 years of experience as a photographer, she specializes in capturing the beauty of nature, travel, concerts, and fine art. In addition to her photography, Dunja also expresses her creativity through writing, embroidery, and jewelry making.
Share:

If you’re new to studio photography, you may want to take it one step at a time. Or literally one light at a time. You can make great studio portraits and create different setups with a single light. In this video, Manny Ortiz will show you how. All you need is one light and an optional reflector – and you’re good to go.
When you only have one light, the final result is all about where you place it. In this video, Manny shows you a few different setups that let you create various looks without introducing additional strobes. He shoots with a Sony a7R III paired with Sony FE 85mm f/1.4 GM. As for the light, there’s a single Flashpoint XPLOR 600 HSS with a Glow ParaPop 38″ softbox.
Even light
In the first example, Manny places the light a few feet above the model’s head, at about a 45-degree angle. It creates flattering light on the model’s face and has a sculpting effect. There’s one thing to keep in mind – you don’t want to set the light too high. If you do it, it will create unflattering shadows under the model’s eyes. Another tip is to make sure to capture the reflections of the light in the model’s eyes.

In this setup, the modifier is right next to the camera. There are two reasons for this. First, it creates even light on the model’s face. Second, this position gives more flexibility when posing, and the model can turn their head to different sides or towards you.
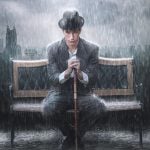
Dramatic light
When you move the light to the side of the model, you’ll introduce more shadows to the images. This creates a more dramatic mood. What you need to keep in mind is that this position of the light is limiting when it comes to posing. If your model turns the head away from the light, their face will be in the complete shadow. Also, make sure that the light isn’t too far off to the side, because then you won’t have the catchlights in the model’s eyes.
Add a reflector
If you want to spice things up a bit, you can add a reflector. With the first setup, place the reflector below the model’s face, slightly angled upwards. It will fill in the shadows and create catchlights.

For the second setup, you can add the reflector on the opposite side of the light, to fill in the shadows and create the illusion of a two-light setup.

After you’ve seen the positions of the light (and the reflector), take a look at a couple examples from Manny. make sure to watch the video for more.


[All you NEED is one LIGHT| TUTORIAL! | Manny Ortiz]

Dunja Đuđić
Dunja Djudjic is a multi-talented artist based in Novi Sad, Serbia. With 15 years of experience as a photographer, she specializes in capturing the beauty of nature, travel, concerts, and fine art. In addition to her photography, Dunja also expresses her creativity through writing, embroidery, and jewelry making.


Join the Discussion
DIYP Comment Policy
Be nice, be on-topic, no personal information or flames.
One response to “Here’s a tutorial on how to get great studio results with just one light”
Stick it inside one huge octabox and rent a spacious studio?