


Get Your Flash 100% On Axis With Umbrella
May 4, 2009
Udi Tirosh
Udi Tirosh is an entrepreneur, photography inventor, journalist, educator, and writer based in Israel. With over 25 years of experience in the photo-video industry, Udi has built and sold several photography-related brands. Udi has a double degree in mass media communications and computer science.
Share:
 OK, So if you look at the title and say ??@?#?$%%$@, it’s time for a little umbrella-holder intro.
Umbrella holder AKA umbrella swivel is a piece of equipment that is meant to attach a small strobe to a light stand. They come in verity of prices and flavors, but one thing is common to all. They have a hole on the bottom to connect to the light stand on one end and a metal stud / hot shoe / cold shoe that attaches to a small flash on the other end.
Wait – didn’t you say they are called umbrella holders? Well, yes – this is because they also have a dedicated shaft to insert an umbrella, either reflective or shoot through.
The swivel (or umbrella holder) is designed in a way that the umbrella does not go exactly 90 degrees into the shaft. It is tilted upwards a bit – this is done since the flash mounted on the swivel is not 100% aligned with the center of the umbrella. If the insert was angled at 90 degrees, light from the flash would hit only the top of part of the umbrella, creating uneven light.
So the umbrella is tilted upwards a bit. However, the swivel is one and mounting options are many – you can use big or small umbrellas, place the umbrella in different positions within the shaft or shoot through only half open umbrella. Since the shaft if fixed, sometimes you’ll end up with the light going only to the top or bottom half of the umbrella – this is why you’d like to place the flash as close to the umbrella axis as possible.
Here are some pictures to help illustrate the idea:
The image below was taken with a regular swivel – flash far away from axis. as you can see, the top part of the umbrella is better lit than the bottom part.

The next image was taken with the flash on umbrella axis (secret shall be revealed in a second) and the umbrella is evenly illuminated.

This is why I was so happy when Josh Robertson (awesome Flickr stream) decided to share a mod to the regular swivel that will place your flash on umbrella axis. Josh also gives some more good reasons to make this mount – stability and speed of operation are two of them.
Ok, so almost a year ago I got my first Flash unit, which was pretty cool. About 10 months ago I got my first set of radio triggers, last Christmas I got my first Strobist kit, a simple 1.8m Light stand, a swivel head hotshoe flash holder and a shoot-through umbrella. Since then I’ve been on the lookout for something to make mounting the flash easier, faster and more secure, and not having found a commercial solution available, I made my own. So today, I give you my solution.
Materials:
- 20mm x 1.6mm Aluminum Flat Bar (~AU$7/m)
- Double sided Velcro
- Pop-rivets
Tools:
- Battery Drill, with appropriate sized drill bit for pop-rivets
- Pop-rivet gun
- Hacksaw
- Bench vice
- Square

I chose to use the 20mm x 1.6mm flat Aluminum bar because it closely resembles the rough dimensions of a flash hotshoe.
First thing, cut yourself 2 lengths of Velcro, long enough to wrap around your flash head with a fair bit of overlap. Here’s one of mine:

Next measure the width of your Velcro, in my case, 25mm, add around 15mm onto your measurement, giving you 40mm. From one end of your flat bar, come in 40mm and mark it. This will be our first bend.
Put your flat bar in the bench vice on the mark you just made and square it up with the top edge of the vice. By applying force to the flat bar near the vice, bend it down to 90 degrees. This should be easy to do by hand.
Pull your bar out and, still by hand, bend it the rest of the way down so you end up with a compressed ‘U’ shape in the end of your flat bar.

Place the flat bar back into the vice with the bend in the jaws. Place the Velcro into the bottom of the ‘U’, at about the middle of the length of Velcro. Close the jaws of the vice. Tight. This should sandwich the Velcro into the bottom of the Bar nicely.

Next move the bar down slightly so that the jaws can clamp down on the bit of overlap, like so:

Once again, tighten the jaws. Pull your creation out of the vice, and put it back in the vice in such a manner that you can drill a hole through both the overlap, and the main bit of bar. Like so:

And pop-rivet!

I realize that my pop-rivet is nowhere near center, and I’m OK with that.
So now you have completed half the job, next measure up your flash unit and decide where you want the second strap to go, in my case I wanted the second to secure around the hotshoe mount, so that I could still access flash controls and the battery door.
I held my flash unit up to the bracket so far, roughly where it would sit in the final product, and marked the flat bar where the hotshoe mount was. I went a further ~12mm longer (half the width of my velcro to centre it on the hotshoe) and marked that point. I then went a further 40mm and marked that point, and cut my flat bar off there.
Copy what you did with the other end on this end, making sure to bend the bar the same way as the other end!
That’s pretty much it for the basics of the bracket, it shouldn’t take more than 20 minutes or so to knock one of these up.
Not only does this bracket secure your flash unit down, it also brings the light source closer to the center of your choice of modifier, (umbrella, reflector, soft box, etc) which means a better chance of even distribution of light across your modifier! This Solution is great for everyone with a hotshoe mount flash on an umbrella stand, but especially the location user.
With you flash more secure on the stand you can move around with ease, not needing to worry about your flash falling off or coming loose.
Congratulations! Now you can securely, quickly and easily use your flash unit off camera on a light stand!
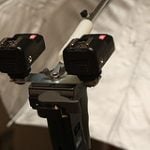
This is what it looks like

And this is what it looked like till you made this fabulous mod (just for compare sake).

A few additions I made to this design include:
Adding some non slip rubber padding to the aluminum bar (to protect the flash from scratches, and the whole non slip thing)

Adding some small strips of foam to the inside of the Velcro, so that the system has some applied friction to further secure the flash.

Using loops of stiff elastic, instead of velcro this one actually works quite well, though isn’t quite as one-size-fits-all as this design.
If you have any comments or queries then please leave a comment!
Get Yourself a Strobe:

Udi Tirosh
Udi Tirosh is an entrepreneur, photography inventor, journalist, educator, and writer based in Israel. With over 25 years of experience in the photo-video industry, Udi has built and sold several photography-related brands. Udi has a double degree in mass media communications and computer science.


Join the Discussion
DIYP Comment Policy
Be nice, be on-topic, no personal information or flames.