


How to fix colour casts with neutral density long exposures
Oct 11, 2016
John Aldred
John Aldred is a photographer with over 25 years of experience in the portrait and commercial worlds. He is based in Scotland and has been an early adopter – and occasional beta tester – of almost every digital imaging technology in that time. As well as his creative visual work, John uses 3D printing, electronics and programming to create his own photography and filmmaking tools and consults for a number of brands across the industry.
Share:

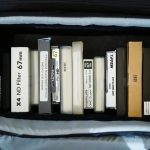
Anybody who’s ever used strong neutral density filters knows about colour casts. Whether it’s the B+W 10 Stop or the Lee Big Stopper, they’re just inevitable. Each filter presents a different colour cast. The same filter can also offer a different colour cast on different camera bodies. The typical way to deal with it is to play around with your white balance to try and correct for it.
Without a good reference, though, shifting the white balance to fix it in post can be a bit of a crap shoot. This video from Mike Browne talks through the problem, and shows a couple of different ways to make adjustments to fix colour cast issues. One is by setting your white balance in the camera, the other is by shooting a neutral reference that will let you do it in post.
It’s a pretty standard and straightforward technique that many photographers do for normal stills. But people often neglect to do this for long exposures, because if you only want one shot, it essentially doubles the time of your exposure. If you’re shooting a 5 minute exposure of a scene, you’ll also need a 5 minute exposure of your neutral grey card.
Personally, for important long exposures, I like to take things even further by photographing either the X-Rite ColorChecker Passport or the DataColor SpyderCHECKR instead of a just standard grey card.
White balancing is great, but in my experience, it only gets you so far. Sometimes, ND not only shifts, but also reduces the effectiveness of particular colours hitting your sensor. Using a solid colour reference like those I mentioned above just gives it that final level of accuracy with the least amount of hassle.
How do you fix colour casts in your long exposures? Do you just do it with basic white balance settings in Lightroom or Adobe Camera Raw? Do you go a little further and use color references like the ColorChecker or SpyderCHECKR? Do you use other techniques within Photoshop? Let us know in the comments.
[via ISO1200]

John Aldred
John Aldred is a photographer with over 25 years of experience in the portrait and commercial worlds. He is based in Scotland and has been an early adopter – and occasional beta tester – of almost every digital imaging technology in that time. As well as his creative visual work, John uses 3D printing, electronics and programming to create his own photography and filmmaking tools and consults for a number of brands across the industry.


Join the Discussion
DIYP Comment Policy
Be nice, be on-topic, no personal information or flames.
16 responses to “How to fix colour casts with neutral density long exposures”
no need to faff about with color cards every time if the light is consistent. (This is how I do it: https://t.co/jIp4kPgLcc)
no need to faff about with color cards every time if the light is consistent. (This is how I do it: https://t.co/jIp4kPgLcc)
no need to faff about with color cards every time if the light is consistent. (This is how I do it: https://t.co/jIp4kPgLcc)
no need to faff about with color cards every time if the light is consistent. (This is how I do it: https://t.co/jIp4kPgLcc)
no need to faff about with color cards every time if the light is consistent. (This is how I do it: https://t.co/jIp4kPgLcc)
no need to faff about with color cards every time if the light is consistent. (This is how I do it: https://t.co/jIp4kPgLcc)
no need to faff about with color cards every time if the light is consistent. (This is how I do it: https://t.co/jIp4kPgLcc)
no need to faff about with color cards every time if the light is consistent. (This is how I do it: https://t.co/jIp4kPgLcc)
no need to faff about with color cards every time if the light is consistent. (This is how I do it: https://t.co/jIp4kPgLcc)
no need to faff about with color cards every time if the light is consistent. (This is how I do it: https://t.co/jIp4kPgLcc)
no need to faff about with color cards every time if the light is consistent. (This is how I do it: https://t.co/jIp4kPgLcc)
no need to faff about with color cards every time if the light is consistent. (This is how I do it: https://t.co/jIp4kPgLcc)
no need to faff about with color cards every time if the light is consistent. (This is how I do it: https://t.co/jIp4kPgLcc)
no need to faff about with color cards every time if the light is consistent. (This is how I do it: https://t.co/jIp4kPgLcc)
no need to faff about with color cards every time if the light is consistent. (This is how I do it: https://t.co/jIp4kPgLcc)
Simple. I just fix mine by going monochrome. :-)