


An easy way to create luminosity masks for perfect landscape selections
Oct 10, 2017
John Aldred
John Aldred is a photographer with over 25 years of experience in the portrait and commercial worlds. He is based in Scotland and has been an early adopter – and occasional beta tester – of almost every digital imaging technology in that time. As well as his creative visual work, John uses 3D printing, electronics and programming to create his own photography and filmmaking tools and consults for a number of brands across the industry.
Share:

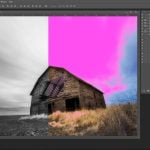
Luminosity masks are one of my favourite things about editing images in Photoshop. They offer so much more power than you can get in Lightroom or Adobe Camera Raw. Creating them, though, can often be a long winded affair. And a given set of actions to create them may not always work so well on any given image.
In this video, Photoshop wizard, Unmesh Dinda shows us a way to create luminosity masks very quickly and easily. It’s a method that also offers a lot more control over the “old way” of doing things, too. Unmesh does walk us through the old way, too, because it’s always good to know multiple methods. But it just goes to show how quickly the other process works.
For those unfamiliar with luminosity masks, they essentially allow you to make selections based on brightness. Or darkness. You can use it to select just the brightest highlights, the deepest shadows, or any range of brightness levels in between.
Then you can apply changes to just those areas. Perhaps you want to create more contrast in the highlights. Maybe you just want to bump the shadows up. Or you might like the shadows and highlights but want to add just a little midtone contrast. You can do any of these, and more, with ease using luminosity masks.
Traditionally, luminosity masks are used with landscape images. This is due to the wide brightness range between the bright sky and the dark ground. But, you can use these with anything. I’ll often use them with environmental portraits to be able to quickly select the shadows and highlights to tone them slightly differently.
It’s a very powerful technique once mastered, and the method Unmesh demonstrates in the video offers the greatest degree of control. Well worth a watch, and a practise.

John Aldred
John Aldred is a photographer with over 25 years of experience in the portrait and commercial worlds. He is based in Scotland and has been an early adopter – and occasional beta tester – of almost every digital imaging technology in that time. As well as his creative visual work, John uses 3D printing, electronics and programming to create his own photography and filmmaking tools and consults for a number of brands across the industry.


Join the Discussion
DIYP Comment Policy
Be nice, be on-topic, no personal information or flames.
2 responses to “An easy way to create luminosity masks for perfect landscape selections”
Dion
I really think you do a thorough job with your tutorials. I wish you would slow down though. I know I can keep rewinding the videos, but when you click buttons, and move your mouse around, even rewinding I cant tell what your doing. It’s frustrating. Sometimes you assume everybody is on expert mode, but not everyone is. “Easy, right?” comes out a lot with you, but its not if your a speed demon. Please consider slowing your mouse movement down.