


This DIY wooden rig makes your DSLR or mirrorless feel more like a cinema camera
Oct 26, 2016
John Aldred
John Aldred is a photographer with over 25 years of experience in the portrait and commercial worlds. He is based in Scotland and has been an early adopter – and occasional beta tester – of almost every digital imaging technology in that time. As well as his creative visual work, John uses 3D printing, electronics and programming to create his own photography and filmmaking tools and consults for a number of brands across the industry.
Share:

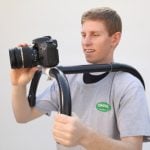
Since Nikon introduced video to DSLRs,the biggest complaint has been about the form factor of DSLRs. When Canon released the 5D Mark II, the demand for these cameras for video work surged. I’ve seen reports stating that as high as 40% of 5D Mark II sales were to video production companies. But, the ergonomics are just wrong. Today, there are many companies selling all kinds of cages and doohickies you can bolt onto your cameras to make them more useful.
But what if you could build your own? What if you could customise it to your own specific needs? That’s what Caleb Pike at DSLR Video Shooter wondered, and so he set out to build his own. He used about $240 worth of materials and components to build his rig, but you could probably build it for a lot less depending your needs and what bargains you find.
Using wood as a base for the frame will add a fair amount of weight, depending on which wood you use. To some this added weight will be a benefit, but for others, not so much. Weight adds stability, but it also makes it more difficult to handhold for longer periods. So, take this into account when choosing your materials.
Caleb designed the wooden box with a recess at one end to house a Sony battery. With a mounting plate to accept the battery and a couple of power output sockets, this lets him plug in devices like external monitors and lights. This is pretty much the only time throughout the project where Cabel needed to use a soldering iron. Three cold shoes are also mounted on the opposite side to receive items such as wireless microphone receivers.

A rail was added to the top of the unit to accept the top handle, and an Arca Swiss style tripod plate mounted to the bottom. For now, these were just screwed in to check placement. Then the hardware was removed to fill holes and for sanding.
Next the Saramonic SmartRig+ Preamp was added. Caleb used magnets to mount this to the wooden housing, which made things much more compact. It also makes it easier to connect & disconnect as needed in the field.

With the placement of each component finalised, the hardware was all removed and the box painted. After drying, the pieces were reattached, with several being permanently placed with epoxy resin.
A long adapter plate with dual Arca Swiss style sockets completes the unit, allowing both the camera and box to be attacked together.

Caleb did provide a list of the components. He spent around $240 in total (not including the camera, monitor etc.), but as I mentioned above, depending on your needs you can probably build it for much less.
- Sony Battery Plate
- Cold Shoe Mounts
- Top Handle Rail
- Top Handle
- 3x Short Quick Release Plates (and clamp)
- Saramonic SmartRig+ Preamp
- DC Jack Cables
- Magnets
- Long Quick Release Plate
A fun DIY project, but for $240, I’d sooner just go and buy a bunch of components from SmallRig. At least if you build your own, though, it will be 100% tailored to your needs.
What do you think? Are you thinking about building your own rig to turn your DSLR or mirrorless into a more usable form factor? Have you already made one? Will you just go with a manufactured solution? Or did you already give up and just buy a C100? Let us know in the comments.
[via No Film School]

John Aldred
John Aldred is a photographer with over 25 years of experience in the portrait and commercial worlds. He is based in Scotland and has been an early adopter – and occasional beta tester – of almost every digital imaging technology in that time. As well as his creative visual work, John uses 3D printing, electronics and programming to create his own photography and filmmaking tools and consults for a number of brands across the industry.


Join the Discussion
DIYP Comment Policy
Be nice, be on-topic, no personal information or flames.
2 responses to “This DIY wooden rig makes your DSLR or mirrorless feel more like a cinema camera”
Any 3D-printer’ed folks out there: roughly how many $$$ worth of material would it take to print out a rig?
Depends on if you give an order, or only have to pay the material. I guess something in that sice is printable for €30-€50 using 3dhubs.com