


Create an Epic DIY Battery Charging Station For Your Gear
Jul 20, 2015
Allen Mowery
Allen Mowery is a Nationally-published Commercial & Editorial Photographer with over 20 years of experience. He has shot for major brands as well small clients. When not shooting client work or chasing overgrown wildlife from his yard, he loves to capture the stories of the people and culture around him.
Share:

Charging batteries is an everyday part of the 21st-century photographer’s life. While we shared earlier today how to prevent a battery fire, this little bit of awesome may do just the opposite. (Okay, so, not really…)
The video production team at Vimeo put together a great tutorial on how they constructed the most epic battery charging station in recent history.
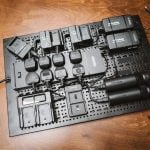
Starting with just a blank slab of fiberboard, they resourcefully built in chargers for every one of their gadgets. Since they already owned the power tools involved, their total cost was $113…which seems really high in my book.
Their Materials
- Fiberboard – $10
- Power Strips – $68
- Short Screws – $4
- Zip Ties – $9
- Velcro – $12
- Storage Hook – $5
- Sandpaper – $3
- Tape Measure – $2
TOTAL: $113
How I’d make it cheaper
This is more descriptive versus prescriptive. In other words, I can’t say that this is a sure-fire approach for all readers, but it would work for me.
Every year we go “dumpster-diving” at nearby Bucknell University as the students are packing up for the summer. No, we don’t actually dig through dumpsters, but the curbs outside off-campus housing become inundated with cast-offs from the students. A lot of it is legitimate crap, often the broken remains of recent parties. But, at a school where tuition alone costs $50,000 a year and we’ve met students with spending allowances from their parents to the tune of $60k PER SEMESTER, there’s a lot of good stuff that is abandoned in their haste to go party somewhere else.
Currently in my office I count two pieces of furniture, three lamps, a mic stand, two multi-drawer storage units, a large cork board, and two area rugs that were all sourced via this method. Seventy-five percent of our kitchen is comprised of dishes, glasses, utensils, and cookware picked up for free. We’ve also procured appliances, more rugs, lamps in every room of the house, clocks, radios, chairs, furniture, artwork, home decor, emergency supplies, designer clothing (often washed and neatly folded in bags and thrown on the curb), wireless routers, cell phones, countless office supplies, and more. Essentially, our home is an eclectic smorgasbord of free stuff…and that’s only picking up the good, unbroken gems and missing others after fellow “divers” snatched up even better finds.
But, I digress… One item that I’ve across frequently is power strips. I have plenty of them in use and stashed around the house. That $68 on Vimeo’s list?…reduced to $0.
The cost of their fiberboard?…also reduced to zero with scrap plywood picked up from our “trash runs.”

However, not everything I own is scavenged like a hungry rat on acid. We love attending local auctions and estate sales. My wife came home the other night with a stash of hand saws she picked up at an auction for $1…for all of them (with a crowbar thrown in free). Need power tools? I picked up an jigsaw (like that shown in their tutorial) and a power drill for $.50 each at another auction.
So, using their cost for everything else, I’d reduce this build to about $37, including power tools.
Moral of the Story
Every day we see all kinds of DIY ideas and inspiration, but, for those on a budget, it can be a little disheartening to think of the potential cost involved. However, with a little resourcefulness and ingenuity, you can keep your DIY budget to a minimum.
And, while you’re at it, check out my post where I detail creating a commercial image with dumpster-dive trash and cheap Walmart gear.
[via ISO 1200]

Allen Mowery
Allen Mowery is a Nationally-published Commercial & Editorial Photographer with over 20 years of experience. He has shot for major brands as well small clients. When not shooting client work or chasing overgrown wildlife from his yard, he loves to capture the stories of the people and culture around him.
Related Posts
 Here’s how I made my own custom DIY battery charging station
 This is how you build a USCSS Nostromo (Alien ’79) inspired battery charging station
 This DIY charging station runs from a single USB charger and only costs $35 to make
 Build yourself a charging station to save time and get organised with your batteries
Join the Discussion
DIYP Comment Policy
Be nice, be on-topic, no personal information or flames.
15 responses to “Create an Epic DIY Battery Charging Station For Your Gear”
Already have one in a portable metal case..
Aus toh ahh.. Pra nsa isang area nlng.. ;)
They relegated the larger, more expensive power strip to being nothing more than a place to plug the other two power strips into? Seems like a bit of a waste.
The entire thing is a waste. If attaching power strips to fiberboard is what passes for “DIY” these days, our standards have dropped considerably.
More like DI-WHY
So my options are a $115 build (that doesn’t even include chargers and assumes I have a bunch floating around) that will result in a hideous Frankensteinian monstrosity, or dumpster dive for a $37 build (that also assumes I already have chargers) that will require more work and result in an even MORE hideous object,
OR — and stay with me here, because this gets complicated …
Go to Amazon, buy two 16-battery chargers @ $35 ea, and be able to charge more batteries for much less money, with the added benefit of the added bells & whistles big chargers bring (readouts, usb ports, etc). Crazy, I know, but it might just work.
A reasonably equipped DIYer will already have the drill, bits, wood, screws, tie wrap and velcro. Maybe even the power strip too. If not, at least most of the supplies.
Next, DSLRs come with their own charger, so that’s already “floating around”. Those who recharge AA/AAAs already have that charger(s) too.
A moderate-quality AA/AAA charger handles each battery individually, not all at once like cheap chargers. I haven’t seen a quality 16-battery charger for $35. Not all of us rely on cheaper charging equipment.
For those with multiple backup DSLRs, each with it’s own battery charger, and tons of AA’s, this is a nice build to get all that mess off the floor and organize the miles of wires.
… stay with me here, this gets complicated …
if this build doesn’t work for you, don’t build it.
I bought a $32 16-bay charger on Amazon four years ago. Hasn’t given me a problem once and still works beautifully to this day. It’s small enough to take in hand-carry bags so I can charge my batteries when I travel for shoots.
I’m as big a DIY’er as the next guy (thanks mostly to my being perpetually broke and unable to afford new stuff), but even I know when it makes more sense to just buy something than try to build a more expensive, more complicated DIY version of it.
I’m really trying to stay with you here… If I understand correctly (from what you’ve described and the 20 seconds of Googling I just completed), you are referring to the 16-bay chargers on Amazon for charging AA, AAA, and occasionally 9V batteries (depending on model), correct?
I, for one, don’t use rechargeable AA or AAA batteries, so something like that would be totally worthless to me. However, a charging station with enough receptacles to plug in a dozen batteries for multiple dSLR bodies, video cameras, my cell phone, and perhaps some handheld radios – all held together in one concise location without wires floating all over the place – would be worth my financial and time investment.
Aside from two proprietary chargers, the board in the article is mostly AA (I count four 4-bays and one 8-bay) which could all be replaced by two 16-bay units. You’d get 50% more AA capacity while using about 50% less space.
If they were really gung-ho on keeping everything on a single board, the two 16s would take up less room and require fewer power strips than the five bulky chargers they have there currently. Though I honestly don’t get the point of having it all on a board, either. They say it’s to keep it clean and portable, but affixing the devices means that if you want to bring ONE charger with you, you have to bring the entire assembly. All this trouble, just to keep the chargers in one place? There are simpler, less semi-permanent ways to consolidate your chargers than by drilling them to a large board and spending $115 in the process.
I normally love the projects featured on DIYP (and have replicated a number of them), but this one just smacks of a solution looking for a problem.
If I were looking at this as an attempted solution for AA battery charging, I would agree with you 109.9872% (I’m contractually prohibited from agreeing with anyone the full 110%).
Which is what I was referring to. In this specific case, there are only two non-AA chargers. The unit as it’s built in the OP just seems like a waste of perfectly good materials.
If, however, you’re not a speedlight shooter (or similar AA junkie) and you need something more for wrangling non-AA proprietary battery systems, then yeah — consolidating them into a single board would definitely be handy (assuming they were consolidated in a more space-saving manner).
Well, then…it appears that we agree after all! If I were looking for a AA battery charging station, this would personally not be my choice.
What is missing is a fire extinguisher close to this charging station.
Thanks Allen for posting this one. Think I would prefer mine to be a little more secure to the wall, but otherwise an interesting build idea.
Yeah, I’m not too certain about handing some that (I’m assuming) heavy from the wall. But, sitting in a corner leaning up against the wall, ready to be easily grabbed and taken to an anti-environmental party, it might do well.