


Build your own 3D printed DIY LED ringlight for your smartphone
Feb 16, 2017
John Aldred
John Aldred is a photographer with over 25 years of experience in the portrait and commercial worlds. He is based in Scotland and has been an early adopter – and occasional beta tester – of almost every digital imaging technology in that time. As well as his creative visual work, John uses 3D printing, electronics and programming to create his own photography and filmmaking tools and consults for a number of brands across the industry.
Share:
![]()
The problem with mobile phones is that if you need lights, you’ve usually got two options. The first is to simply deal with the underpowered, far-too-close-to-the-lens built in LED. Unless you’re using in the front camera, in which case that’s usually not an option. The second is to lug around all the usual LED lighting gear you’d use with regular cameras. In which case, you probably might as well just use a regular camera.
The folks over at Adafruit, though, have come up with a great project to help solve this. A 3D printed smartphone case with a built in LED ringlight. Not only does it wrap the light around your lens instead of being right next to it, but it also offers a fair bit more power. That it’s controlled by an Arduino also means that you can reconfigure the lights to give some neat effects.
Like another recent Adafruit project we showed you, the whole thing is powered by the Adafruit Trinket – a teeny tiny Arduino clone. It’s portable and battery powered, or you can just hook it up to the wall using a regular Micro USB adapter if you’re shooting something a little longer.
This is the complete parts list.
- 4x NeoPixel 1/4 60 Ring – Natural White
- 2x NeoPixel Stick – 8 x 5050 RGBW LEDs – Natural White
- Flex Perma-Proto
- Adafruit Trinket (3V or 5V)
- Adafruit Trinket Lipo Backpack
- Slide Switch
- 3/8″ to 1/4-20 Tripod Adapter
- 2500mAh Lipo Battery
- Swivel-Head Pan Tilt Tripod Adapter

They suggest using the RGBW LEDs as the regular RGB LEDs tend to have a slightly magenta cast to them on skintones. The combined RGB just doesn’t produce a good natural white light. The RGBW LEDs get around this by having a separate, fourth, LED that is pure daylight white. So, the colours are much more natural.
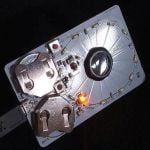
The basic construction is relatively simple and straightforward. After firing up your 3D printer and leaving it to do its job, soldering the LED strips together is the next job. Using four 1/4 60 ring strips and a pair of straight strips, you can achieve an oval shape which wraps around your phone nicely. You’ll want to make sure everything’s oriented correctly so the data flows in the right direction.
![]()
With these connected, you’ll probably want to wait until your parts have finished 3D printing. For Adafruit, this took around 5 hours in total for four components. There’s the frame which houses the LEDs and fits around your phone, a front panel to help diffuse the LED lights, a piece to mount the electronics to and a battery holder.

Small machine screws secure the LEDs to the base frame. Machine screws also attach the Trinket and the Lipo charging circuit to the electronics panel. But it’s a good idea to dry fit everything first to measure out your wires ready for soldering. The electronics holder just clips onto the main frame. This is a great design as it helps to ensure that it keeps a nice snug fit around your phone.
The great thing about having an Arduino control something like this is that you can programme it to give you all kinds of different lighting patterns. You can add a power level button to turn on and off alternating lights depending on the power you need. Or even a dial, that dims the power to all of them. You can power it asymmetrically so that one side isn’t quite as bright as the other to provide a little light direction and introduce some shadow. Or, you can make creative effects with white or coloured lights spinning around the perimeter.
The plans for the 3D printer can be downloaded here. And while it’s designed for the iPhone 6/6S/7 Plus models, it can be easily adapted to fit your own phone.
A very neat project with some interesting creative potential, as well as practical. It’s ideal for vloggers who use their phone’s front camera.
You can see the full build log, code and the rest of the details over on the Adafruit website.

John Aldred
John Aldred is a photographer with over 25 years of experience in the portrait and commercial worlds. He is based in Scotland and has been an early adopter – and occasional beta tester – of almost every digital imaging technology in that time. As well as his creative visual work, John uses 3D printing, electronics and programming to create his own photography and filmmaking tools and consults for a number of brands across the industry.


Join the Discussion
DIYP Comment Policy
Be nice, be on-topic, no personal information or flames.
5 responses to “Build your own 3D printed DIY LED ringlight for your smartphone”
“The problem with mobile phones is that if you need lights”……no….The problem with mobile phones is that they are MOBILE PHONES not cameras.
If you are shooting something that requires a ring light, you require a camera not a cell phone.
Would a craftsman use a hammer as a screwdriver on fine woodwork? No.
So why use a cellphone on an image that is serious enough to require a ring light?
Use a cell phone for snapshots.
….and yes, there are some VERY talented cell phone photographers out there, but they are very very few.
I love people who start writing a comment, and then contradict their own point by the end of it. :)
There is no contradiction, there are very very few good cell phone photographers.
That was added because there is always some knee jerk idiot like yourself that is going to say…”there are good cell phone photographers out there”
Yes, there are but they are very few and far between and they certainly aren’t making DIY ring lights.
Possibly you need to get a brain?
When you added it, you did contradict yourself, because the fact that ANYBODY can get a decent image out of a phone proves that it’s not the phone that’s the problem.
Possibly you need to find things more positive in your life, instead of looking down at others who don’t share the same beliefs as yourself.
I dunno…. maybe experimentation in a different medium.
Photographers need to stop taking themselves so seriously. It’s an art and as with ANY art, there are different tools to achieve the look that they are after. Not everyone needs a RED camera rig to experiment.
Maybe for a novice videographer/photographer this would be a good place to start or it may just be a hobby or something to tinker with. Do lessons on composition and storytelling require a full blown rig? I think not….
What an elitist attitude…. SHM