


How to quickly remove the white outline around your model in Photoshop
Feb 27, 2017
Dunja Đuđić
Dunja Djudjic is a multi-talented artist based in Novi Sad, Serbia. With 15 years of experience as a photographer, she specializes in capturing the beauty of nature, travel, concerts, and fine art. In addition to her photography, Dunja also expresses her creativity through writing, embroidery, and jewelry making.
Share:

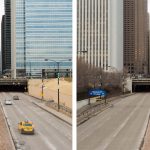
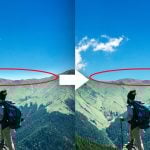
If you shoot models on location against a blue sky, you may wish to enhance the sky brightness and tones. If you do it by darkening the sky using Luminosity, it can result in the appearance of a white outline around your model. Emma Grigoryan from Fstoppers shared with us a simple way to get rid of it. This Photoshop tutorial that will show you how to remove this white outline quickly and easily, in only a few steps.
First, open the image with this issue and zoom to 200-300% for more accurate results. Select the Eye Dropper Tool and click on the white outline around the subject. It’s recommended that your Average Range is 5 x 5 px, as the outline is not a solid color.
Next, go to Image > Adjustments > Replace color. The chosen color will be in your Color Box, but you can change it anytime during the process for better results.

Then, some you need to do some improvisation. Not every image is the same, so here there are no universal settings. Play around with the box. Move the Fuzziness slider slowly to the right, until you see the selected color outline (it will appear white in the Fuzziness box).

As the selected color is not uniform all around the subject, you can bring the Saturation slider to the left and desaturate the color range you selected. You can also play with the Lightness box, and see what gives best results.
The problem that may arise is that you have a similar color somewhere in the image, and it gets replaced as well. If this can’t be resolved with moving the Fuzziness slider, there is another solution. You can use a Layer Mask to control the area where you want to apply the change.
There are several ways of resolving this issue, but this is one of the simplest ones we’ve found, yet it’s pretty effective. What is your way of getting rid of the fringe around the subject?
[via Fstoppers]

Dunja Đuđić
Dunja Djudjic is a multi-talented artist based in Novi Sad, Serbia. With 15 years of experience as a photographer, she specializes in capturing the beauty of nature, travel, concerts, and fine art. In addition to her photography, Dunja also expresses her creativity through writing, embroidery, and jewelry making.


Join the Discussion
DIYP Comment Policy
Be nice, be on-topic, no personal information or flames.
5 responses to “How to quickly remove the white outline around your model in Photoshop”
I’ll tell you an even easier way, if the model is already on a separate layer (and if she’s not, just make a selection around the model and click on Layer>New Layer From Cut) control-click the model layer with the magic wand tool to make it a selection, go to Select>Modify>Contract and contract selection by 1 or 2 pixels. Hit okay then Select>Inverse. Hit the delete key. White outline on your selection is gone, all in less than 30 seconds. If outline is more than 2 pixels thick, simply repeat the steps but with a higher pixel number.
What is that, Photoshop 6???
0.6*
Layer>Matting>Defringe 1 pixel. Then use a mask for any leftover unwanted white outline.
This literally just happened to me today and then I randomly came across this article later. What I did was zoom in really close in PS and just use the brush tool and select the color right next to the halo and paint over it carefully. Which is fun for me but probably would drive other people crazy. I’ll have to try this method next time though! Thanks!