


Portrait Lighting Cheat Sheet Card
Jun 18, 2008
Udi Tirosh
Udi Tirosh is an entrepreneur, photography inventor, journalist, educator, and writer based in Israel. With over 25 years of experience in the photo-video industry, Udi has built and sold several photography-related brands. Udi has a double degree in mass media communications and computer science.
Share:
 Setting up lighting for a portrait can be quite a complex task. If you, like me, are using small strobes which have mo modeling light it is hard to predict what will be the outcome of each lighting array.
There are however some basic lighting schemes, kind of a starting ground for new portraits. Of course, once you lay out the initial lighting you can change it, move it around and use modifiers to soften or restrict the light.
Wouldn’t it be nice, though if you have a magic card that will show you what will be the final lighting of almost every lighting scheme? I think it can be pretty darn cool.
So, after reading Light, Science and Magic, watching the lighting tutorials from pro photo life and getting my share of the Strobist, I decided to create the Portrait Lighting Cheat Sheet.

(Click here for a bigger size, and here for a super size)
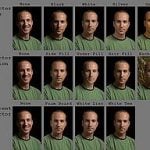
The idea is simple: Take a great model. Now take pictures of almost every possible lighting on the model and keep them on file. Now, When ever you want to set up some lighting, you can refer to the cheat sheet, and decide where to place the lights.
What’s in The Card?
The cheat sheet shows three possible angles for setting the flash: Angling the flash down 45 degrees toward the subject; having the light on the same level as the subject and angling the flash 45 degrees up to light the subject from below. Each height position is placed on a different line.
For each angle I took 8 pictures, in 45 degrees interval, so I have a full circle of lights covered. The leftmost image is frontal, then moving counter clockwise, there are seven more pictures each moving 45 degrees.
Using the Cheat Sheet Card
When ever you want to create a new lighting setup, you can refer to the card to see how each light will affect the overall subject lighting. For example, Say you want to decide where to place the key light.
Since every person is unique, lights will have different effect of different people. It depends on facial structure, nose, hair, cheeks and more. So use the card as a general reference, you will probably have to adjust a bit for every individual model.
Single Light: You can see the effect of placing the key light on your model. For example, placing the flash “looking down” at a 45 degrees angle, placed 45 degrees to the left of subject will create Rembrandt lighting. Placing the light in the same level as the model, 90 degrees to the left will create edge lighting.
Multiple Lights: You can use the Cheat sheet card to estimate what kind of light each new light will bring into the picture. The card can tell you how each light will add light to the subject, emphasizing cheeks, noses and chins.
You will probably want to set each light to a different power level, but you can use the card to get an idea of the area of the face that will be lit as well as the direction of light.
Creating the Card
Yossi (yup, this is the guy on the card) and I decided to take on a photographic exercise to better understand how positioning the light on different locations will effect portraiture.
We used black muslin to remove any background distractions, and placed a chair in the middle of the room. The back of the chair was marked on the floor. Now we make a “circle” around the chair marking each 45 degree arch on this circle. This is where we will place the light stand.

I used a Bogen 001b light stand to mount a Canon 580Ex II flash with a cactus slave and started taking pictures. The first cycle was of flash tilted 45 degrees down. The flash was set on 1/8 – 2/3 power at 85mm.
The next cycle was taken at face level. We had to adjust the power to 1/16. This was done because now the flash is closer to the subject.
Lastly we took a last round with the flash tilted up 45 degrees.
Equipment used to create the card: Bogen 001b light stand, Canon 580Ex, Cactus Slave, My good old D70, Some old black muslin.
The Lunar Eclipse
This is just a fun thing with all the images.
Sharing the Cheat Sheet
I placed the Portrait Lighting Cheat Sheet Card under CC license. Feel free to download it, print it and spread it around.
Have any idea on how else you can use this card? Hit me in the comments.

Udi Tirosh
Udi Tirosh is an entrepreneur, photography inventor, journalist, educator, and writer based in Israel. With over 25 years of experience in the photo-video industry, Udi has built and sold several photography-related brands. Udi has a double degree in mass media communications and computer science.


Join the Discussion
DIYP Comment Policy
Be nice, be on-topic, no personal information or flames.
One response to “Portrait Lighting Cheat Sheet Card”
This cheat sheet is really useful, I have sent your link to several students and it really help make lighting more understandable.