


How To Build A Kick Ass 4 Feet DIY Ring Light
Aug 16, 2012
Udi Tirosh
Udi Tirosh is an entrepreneur, photography inventor, journalist, educator, and writer based in Israel. With over 25 years of experience in the photo-video industry, Udi has built and sold several photography-related brands. Udi has a double degree in mass media communications and computer science.
Share:
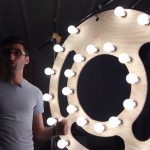
Ring lights have a very specific light signature. Mostly it is connected with fashion photography as it gives out a very flattering light. The light is coming from around the lens, but since it is symmetrical it seems as if the light is coming right from the center of the lens.

Small strobe powered ring lights can be used for stills but if you want something really impressive, you would go with a huge wooden bulb-driven ring light. While those are a bit harder to transport, they give out a spectacular light that can also be used for video.
(Oh, and make sure to check out those crazy catch lights at the sample pictures at the end of the post!)
What You’ll Need
- Plywood – 4feet x 8 feet
- 12 bulbs
- wire
- bulb fixtures
- spray paint
- 1×8 wood (optional)
Tools:
- Jigsaw
- ruler
- Drill with Cup
- TIME (lots of it, plan for a weekend project)
Prepping The Wood
Make sure you have a big enough car to fit your plywood, or else you would be driving like this

Cut the 4×8 plywood in half
find the center of your 4×4 plywood, measure 2 feet length and 2 feet width and find the center


I marked it with a screw and used scrap wood to make a circle around the wood

Make a big circle and a smaller one (6 inch difference)
Make twelve lines 30 degree apart from the center of the circle to mark the fixture for your bulbs


Now It’s Cutting Time!
I used a jigsaw to cut the holes


I used a drill with a cup to cut the 12 holes for the bulb fixtures


Spray Paint your wood after this (This was where I went wrong, because I installed the fixtures first before I sprayed it)

If you do what I did and installed the fixture first, no problem, What I did was cut a Gatorade bottle and used it to cover the fixtures so that I can easily spray on the wood without spraying on the fixtures

If you didn’t do it wrong like I did and sprayed it first, now it’s time to do the wiring. It was easier to put a washer in every screw so that the wire would lock easily. The wiring is fairly simple, but we are not going to show it here. If you don’t know how to wire this, you probably should not, it is dangerous. Swap a portrait session for some assistance with your local electrician.


Check wiring and your done!

Optional
I made a 2nd ring so that my wiring would be covered. I used 1inch x 1inch wood to bolt the two pieces of rings together

I also put a 1×4 wood in the left and right part of my ringlight where I can place my 2 lightstands to hold my ringlight. (it is that starry ring flash you see in the middle of the monster)

Last I put a switch in my ringlight so it’s easier to turn off and on.

And Finally, Some Samples Photographs


About The Author
 Laya Gerlock is a portrait photographer based in the Philippines. You can follow his work on his web page, follow him on Flickr and if you happen to come by Cubao Quezon, (To Manila, Philippines) he gives a great workshop!

Udi Tirosh
Udi Tirosh is an entrepreneur, photography inventor, journalist, educator, and writer based in Israel. With over 25 years of experience in the photo-video industry, Udi has built and sold several photography-related brands. Udi has a double degree in mass media communications and computer science.


Join the Discussion
DIYP Comment Policy
Be nice, be on-topic, no personal information or flames.
8 responses to “How To Build A Kick Ass 4 Feet DIY Ring Light”
How many feet of wiring am I going to need? Also, what type of wire should I be using?
I built this and it vastly exceeded my expectations. Here’s what came out of it: http://www.jimstonephotography.com/lightring/
Just realized this link was broken. it’s fixed now.
And I suggest a dimmer. You don’t want it to just be all on or all off.
I would love to see a hinge on the back so I could fold in half. GREAT JOB!!! I looks awesome
wow!! huge but amazing job! :D
I built a similar sized rig with 20 3W daylight LED bulbs. Can’t wait to test them out. The entire thing runs cool at only 60W, but at 240 lumens each, it’s noontime bright.
sound sweet, would love it if you made a tutorial for the blog.