Cheap DIY (Homemade) Muslin Photography Background

diy muslin background (aka studio backdrop)Intro - Muslin Photography Background (AKA backdrop)
This project had the website diyphotography.net in mind and strives to help develop it into a vibrant online community. This backdrop is similar to those sold online for a couple hundred dollars! But guess what? for around 20 bucks and about an hours time I've made a studio backdrop myself, and now I'll show YOU how you can make a backdrop yourself!  (And complete the DIY experiance by adding a DIY backdrop stand)

cheap diy muslin background 01

Get the parts for your studio backdrop

1. 9X9 feet of muslin fabric - this will be the actual backdrop.
2. RIT dye and salt - pick the color you want for your studio backdrop
3. 18 Gallon Plastic "tote"
4. Twine to tie up fabric
5. Pot to boil water

Step 1 - Wash the Fabric and prepare dye mix

Pre wash by hand the muslin fabric. I did this in the shower with a little detergent. Basically, just swish it around in soapy water and rinse out until its not bubbly.

cheap diy muslin background 02

Step 2 - Prepare the dye

The box of RIT has all the instructions. The hotter the water the better this dye will absorb. Dissolve RIT and salt in pot with water. - Remember if you get this mix right, you will have better colors on your studio backdrop when you cut your cords .

cheap diy muslin background 03

Step 3 - Bunch up fabric - this is where it happens!

This is where you get to be creative! the pattern you make in this step is what will influence the overall look of your backdrop. What you must do is take that damp, clean piece of fabric, lay it on a large waterproof surface. flat, and crunch handfuls of the material towards the center. Then, once its in a ball, take cheap twine (got mine at the dollar store) and randomly wrap around the fabric ball. don't get too crazy at this point with the tightness of the string. you're trying to keep your design together, not boucle it up or make the ball too dense to absorb the dye.

cheap diy muslin background 04a
cheap diy muslin background 04b
cheap diy muslin background 04c

Step 4 - DyeBath

Fill your 18 gallon plastic bin a little under half-way with as hot of water as you can get out of the tap and make sure you're doing this in a place that will survive getting dye spatters around. No matter how careful you are, there will be some contamination of the surrounding area. Carefully pour in your dye mixture. I actually put some more water in the mix then the instructions so that the hot boiling water would bring up the temp of the bath overall. REMEMBER with RIT, hotter is better (within reason). Keep the fabric down in the bath with a stick. I used a piece of PCV pipe. The max absorption time seems to be a half hour according to the RIT box. I flipped the fabric ball, which was relatively flat on the opposing sides, every 5 min or so, for a half hour.

cheap diy muslin background 05a
cheap diy muslin background 05b

Step 5 - Cut the Cord

Whatever color it is on the outside is the color the darkest part will be. This is the fun part, when you'll un-do all the ties and see how it ended up. If you think the parts restricted from dye are "too white", after untying dunk the whole thing in the dye again for a min to over dye the fabric. Keep in mind, if you over dye, the variations in the color will not be as obvious. Dry the backdrop flat, you'll notice it will be a couple shades lighter when its dry. You don't really have to rinse it out unless you want, since it will just be hanging up anyway, and probably wouldn't need to be washed. You'll also notice this nice crumpled texture that makes it a great backdrop! This project had photography in mind, but this could be used as decoration in a room as well!

cheap diy muslin background 06a
cheap diy muslin background 06b

Step 6 - USE IT !!

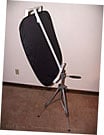
After the backdrop was dry I took 4 binder clips and clamped them evenly across the top of the fabric. I'm going to put little white hook-screws in the wall to hook through the holes in the binder clips to act as a backdrop mount, but for the photo below I just used clear package tape to hang by the clips (be careful when removing tape, the paint may come with it!). If you want a more elegant solution you can use this non intrusive backdrop holder. This is something you can do *really* easy takedowns and setups with, and you can use any wall in your house and there is no need for a "blank wall". This is in front of my closet. When its not up, leave it balled up in a corner somewhere so you don't loose all the cool wrinkly texture. I hope you enjoyed reading this and it helps you out. Now make your own!

cheap diy muslin background 07

This article was contributed by Jay Bedingfield, and was also posted on instructables.com to help make people aware of this site.

Did you make one of these backdrops? post a comment and show off!

- there is also a new instructables.com group for this site: http://www.instructables.com/group/diyphotographydotnet/

Want to make sure you get more great articles? Register to the RSS feed or the newsletter.

More Cool Backdrop Thingys:
- Really Cheap Homemade DIY Studio - No Lighting Needed
- Greenscreens and Backdrop Stands
- Home Made Cheap DIY Backdrop Stand
- Super Easy Hardware Store Light-Backdrop Stand

make money by selling your photos

RIT Dye:

Comments

Photo Backdrop

Thank you Thank you! This came at a time when I was researching a bacdrop. It is a quick and easy looking method which I will be trying this weekend.
Thanks so much.

Muslin backdrops

Hey, Thanks for posting all the great info about DIY Muslins.

I'm just beginning to build a small portrait studio including some backdrops.
As I try to do this on a shoestring budget, you can only cut corners so much.
I started with 1 strobe, 1 umbrella, 1 reflector and today bought a backdrop stand.

Then "YIKES" I looked at the costs of new Muslin photo backdrops........whew!!
I found natural muslin cloth for $3.00 CDN per meter. That's great info.

Thanks

Dave/Photobiff
www.photobiff.smugmug.com

muslin

Hi,

Can you tell me where you found the muslin cloth for $3CDN per meter? I'm opening a studio and the help would be greatly appreciated. I too, am doing it on a shoestring budget.

Thanks,
Trish

DIY Photo back drops

I am also starting a home photography business and this was the best thing I have found. I did a dark chocolate color with the RIT dye and I did get the material from JoAnn Fabrics for 40%, total bill was $19 for 108" x 6yds length! I can't wait to use it. One thing I did do, since I wanted a dark color, I used 2 bottles of dye for the extra length. This just saved me a lot of money!!! - Thanks a million :-)

JoAnn's business discount

If you have a business license be sure to take it in to your local JoAnn store. They'll copy it and issue you a discount card for 15% off your total purchase anytime, without a coupon. Great place to stock up on props. :)

Also of note (I don't work

Also of note (I don't work for them, but I like them!) is Rose Brand (www.rosebrand.com) who sells super-wide muslin.

If you check out: http://www.rosebrand.com/A_Com/showprod.cfm?&DID=6&CATID=1&ObjectGroup_ID=3 it lists the NFR muslins, up to 39 FEET wide. NFR = Non-fire retardant, if you're dying it you definately don't want the FR salts.

-- BLP

Fabric

Where is a good place to find big enough muslin fabric?

I bought wide muslin at

I bought wide muslin at JoAnn Fabrics. They have a good selection of widths. Plus, you can get 40% off coupons and then its super cheap!!!

how much

how much Muslin material do i need to by. im doing my senior pictures and i wanted a really nice muslin background but i dont really quite know how much to buy. how many yards. i went onto http://www.rosebrand.com/A_Com/showprod.cfm?&DID=6&CATID=1&ObjectGroup_ID=3
but i didnt know how much to buy. can you tell me appro. how many yards i need!?!
thanks for the help

what do you do with the bucket of dye?

I dyed a muslin last night and used an 18 gal bucket for the dyebath. Now I have a beautiful,unique, rose colored background and about 12 gallons of rose colored dye. what do I do with the leftovers?

RE: what do you do with the bucket of dye?

One suggestion is do it again and sell the others on ebay, but you should send me one for the suggestion (wink, wink!). Have a good one!

How did you get the rose color die?

How did you get the unique rose color die? Is is a mixture of two colors? Or does Rit come in rose?

RIT comes in Rose. I bought

RIT comes in Rose. I bought rose and dark brown last night. I was able to buy the dark brown in the liquid form but had to buy the Rose in the powder form. Hope this helps.

Thanks... this is great

Thank You very much. This is the cheapest way of making a backdrop. Thanks again

You can also sponge paint on

You can also sponge paint on the muslin after it is dry for an even more dramatic appearance.

what type of paint do you

what type of paint do you use to paint it with?

painting on muslin

you would use dye to paint im sure.

If you want it machine washable, it would have to be something of that sort.

am i correct?

muslin

What weight of muslin is the best choice? Light, medium or heavy?

muslin

Does anyone know how to wash a black muslin background?

Wash

Put simply, DON'T wash it. Hand rinse the dye out after you soak it in the die, untill it runs relativly clear. Keep in mind the color would fade with washing, and you dont want that right?

You can wash it just a tie

You can wash it just a tie dyed t-shirt. You might want to avoid washing other items with it the first time. After that, it's like any other bed sheet, etc... You can use warm water, but avoid hot.

Robert

Muslin

I found with the pearl gray dye from RIT, 2 boxes probably would have worked better, since I was dying non-bleached muslin (90"x4 yds). Even so, I did this with the Navy blue dye on bleached muslin and I LOVE how it turned out.

I also prewashed and bleached my muslin in the washing machine rather than by hand, and the frayed edges work fine on the bg.

Thanks for the tip. :)

Choosing a color for the background

What is the best background color to use for most portrait shots?

Depending on what you want,

Depending on what you want, I would suggest something that is close to but not the same color/contrast as what you are photographing. For starters white and a dark color should do. If you are using auto light metering and you are photographing something light against a dark background (or the opposite) you might get highlights blown out or too dark. Manual mode or spot metering is best if you have high contrast differences. With similar background contrast then it will be easier for the camera's computer to get things right. Just be careful not to get them the same color/contrast or it will be hard to tell the subject from the background.

wonderful idea!!

This idea was so great, i've been looking everywhere for a backdrop, and i simply could not afford it! i'm only doing pics of my kids for scrapbooking, and cards, and i was not willing to pay what others are asking!!

Works great!

I've made a couple of backdrops with these instructions. My favorite so far is the one I made with two bottles (not the boxes) of the Wine color Rit dye. The color came out really rich looking.

Thanks for the tips! And keep them coming!

Fantastic!

Great ideas there, hoping I can find that size fabric here in the UK. I'm sure with a bit of hunting round I will.

Thanks!

muslin

Where do you find Muslin material wide enough for a backdrop? I have only found it at local fabric stores at 45" to 55" wide. I can sew it together but the seams will show. I have used canvas (painters drop cloth) in the past but they are heavy and time consuming.

Wide fabric

There are links up above that give information on where to find really wide muslin. I usually go to Joann's where I can find 108" or 120" mulsin in either white or unbleached. I also am on their mailing list so I regularly get coupons for 40-50% off so it brings the cost of the fabric down to about 25-30 dollars depending on how many yards I get.

Hope that helps!

Painting on muslin

I was wanting to know if you know what kinds of paints to use to paint a scenery on muslin or canvas that will be permanent and not chip pr flake off? I want to make my own senic back drops and am not sure which kinds of paints to use or what I should use to paint on the fabrics. Can you please help?

Painting on muslin

Handy product lets you make fabric paint out of regular acrylic paint.

Golden GAC Acrylic Polymer Mediums

GAC 900:
Acrylic Polymer for Clothing Artists — Blend with acrylic colors to produce fabric paints. When heat-set properly, it offers a very soft hand and laundering stability.

See it at Dick Blick's or numerous other artist websites.

(No affiliation with product or website)

Painting on Muslin

I've never used this Golden Medium. Are there instructions on how to heat set it. I know there are heat-set oils out there, but did not realize it was necessary with acrylics. Any advice?

Thanks,
Melissa

Re: Painting on Muslin

I have found that the best paint to use is Rosco Idding Super Saturated paints. They're a specialty paint that is designed to be diluted with water (up to 1:10). The problem with this kind of paint is that it's rather expensive, between $27.50 and $30 per quart (depending on the color). If you plan on doing a lot of backdrops, the cost isn't so bad but buying paint just for one, its a rather spendy. If you get the just primary colors (Red, Blue, Yellow) you blend them to make others for a full range. (That's what I did.)

If you not willing to or can't drop $90 on paint, you can get your regular household flat latex paint, you can usually find mis-mixed quarts for cheap, and dilute them with water but no more than a 1:4 ratio. The darker color you start with the better as you can always add a little white to brigthen it up.

Some people like to pretreat and seal thier muslins after their done to keep them looking nice and lasting. If you want to, you the same technique thats used for Canvas.

Hope this helps!

How to seal...?

How to pretreat and seal the muslins and Canvas, what do i use?

You can mix house paint with

You can mix house paint with fabric softener. A little trick I learned from my theatre days...

What type of house paint?

What type of house paint? Oil based? Latex? Or will it work with any and what kind of ratio?

Finding Wide Muslin: Searches

If you're trying to find the wide muslin, search for Quilt backing or fabric. The quilting folks use the wide cloth on the insides of their quilts--the widths we're after correspond to queen and king sized quilts.

On ebay, I found a store called "Fabrics From the Heart", selling the wide quilt fabrics.

Whoah...that's some harsh

Whoah...that's some harsh shadows on that backdrop.

wideseamless muslin and canvas

I always buy my muslin at chicago canvas and supply. They have wide widths, so the backdrops are seamless. They usually ship within 24 hours and their prices are great. Their number is (773) 478-5700, website: chicagocanvas.com. Hope this helps.

Hanging Muslin

Great suggestions above. I thought some may be interested in a relatively inexpensive curtain track kit that I used to hang a muslin backdrop. Far less than the typical commercial set-ups, and cheap DIY is the theme!  link 

you may have to cut and past the link since it is so long

who sells this?

the link listed is no longer available please post name of retailer or name of track!

curtain track stores

Hi Shsta,
try this link at froogle. you can also usuaaly find them at home depot or similar stores.
This is what I got from Ikea.
- udi

How much?

Okay, if we're talking about the RIT dye here; How much do you recommend getting it? This is a wonderful idea and I'm already about to get my muslins. Let's say, the liquid RIT? How much do I need for 120" x 2 yards, for example?
http://www.ritdye.com/Liquids.28.51.5.6.lasso

Two Big Ones

I just finished two of them - both 10' x 18' (12 yards of muslin!). with the 40% off coupon from today's paper, the material was about $50. I spent another $20 on dye.

The instructions worked great - I just had to think in larger quantities and bigger sizes.

I did one of them in brown tones (mixed myself using dark brown and a little black dye) and the other in gray tones (one box of black).

Took me about three or four hours total - but I'd do it again!

I was looking for a cheap

I was looking for a cheap green screen for some home movies. Is there a way to dye it where the whole thing is the same uniform color ?

I would think...

I would think that if you followed the basic instructions on the bottle of dye, that it would come out in all one solid color. If it's a big piece of fabric, you'll want to follow the directions for using in the washing machine. You will probably want to use at least two bottles of dye to get a really saturated color to it. Or just start with one bottle and if it's too light, dye it again with another bottle until you get the color you want.

Thanks. Would a green vynel

Thanks. Would a green vynel tarp work as well ? I saw a couple on ebay real cheap or would any possible light reflecting from a tarp mess up the gren screen effect ?

I did it and it was cheap

I did it and it was cheap and lots of fun... Wear gloves... my hands are stained blue... they look like Zonbie hands...

Photo Sharing and Video Hosting at Photobucket

Wow! That looks great!

Wow!
That looks great!

Where did you get the muslin though? I can't seem to find a decent price. Def not $20 for a 9x9.

Thanks!

different shades

how would you suggest dying the fabric if I want to do two different shades of dye instead of just one?

different shades

To do different shades start with your darker shade first. Bunch your fabric into tighter bundles. Also Tie it Tighter with the Twine. Dye it, and let it dry. Then Do a looser bunching, and don't tie it as tight for the lighter color. Remember that you will get some blended shades in between the colors, so make sure that you use complementary tones. I have done this with T-Shirts in the past (used blues and greens) and it turned out pretty good.

You may want to do some sample dying using t-shirts or pieces of fabric so you don't waste your large piece on a mistake.

DIY Cheap Background

Jay, I have to say you are the man. I am currently working on making a Member Photo Directory for the church I am attending. I volunteered my time, computer and equipment for this venture so it would not cost the church anything besides printing them. In short, I am trying to do this on the cheap to start it up for the first year. This method worked like a charm. Would love to include a picture in this, but not sure how. It only cost me 14 USD for the fabric and 6 for the dye, and the backdrop looks like one I would purchase from a store. I followed the instructions to the letter, and then over dyed it to gray out the white areas. Used bleached Muslin and 2 bottles of black dye. Thanks for the instructions with the pictures. It has helped out my project immensely. Thanks again. Fred.

diy backdrop

Hi Fred,
Where did you get the cheap $14 fabric?

Great Results!

Thanks for the great DIY! I started the project at 8:30PM. It took a while but then I was able to take it to visit my family and use it at a family reunion that weekend. The pictures look really great and I don't even have good lighting yet. Adding a backdrop makes them look 'professional' or so say the persons at Walgreens who made my brother in law sign a release saying they weren't professional prints. :-) The muslin is so light I was able to tape it up with duct tape at the family reunion. Everyone lined up to be photographed in front of it, lots of big families. Very Very cool, and cheap. My wife showed me how to hem the sides. That added another 15 minutes to the project.

I'm going to try this again with multiple colors and also maybe different dying techniques. I'm thinking of upcoming holidays and how to dye large patterns into the muslin.

Again, thanks for the great ideas! Next I'll make myself some diy lighting... Cheers!

help

How does one post a picture to accompany comment? thsnks

posting an image

you can use the img tag in the following way:

<img src="http://imagelocation.com/path/to/myimage.jpg"/>

you can do this with your image on flickr for example.

Backdrops

I just wanted to say thank you. I have been wanting to start my own photography business for about 2 years now. It just cost so much for the backgrounds and equipment. I came across your webpage and I fiqured why not try it. I didnt have anything to lose. A neighbor gave me some nice material to use and said good luck. Well I dyed it today and it looks so good that I am going tomorrow to get some different color dye. I only had one problem with the dying. No room. So if anyone is stuck in my situation my suggetion is use the bathroom. I placed my container of water in the tub and then hung a shower rod in the center at the top so that it did not drip on the floor. Then ran some water in the tub around the bucket so as the material dripped it would not stain the tub. I cleaned up as I went. No stains. Thanks for the instructions.

16'5" Trevira CS Digital Muslin, IFR from RoseBrand.com?

16'5" Trevira CS Digital Muslin, IFR

Cut Price from $53.62 per yd.
Full Piece from $42.90 per yd.

1.- Is this good for GreenScreen?
2.- What is IFR?
3.- What do they mean by Cut and Full Price?
4.- If i order 1 Qty. how much do i get? (16'5" x 1'?)

Thank You.

Fabric at Walmart!

I went to local walmart in st. louis----they have muslin 108 inches wide (9 feet) and i got 12 feet length. If you wanted 9 feet it would be even less at a little under $5.00 per yard....so it was just at $20 for 12 feet...then over in the detergent aisle for the RIT. I got 1 box tan/light brown and 1 box of dark brown. i'm hoping to make more of a marbled look. i'm going to try the sponge dappled effect with the dark brown after i pull it out of the light brown tie-dye bath....i also am thinking of making a mixture in a squirt/mist bottle and spraying the dye on with my darker color while it's laying outside in the grass.....(best idea i have right now) also thinking of sponging some on we'll see....

Tie-dye Backdrops

You could also use oil paints or water or acrilic color to dapple with. with acrilic you can bye a fabric medium to use with it. I have used this on Tee-Shirts and it holds up well.

Great idea ! I also use king

Great idea ! I also use king sized sheets the same way ! You can use top of sheet where the band is to hang your pole through. You can find discount sheets for around $30 dollars at most retail stores.

Wide fabric...

When looking for wide-fabrics try looking in the quilting section. You can often find 110" or wider there as they are used often for the backs of quilts.

You ROCK!!!

I just have to say, I love photographers. You guys rock!!! Whenever something is super expensive, you find a way to bring the price down. Thank-you SO MUCH!!! :P

This worked great!! I found

This worked great!! I found Muslin at Hancock fabrics.com on sale for $2.49/yd and the Rit was about $3.00. I liked the first dark drown one so much that I did 3 others black, dark blue, and terracotta. This works great for taking photographs of my kids since they do not always cooperate when I take them to a studio. Thank you for the idea!!

Hey I did it...

I made my backdrop today...I dyed it yellow with Rit Dye first in the washer and then put it in a bath of Rit Kelly Green and it came out wonderful....thanks for the great instructions and the help...I wish I could post a picture here and show it off...

Jannine...

My Backdrop

I hope this works...
Jannine

Will the dye come off on other fabrics?

Once the backdrop is dry and ready to be used, will it leave any color on other fabrics? Do you need to add anything special to set the die? If you don't rinse it out, will this cause the dye to transfer to fabrics?

Green Screen???

Has anyone successfully tried to make a green screen yet? If so, what color dye did you use, and where did you find it?

My wife and I just did our first Navy Blue backdrop and it came out great. We soaked it for 30 minutes and then let it drip dry for about 15 minutes in the bundle, and then cut the twine and laid it out. It looked OK, but there was a big contrast between the blue and white, so we stuffed the whole thing back in the bucket for about a minute and then hung it up to dry. Looks great! Thanks!

thank you soooooo much

This site has helped me alot.I am just starting out.And all of you have given me great ideas for my first work I got to do at a daycare.Again thanks alot.

Homemade Background

I just want to say thank you for that tips. I have to say this you save me a lot of money on backgrounds.

White Backdrops

I would like a solid white background. Most of the muslin I have found (at JoAnn's) is the lightweight stuff. I'm assuming that if I use that, stuff behind the muslin will show through. They have the natural (unbleached) in a medium weight (looks pretty good), can I bleach this white or paint this white to suit my purpose?

bleaching for white

Go ahead and bleach. If the fabric is of good quality, it will survive and bleaching will remove any weird color casts.

- Udi

Thank you

Thanks for taking the time to put this up -- I really appreciate someone sharing ways to save hundreds of dollars. Good work.

DIY BACKDROP

How can I put a picture of my backdrop on here for others to see?

posting pictures on comments

Hi Studio Casas,
See this article.

- udi

Thanks

I just wanted to say thanks for the idea. I bought a 10x21 foot piece and dyed it and built a stand. Just wanted to say thanks for the tips and advice. Here is my attempt http://www.flickr.com/photos/bigwhiskey/2005506649/ I think it turned out alright.

Thanks again,
Mike

Bed Sheet

This may be a stupid question, but why wouldn't a plain white cotton unfitted bed sheet, died in this fashion, be suitable? Is muslin that much superior? If so, why?

This is a great idea

Bed sheets will work great. Actually, this is also a source for colorful backdrops as well.

- udi

re: Why Muslin?

Why go for muslin and not just bedsheets? Low price and (relatively) unlimited size.

If you look at Bill's post a couple above yours and click his link, you'll see what he paid for his which is $25 for a sheet 10' by 21' (that 210 square feet) which works out to 12 cents a sq. foot. That's pretty cheap. A bedsheet isn't going to be anywhere near that size, even a king sheet is only about 7' X 7' (49 s.f.) and you'd have to find a king size flat for $5.88 to match the cost of the muslin. Bed sheets don't come on a continuous roll, 7' is the widest/longest you're ever gonna get. You can get that muslin in nearly any length (as long as they have it on the roll).

Even if you found a king flat for $2.00 - or free, for that matter - you're still restricting the size of your backdrop immensely. Save those two bucks in that case and spend ~$11 on a 10 X 9 length of muslin.

As far as material goes, no, muslin is not better; it's just inexpensive and therfore you can get a whole lot more of it for your buck. And it can be found in quite wide sizes at whatever length you want.

What Color?

Hey I think this is a terrific idea I'm going to go buy the materials the afternoon. I really like your final shot against the dark grey background and I was wondering if you could tell me how you did that one and what color dye you used. Did you dye the muslin a color first?
Thanks again for the idea.

I made a couple and while

I made a couple and while myfinger tips are little blue yet, they came out quite nice. My only mistake was not making the back drops BIG enough. 120in Muslin is $7/yd at JoAnns and with the common 40% off coupon, not expensive at all.

Cheap muslin background

Here is another way to make a cheap muslin background.
What you will need are some containers for the colours (as many as you like). cutoff milk containers or cutoff plastic bottles.
Some tubes of acrylic artist paint (does not have to be expensive, hobby standard is o.k.) A large brush. or squirter. A plastic sauce bottle etc.
Mix up your paint with water. 1 colour to each container. Test it on a piece of wet paper for colour strength. Add water or paint accordingly.
Lay muslin out on a lawn and hose down the muslin with a fine spray until it is wet through. Then (here is where the artistic part comes in) carefully splash colour on by dipping brush into liquid and with an arcing motion spatter a line of colour onto the wet muslin. The colour will start to spread so dont try to cover too much at once. Leave blank space between colour for spreading or to add a different colour in between. The natural muslin colour can be used in between if you like. When you are happy with the result let the sheet dry and then you can use it. It can be rewet to add more later or you can fine spray it to redampen or run colour or to tone it down. This technique produces soft cloudlike effects. You can even hang the muslin with clothespegs for a different effect by adding the colour and letting gravity take control.

More details

Great ideas. Do you have a picture? Would you ever wash this muslin?

Chroma Key

Still wondering if anyone has specified what color to use in creating a chroma key (generally blue or green) backdrop. Is there a specific color one must use. Does RIT work. Again, which RIT. I've got my muslin (Hancock Fabrics), and I'm ready to get my RIT. Thanks!!!

My red background

Here's a picture of my red backdrop with a black and decker work flashlight passing through some metal shelving. It's amazing how fast you can knock these out. From stove to use in one hour.

What color?

I LOVE your backdrop..what color is this...is this RIT? I tried to do something like this and it turned out just awful..so what ever suggestions you could give would be great!

A couple more examples

Here's a couple more pictures using the new backdrops I made today.

The first is my pregnant wife and her "current baby"

The next one is that "baby" in a basket. I'm practicing for when the baby gets here

Great project

I made a blue one of these and posted a picture of it on my blog at http://www.driftlessramblings.com/?p=11. I've already ordered a large roll of muslin so should be getting several more. I'd also be interesting in knowing what color should be used for the ChromaKey. I'm going to guess it could really be any color, that doesn't appear in the subject, then use image editing software to remove that color. A good consistent color would be the key.

Allen

ChromaKey

OK, stupid newbie question. What is a ChromaKey?

You know how the made superman fly?

They put a green-screen behind him, and made the movie with a green background.

Later, in editing, they replaced the green background with the cityscape of metropolis.

This green-screen is chroma-key.

- udi

Having trouble finding wide

muslin fabric. I've checked JoAnns and Rosebrand. Do you buy the 54" wide and sew it together? Sorry - I'm confused.

Right type of Muslin?

I went to chicagocanvas.com to look at pricing of the muslin fabric, and I'm not sure exactly what type to get. They have "Heavy Natural Muslin" 10' wide for $6.10 per yard, and "Medium Natural Muslin" 10' wide for $5.25 per yard, and "Poly Cotton Musline" 10' wide for only $4.30 per yard. I know you can also go to Joann Fabrics for muslin, I haven't checked on the pricing there yet. I guess I need to make sure I'm the right material, I am very new to the photography world.
Please help.
Thanks

Question

I love the tye dye, But, if thats not the look that I want can I just dye the fabric a solid color? I love the colors of some of the seamless paper, and I am thinking that I can just dye fabric the same color for cheaper.....am I right or wrong?

Thanks in advance!

backdrop

Am making a backdrop the measurement is 20ft how much fabric do I need ,if am using a 60'width

Cheap DIY (Homemade) Muslin Photography Background

This reminds me of my days in High School when tie-dye was fashionable for tee-shirts and jeans. As students we were required to make such things as part of our arts class. The process is exactly as described in the tutorial with one notable step that I feel is missing. That being when one is finished with the dying process and prior to removal of the cord the bundle is removed from the dye container and placed in another container filled with a sufficient amount of water to cover the back drop completely, and to this container approximately one quart of white vinegar is added and gently agitated. Allow at least 30 soaking time in the water and vinegar, the longer the better. The purpose of the water and vinegar bath is that the vinegar will cause the dye to become set, aka become color fast, thereby rendering a much deeper color prior to rinsing and greatly reducing color washout. Give it a try and see what a difference this additional step makes to the finished project.

How to make multi-color backdrop?

I have made one in blue and it looks just great! I am planning to make some more.

I am wondering how to make multi-color backdrop from white cotton.

Trying to find....

Does anyone know of any online fabric store that ships to/in Canada? I live in a small rural town, and a few of the fabric stores I checked do not sell muslin, or don't sell it in the 108" width. I found one place that wanted over $9 a meter, and that is for the 60" width....I would like to see if I can find it cheaper than that.

I did it! you can too!

I made two so far. I made both 10' by 20'. I wanted to lessen the "tie-dye" look a bit but still have light and dark variations.

The first try didn't give me the results I wanted...so I tried again with success!

I will be posting my exact method and some pictures to go along with very soon on my blog http://sometrouble.blogspot.com.

LOVE IT

Of all the DIY Backdrops I've seen, yours is by far the closest to the look that I want. I checked out your blog and didn't see your method there. Can you post it, or email me? leftbrainer@verizon.net

Thanks!

Wonderful technique

I agree with your other reply.

I love how your background came out. Can you share your technique? Send it to wzorn40@gmail.com. I'd love to hear it. Had a look at some of your photography while I was searching your blog, looks wonderful!

-Will

that gave a great idea for

that gave a great idea for my home business i have looked at several websites and they range from $50.00 to $200.00 thanks

Backdrops

I shoot mostly B&W and was wondering what materials are best for backdrops both in solid black and solid white. Is the a certain type of paint or other material that works well? If so, how do these materials affect lighting?

You only need one!

Here is a great money saver...make one l18% gray backdrop and simply use colored gels on your BG light to change the color...works great.

These are nice but...

How do I get them to look less tie dyed? I like subtle variation in the value, but I think the tie dye feel makes it look a little cheap. The on posted on Feb. 18 looks alot more subtle and natural...But it may just be the lighter color of the dye. Any suggestions?

This may have just saved my shoot

To make a long story short, I had recently ordered a couple of muslin backdrops from one of the major suppliers, and through some pretty shabby customer service, they dropped the ball and didn't get me my backdrops in time for my shoot. I'm supposed to set up for the shoot tomorrow, and I STILL don't have my backdrops. So, instead of having to face the wrath of the client who would have to reschedule a LOT of people, I decided to try to make my own. Now I needed 2 of them to be similar, so I ended up buying 10' x 42' of muslin and dyeing it all as one piece. I used 2 of the bottles of RIT dye, and I also used a 32 gallon tub that I placed in my bathtub. After it was hanging to dry I cut it into two 10' x 21' pieces, and now I have 2 backdrops that can be used together as a 20'x20' backdrop. I was VERY PLEASED with the results. And to keep it from having a stark variation, I just bunched and tied it a little more loosely. Worked great. Thanks for this article. I may not have wanted it as dark as I got it, but hey, it was all trial and error and considering, it looks good and I can keep my shoot on track. Now I'll have to deal with the people at that backdrop supplier.

Just what I needed

Hi Mike,

Glad to hear that. It is amazing how much you can get away with when going DIY...
- udi

Backdrops Supplier?

Hi Mike,
From which supplier you ordered for muslin backdrops?

OK just did my first one...

And it went relatively smoothly! I did it in my bathtub because I was being too lazy to go back to Wal-Mart and get tub for it. (Note: Make sure your bath tub is clean if you do this because the dye will stick to every tiny spot of soap scum/mildew. On the bright side I got to give my tub a good scrub afterward!)

I bundled it loosely, and during the final 5 minutes of soaking in the dye...I unbundled it completely and let the dye saturate everything. This really helped tone down the tie-dye effect so I was very pleased. After I removed it from the dye, I then placed it in another container (I had one of those huge commercial sized pots in my cabinet) with enough water to cover it and a quart of vinegar as suggested above, and it made my color so much more vibrant! It's still drying, but I will post a picture as soon as it's dry.

Well it didn't look as good

Well it didn't look as good dry. Too light and I am not fond of the pattern, so I am going to go back over it again. I have an extra box of Navy so I will see what happens if I redye it.

Muslin Type

I want to do with this with my students at school and then do a photo shoot with it. Does it matter if the muslin is bleached or not? I just looked on Joanns site and they have both.

RE: Muslin Type

Hi Danyell,

Good luck with the project. I used bleached for my shots, but I dont think it matters much.

- udi


Painting a scenic background

I have a talented young artist that is going to paint a scene on a muslin background for me. It's his first time painting on something this big and my first time having something painted for me. I have read articles about this being done and the paints being mixed with downy to help keep the paint from cracking later down the road. My question is what type of paints do we buy for him to use? Help we are going to get the materials today! (Wednesday)

Worked out pretty good

Tried it and it worked really well.

I did a first long dunking, pulled it out and cut the strings. I didn't like all the white, so I threw it back in a swished it for about 2 minutes and yanked it back out again.

I've since bought some red / burgundy dye in a 'spray' (at Michaels) and did the scrunching in Step 4, Photo 1. Light spray of red on the peaks to give random blotchy overtones.

Gerat article! Thanks!

http://www.flickr.com/photos/14868863@N03/1895572335/


'Bump' lit with 500W halogen worklamp diffused though white sheet in wooden frame to the left, about 4 feet away. A white CFL spotlight to extreme right and above, 2 inches from backdrop for hair highlights and shadow reduction. No flash.

DIY Background

made my first one tonight great info thanks, this is double dipped using a bottle of rose.

P3201311

Made 2 muslin background so far...

So i've attempted and mad 2, (blue/brown), they turned out great. Did it all under 1 hr each, in fact the 2nd one was done in about 30 min prep time. Dried in the drier 1 hr.. and its ready for use. All together, the RIT and muslin totaled about 50 bucks.

Its a good thing I didn't buy off eBay.

BTW, Joan's Fabric has a %40 off a single item (cut fabric) starting this Sunday the 30th to the end of the week... hurry in before I buy all the muslin fabric.. LOL

Should've waited, would have saved me over $15!

Getting a refund at JoAnn's for savings from coupons

Hey, I used to be a customer service manager at a JoAnn's etc store, and we were allowed to give a coupon refund. The customer brought in a receipt for a recent purchase and the coupon they wished they had used, and we did a return/ then re-sale to give them the savings back. Hope that's still their policy... it was a few years ago.

Good luck!

Muslin

I was wondering if it matters if the muslin is bleached or unbleached, or if it makes any difference. Please let me know!

Backdrop

I really love this idea!! I have been using a table top light box, but I need to make a backdrop like this for some of my other pictures. Thanks so much for sharing!

Christine

Check out my Fused Glass Creations!
http://www.mastersglassart.com/products289162.html

Has anyone tried to die the

Has anyone tried to die the muslin to a solid black? I am looking to make a black background, and my local supplier want $200 for one, and I just don't trust ebay.

Black Background

Dying fabric a continuous deep black is difficult - the same variations that add interest in the colored backgrounds are patchy when you dye fabric black. A better thought might be to look for fabric sales with black velvet - I bought 5 metres for about $30 (about a metre and a half wide) on a 70% off sale - full price that's still half the cost of your local supplier.

Some help from Rit Dye

Found this information on Rit dye site for doing multiple colors. Now to find someone that still sells dye.

http://www.Ritdye.com/Two-Color+Marble+Tie-Dye.43.lasso

How much salt? What type of salt?

Hi, This is a very informative site. I almost spent quite a bit for a premade seamless muslin. Now, I'm going to try one after buying some supplies today. I probably I missed it, so forgive me for posting rather than rereading more carefully, what quantity of salt do I need in relation to one pkg of RIT? Does it need to be fine or coarse?

I'm going to buy a suitable dropcloth at my local Walmart or local hardware store (rural Alberta, Canada). Thanks for the advice about king size bedsheets and the velet remenant for black backdrop. I am also going to price out the plunger & paint extender backdrop stand.

Once done, I'll post my results. Thanks in advance for your help! Cheers!! :)

Black back drop

Another cost affective solution for a black back drop is to buy black felt off the roll (joanns or walmart). This is what I have done for my make shift backdrop that I hang from the wall in my living room and it works great.

Hee are my versions of it.

Photobucket

Photobucket

Good Backdrops

Nice Snaps ... I like the backdrops too! Where did you get the backdrops from? I do generally buy backdrops from www.AuraBackdrops.com

batik

we call this batik in Turkey. Here my version
diyphoto_muslin
my muslin photo

love it

thanks so much for saving me tons of money! i cut a 12x40 piece of an old white muslin backdrop ive had for years and made two pieces! used black rit on one and tan on the other! LOVE IT LOVE IT LOVE IT! Now i have two new backdrops for a fresh look in my studio! thanks a lot!

heather

DIY Muslins

Great!!!
I dyed mine all bunched up with a blue. It came out okay but I really wanted it to blend a little better so I tooksomeone else's advise and layed it in the yard and used the brown and black dye in 2 spray bottles. It complimented it very well and gave it great contrast!!! I will be making more soon since it was so easy...but this time I will be buying some big rubber kitchen gloves for my hands!!!

Can you post pictures of

Can you post pictures of this. I just did a black one that came out gray and I would like it to have red as well but the white parts are somewhat gray too and I am afraid that it will ruin the whole thing if i attempted to add another color. Any help!!

Great stuff!

I went out tonight and got 3 yards of some Muslin at walmart and 2 boxes of scarlet, yellow and Navy Blue Rit dye I did not mix them but just used two boxes in a large pot on the stove with the heat on high to where it was almost going to boil.. It looks pretty good I could of filled in the white spots a little bit more but it's nice and dark looks really good.

Now How can I get yellow and Orange to mix and look nice with out changing to some odd color?

Brown

I just bought a bottle of Dark brown and a bottle of Tan Ritz dye and I was wondering do I mix the colors? I am looking for a light/dark brown shades on my backdrop. I am going to get my fabric today, and I am going to try not to tie it up cause I don't want the tye dye look, but looking for advise before I start. When do I put the salt in? On the stove? Will it stain my pots?
Love your website..
Thanks for the helpl

Paint!

Thanks for the commentary on paint! I'm hoping to paint a scenic backdrop in the next two weeks, and the info here helped alot! :-D
Great day, everyone!
~Ranae

Thank you sooo much!

I loved the way mine turned out. Much cheaper and awesome!!! ^ - ^

Oh My God

I wonder how he liked the backdrop. Great work there.

how is this one done

I LOVE this one! Was this dyed without being tied? It turned out great!

I want to know too! It looks

I want to know too! It looks great!

backdrop color

How did you create this backdrop and what color did you use.

First-attempt backdrop

-Made our first backdrop yesterday, basically blue, and took the instructions not to tie the bundle of fabric too tightly a bit too far. Using lightweight muslin, 9 feet by 11.5 feet, I tied it into a loose bundle about 20 inches wide and 10-12 inches deep. Should have tightened it to something more like a ball of 12-14 inches diameter. We came out with a very nice, evenly-dyed blue, rather than the tie-dyed effect I was hoping for. -Salvaged the process by bundling it up and over-dyeing with pearl gray for about ten minutes. I may have been stirring the original bundle too much, too. That seems to have worked the dye in too thoroughly.
We're satisfied with the results but will probably try another one soon, using different colors.
Bought our fabric at JoAnn Fabrics, and the clerk even GAVE us a 40%-off coupon, since we didn't happen to have one of our own. With dye and all, I think the total cost of just the backdrop is about $25. Not bad, huh?
We bought a large-enough piece that I'm also building a couple of light diffusers to use in front of quartz-halogen work lights.

Spray paint works great...

I tried using RIT dye and the results weren't exactly what I wanted. The backdrops were just too light and faded. So, I decided to try using some extra spray paint I had laying around. It worked great! (I'll post some pictures soon)...I had king-sized sheets laying around that I used. So I got the sheets wet (so the spray paint wouldn't create harsh lines) and then sprayed. I started out with a dark color..made some darker areas and lighter ones. After it was dried, I went back through and put some lighter color spray paint in. The results were so great that I went to the store the next day and got more paint to fix the other backdrops I had tied with the rit.

I can't wait to see it!

I tried using some spray paint, but I think I was afraid to use too much. I'll have to try again.

I was just wondering if you

I was just wondering if you would send me the pictures of what your ended up looking like because that would be very interesting.

Did anyone tried to sew?

Hello,
I live in kenya, and here the widest muslin comes in 45" wide rolls.

Did anyone tried to sew different pieces and then colored them?
Any suggestion?

Can't wait to try it.

I have been reading the different ways to make the backdrop, and I can't wait to give it a try. I am not a big fan of the tie die look but it looks great.
I am just starting out trying to learn about photography, so Ihave a long ways to go, but I am looking forward to doing my both my daughter's portraits myself.

what weight fabric?

I LOVE this idea! And I can't wait to try it!! I have been to Joann's fabrics so many times looking at the muslin. But my question is...should I use the thicker weight of fabric? It is more expensive, but will it dye well enough? I really want a BLACK back drop, but a dark grey will work too. What would be a good lenght? Thanks for any help!

which fabric is better

Is the thicker muslin better than the thinner muslin for a backdrop?

this is awesome

Thank you so much for this i am a photographer that is starting out from my home and i couldn't afford backdrops and i looked up you site and added it to my favorites. I went to wal-mart and got my Muslin $8.00 and rit dye that cost me $1.80 i was so happy and the out come of this i not have a backdrop and will be doing more over the weekend thanks a lot you are a life saver.

C'mon people...the sevethies

C'mon people...the sevethies are OVER! Those backdrops look just horrible! I am a beginner photographer and I am all for saving a buck or two, but please, show some class!!
OK, if you insist, that you like that backdrop, get the subject at least 3 ft from it and use low F-stop, so your backdrop is not in focus and all the creases and wrinkles not showing up on the photo.
If you buy the paper back drop, that is in expensive, and i bit more upscale... if you really want lots of options and don't mind to roll your sleeves up and get dirty, try this method : Start with a king size sheeth any colour, as long as it is a solid.. then buy one of those rollers at Home Depot or any paint store that gives you the effect of the "rag-rolling " technic. Pick out 4-5 different colours and start rolling. Try to distribute all the different colours evenly... then get different colour gels and set that front of your studio light, and every time you use different gel, you will have a whole different backdrop colour, get as creative as you can...same rule subject at least 3 feet from it and low F-stop... good luck!

...

uhmmm... actually, a lot of the top studios use backgrounds just like these... believe me... I've worked for a couple of them.... I agree some of these do look not as great, but some of them look awesome.
Paper and muslin are two very different looks... part of the look of muslin is the wrinkles and texture of the fabric. The paper is flat, and a little bit more reflective... I personally don't like painted paper... and paper is not more upscale, it's just a different look... different people prefer different things... I like the paper plain and white.

Type of Muslin

Is there a certain type of muslin that should be used? I have seen many different weights of muslin available. Thank you

re: Type of Muslin

Hi TJ,

I'd go with a  thick muslin. This will make it opaque so you don't have to care about what's behind the muslin

Joanns and discounts

I just got back from Joanns and ended up with a good amount of 90" muslin thanks to a lady who handed me her 50% off coupon. I love good people!

Anyway, I asked about the "if you have a business license they give you a discount" and I was told (at least in my area) that they only give discounts to teachers.

That said, the coupon I scored put my 5 yards of 90" at $17 and change.

As for doing the dye in the washing machine - while the box says you can do so, I'd suggest you NOT. You may very well end up with having to deal with left over dye in future loads, and dye coloring up the rubber/porous pieces of your washer. Just a word of caution. :)

Now I'm off to start the magic for my own project!

using washing machine to dye

I was at a local laundry mat the other day and they have 1 washer saved for dyeing.

This is just awesome!

I too am just starting out in the photography business, and the cost of the muslin backdrops really had me holding back and on getting things going! I had no idea I could make one so cheap!
I do still need some help though! I too am not all that crazy about the tie dyed affect, although I don't think they look horrible, and I do plan on making a couple for myself lol. What I would LOVE to make is a painted one, but there have been several questions here about how to dilute the paint, or what types of pain (latex, glossy, simi gloss etc...) and unless I'm just passing over them, I'm not finding the answers.
If any of you have any suggestions at all on this matter, PLEASE help me here? I'm soooooo excited about getting started!
Any photography tips and suggestions are also welcome! Like I said, I'm just starting out, so I still have soooo much to learn! I've gotten excellent pictures accidentally, and I want to learn how to get them perfect every time! ; )
My email address is bdjznana@yahoo.com and I have a myspace too! http://www.myspace.com/holdon2the1uluv I'll be setting up an account with all my new photography work soon, and post again when that happens : )

painted backdrop muslin

hi i own a photo studio and i recently xperimented with makin my own hand painted muslinz ,i started with a large roll of wide black paper and about five different spray paints then i just choose random colors and spray at the paper every time i add a color i step back to analyze the backdrop to see how the colors were merging togather and see what color to add next and where to add it then i fine tune the mix untill it looked like a real factory made muslin. it looks totally wicked
I did the same with water base paints on a roll of wide white paper, instead
of using a brush i used a car wash sponge to add the colors randomly then i smooth all the colors nicely and seamlessly into each other so they look like gradients and not brush on its awesome am now using them in heavy rotation in my studio. if you want to see samplez they are on my hi5 website at splectron@hotmail.com in a folder called 2009 nu samplez

Thanks for this tutorial.

I have make to backdrop now. Easy to do. Thanks for this tutorial. I dont find muslin fabric in the store so I use some other fabric.

8070

8075

8345

8309

paper backdrops

Some of you keep mentioning paper back drops, and that they can be inexpensive. Where can you get them? and how much are they generally?

paper vs muslin

look at all the magazines and other publications. no one uses muslin.
it looks like what it is a wrinkled sheet. a roll of paper costs about 60.00 you can find them on ebay. or at a photo store. adoroma ( im not sure about spelling) sells them.
the other thing is a sheet of flooring. turn it over and paint the back side of it. what ever color you desire. comes 12 ft wide and gives you a seamless floor to ceiling wall for about 150.00 i use my studio muslin for a curtain effect but not as an entire backdrop.

railing system for muslin backdrops

electrical conduit pipe comes in 12ft lenghts. duck tape across the top of the muslin sheet gives it strenght. i tape the top of the sheet and leave about 1" hanging off the top and that way i can apply a second strip to the back side of the muslin. the muslin is sandwiched in between the duck tape. then i use CHEAP shower curtain hangers. i found them at a mega store for 1.50 for 12. the oval type that locks and is just the wire. unless you or a toddler hangs on the muslin this works. i hang the conduit on wall mounts that i found at home depot. i just poked the wire hanger thru the muslin and duct tape, sometimes i used a nail and hammer to make the hole first. fold the muslin into 12 sections across the top so your hangers are even.

also in the electrical conduit area i found 12 ft lenghts of square pipe. its not pipe but its a track for some thing. i took a shelf support which fits into the end of the track and i mounted that across the ceiling of my studio. i mounted the shelf support to the walls about 6 inches from the ceiling. i use this to hang my refectors and any other item i need to be off the floor. i also use this to wrap my extension cords and let the plug hang down so i dont have extension cords all over the floor. i use the florscent screw in tubes that are for photo 52000 kelvin (ebay) and use the large metal reflectors (home depot) they come with a pressure clamp and they work great for backlight or hair light. you can tape a cheap plastic bowl over them for diffusion. (dollar tree) this can be clamped to the conduit track and works great. i have the track about every 2 feet across the ceiling.
i found a plug system at office max that is flat and it sits under your monitor . it is about 2 inches thick and about 12" square. it has 6 plugs in the back and the front has flip switches so can turn on and off each plug. it is 45.00 and well worth the money. they also sell them on ebay. they are hard to find. and each plug is color coordinated to the switch on the front of the plug. (magic marker)
another great effect if you use muslin is to make a frame from 2x4's and stretch it across the frame like a painting. then paint it like a canvas.
if you have an area that is just for your photo work i painted the walls different colors about 8' apart. so if i have a baby i can set up quickly for either sex. pink for girls and blue for boys. i have a cart that i used microwave (sam's wholesale) and you can put baby top with a drape and have mom sit real close for support. also great for a lean support on head shots.
i also sponge painted the walls for more effect in the other corner of the studio.
if you want a brick wall ..... go to home depot and a sheet of fake brick paneling. 13.00 and you have a great backdrop. i mounted it on the back of the wire rolling shelf( sams wholesale)like in resturant coolers i think they are called metro shelves, and that way i hide props behind the paneling and i can move the brick wall easily and quickly. you can also use the brick on the floor for a paver effect. i attached it with dolly bolts so if i need them off the shelf quickly i just pinch the dolly part and it goes thru the wire shelf and i can use it on the floor.( home depot sheet rock screw area)

more ideas for muslin

http://viewmorepics.myspace.com/index.cfm?fuseaction=user.viewAlbums2&fr...
www.sohosalonandstudio.com

in these galleries are various from muslin to painted walls to paper.
the oil painting of the little girl was done in front of a sponged painted wall and floor. i used painter 10 to get the oil painting effect.
i go to the paint oops section at home depot and can find all kinds of paint for 1.50 to 5.00 a gallon.

which fabric

which muslin fabric should i get?..theres a ton of 'em at joannes...
i need help asap cause im buying these things tomorrow...

Hi, my friend,Thank you! It

Hi, my friend,Thank you! It is really a good way! Please tell me how much to make the '10x20ft' ones by this way cost.

Here is a good website: http://www.elifeshop.com

where many wonderful styles are introduced. Whether is to make it by your way cost less than buy from the website?

How to make a cheap background stand

If you don't want to spend $120 to $170 for a background stand get out the PVC and do it for 5 bucks! Run down to your local home supply store and pick up a 10 foot length of 3/4 inch PVC pipe. Get 2 90 degree connectors. Get 2 3/4 inch straight connectors.

Use a hacksaw to cut 3 - three foot pieces ( or 2 4.5 foot pieces), and 2 six inch sections. Use the straight connectors to put the rod back together, put the angle connectors on the ends, and put the 6" pieces in those. Get a couple of old light stands - anything will do - and slide the 6 inch sections over the top of the stands. Raise the rig up as high as you need it and you're in business.

I've used this to hold seamless paper and muslins - some home-made, others store bought.

Joann do not ship to the UK

I must say some great ideas.
I have been reading the above and I've now decided to buy 108" wide x 15 yards of muslin from Joannes.
Dye it with a 'Dylon' Tropical Green no.3 for my own chromakey green screen.
...with a 40% coupon I can get it for around $75 not including shipping to the UK.

Found out they do not ship to the UK!!

Does anyone over there in the US know of anywhere in the UK that sells that type of length for that sort of price...I know that's a stupid question but I have spent weeks and weeks trying to find a supplier here in the UK without any luck!

If anyone has any ideas please let me know.
I don't mind buying from the US if that's what it takes.

Cheers,

Alex.

For Australian Readers

After hunting around for Muslin, I soon discovered that Muslin in Australia is not the same as Muslin in other countries...It's more like cheesecloth.
I went to spotlight and bought calico which is apparently the same as Muslin in the US. I also bought Dylon Colourfast Dye as Rit is really hard to get here (lincraft apparently have it). I ended up making 6 backdrops.
Thouroughly enjoyed making them, although my shower was a mess afterwards. All this cost me about $140 AUD.
Below are the 6 backdrops. Not a fan of the creased look, may iron them and see how I go.

I took 1 picture of my cat on a stool to see the DOF with the background.
I know the cat is blurry, hard to keep a cat still on a stool but I love the way the background looks. This is the first background of this post.

Help in ideas how to do this best

Ok here is what I want to try and do within a budget of course seeing that I am just a guy who wants to try this for home use on the kids portraits etc.

I just got my camera a Nikon D90 and a few other things for portraits a 50 mm prime 1.8 lens and a sb600 flash, im learning what I can do from angles with my flash triggered remotely and am interested in making a backdrop that would be just for fun here at home.

Here is what I want and what I am thinking of trying, any input appreciated for the best outcome.

Buying a muslin or large thick king cotton bedsheet (whatever i can find cheapest). Then grabbing some RIT dye, BUT what i want is to try and get more of a uniform look and mix 2 colors in a marble like way if possible.

My idea is to dye it dark grey (no rubber bands) then try to dye it as dark blue as i can with rubberbands, so the end effect would be something with a midnight blue look and have a dark gray accented back area (where the rubber bands kept blue from going).

But i am curious if i do dye it dark grey first will the blue "take" and work or will it just be a mess of a non/blue?

Any help appreciated, my first feeble attempts at pics with this new cam are at http://flickr.com/photos/bills_d90 for anyone interested, hoping to add some better pics soon as i learn to use the dslr here and even more fun once i start trying to setup a mini studio setup here at home :)

Bill

Hancock Fabrics...OMG cheap!!!

I read this last night and was all set to go buy some Muslim and dye it today and it was even on sale for $4-5 a yard for 109".

However I found some colors that were just perfect for $8yrd (the lady also said I could get 40% off one item for joining the preferred club). Score! I kept browsing because the stuff was mostly 44", but then I found some cool stuff on sale for $1.20/yd (normally $1.95). No need to get messy and waste time dying the muslim. These were exactly what I wanted. I got out of there with 4 backdrops for about $20 and made my own Y strap for a under $10. I think I can make do with most things using 44". Gonna rig a clothes line or shower curtain/curtain rod to hold them up. I just laid them over a loose screen door for now to test them out.

How I made A Y strap
7 ft of 3/4" black nylon belt (Was at least a foot too much, but I wanted to be safe). Set of 4 D rings (only needed one), 3/4" Belt fastner (like the ones on regular camera straps). And a backpack style clip.

Then went to home depot to check out the Strip lights and found some type of S snap hook thingy and a 1/4" bolt with loop, but I think I am going to opt for an O-ring on the upper right side of the camera vs. using the tripod mount. I don't think I like it hanging upside down and dont want to damage the thread. I tried just hooking it around my current camera strap loop and love the feel of it. My heavy E1 and 14-54 ZD feel light now.

If anyone is interested I will post photos. I owe it to you all for the ideas I got last night reading this great site. I will post my Ghetto Muslims too.

marble affect

I was wondering if any one knew how to give the fabric a marble look or something that is a little less tie-dye. I've made a couple tie-dye backdrops and just want a different look. Thanks a ton

Marble Effect

Dont tie the fabric up tight, doing it very loosely gives that effect.

DIY 3-Color Marble Effect

To get a realistic marbled look you really need to use three colors. I used dark blue, purple and green.

ITEMS NEEDED
Muslin cloth (your choice of size)
Twine
Dark Blue, Purple and Green RIT Dye
Hot water
Salt
1 - 16 oz Bottle of white distilled vinegar
Two 18W x 14L x 10D gray plastic containers (Approximate size)
Rubber gloves

Follow the same steps as basic tie-dye, bunching handfuls of pre-washed dampened muslin cloth.

Fist color: Tie up muslin cloth, not to tight or too loose, you want to have some white areas to contrast with the two other colors. Using enough hot salt water and dark blue dye, fully immerse in a rectangle plastic container (approximate size) for 40-50 min. Turn over half way through what ever time you choose, to ensure even dyeing. Wearing gloves, remove, cut tie and squeeze out excess water and hang for 1 hour till just damp. After half way mark, begin preparing second color in second container.

Second color: Using plastic container, prepare green dye. Take damp muslin cloth, bunch up and tie up again with twine, not to tight or too loose. Use enough hot salt water and dye to immerse ONLY half of the bundle for 15-20 min. Begin preparing third color in first container. Note: Leave bundle tied up this time, do not cut.

Third color: Having prepared purple dye in container, using gloves take bundle from green dye and turn over and place other side into container with purple dye, again use enough hot salt water and dye to immerse ONLY half of the bundle for about 15-20 min. During the wait time empty other container and fill with hot water and vinegar. This is to set the dye.

When wait time is up remove bundle, cut tie, squeeze excess water and place in container with hot vinegar water, rinse and soak for 30-45 minutes to set dye. While soaking, empty other container and fill with hot rinse water. Remove from vinegar water and squeeze excess water and place in rinse water and slosh around 5 minutes, remove, squeeze water and hang till dry. Enjoy!

You can also substitute a plastic container by taking a cardboard box and lining it with a heavy duty plastic garbage bag and taping the bag to the outside of the box. I’ve also used large disposable aluminum pans. When finished, just through it away.

re: DIY 3-Color Marble Effect

Larry,

Thanks for this great tip. It should definitely give an interesting effect. Got pictures?

marble affect

Here's what I did and I got a nice marble affect:

I had a very large piece of fabric because I wanted it to drape down onto the floor so I got a piece that is 16' x 120". All this fabric fit nice and snug into a 5 gallon bucket (you may want to have a smaller bucket if you have a smaller piece of fabric). I mixed the dye solution in the bucket (mix well!). I got the fabric wet first and then I pretty much just bunched it up like it was dirty laundry and stuffed it in the bucket. I took another 5 gallon bucket with just water (for weight) in it and placed it on top, to be sure that all the fabric would be submersed in the dye. I let it soak for 20-30 minutes and removed it. Because it's the middle of winter and I live in MN I immediately put the muslin into the washer - put it on a rinse cycle and put it in the dryer.

My first color I chose taupe in powder form and I liked the way it turned out but I didn't mix the dye well enough and it had terrible red sploches all over it. So, I re-did it with liquid brown and it turned out much better.

Hope that helps!

Marble

To get a realistic marbled look you really need to use three colors. I used dark blue, purple and green.

ITEMS NEEDED
Muslin cloth (your choice of size)
Twine
Dark Blue, Purple and Green RIT Dye
Hot water
Salt
1 - 16 oz Bottle of white distilled vinegar
Two 18W x 14L x 10D gray plastic containers (Approximate size)
Rubber gloves

Follow the same steps as basic tie-dye, bunching handfuls of pre-washed dampened muslin cloth.

Fist color: Tie up muslin cloth, not to tight or too loose, you want to have some white areas to contrast with the two other colors. Using enough hot salt water and dark blue dye, fully immerse in a rectangle plastic container (approximate size) for 40-50 min. Turn over half way through what ever time you choose, to ensure even dyeing. Wearing gloves, remove, cut tie and squeeze out excess water and hang for 1 hour till just damp. After half way mark, begin preparing second color in second container.

Second color: Using plastic container, prepare green dye. Take damp muslin cloth, bunch up and tie up again with twine, not to tight or too loose. Use enough hot salt water and dye to immerse ONLY half of the bundle for 15-20 min. Begin preparing third color in first container. Note: Leave bundle tied up this time, do not cut.

Third color: Having prepared purple dye in container, using gloves take bundle from green dye and turn over and place other side into container with purple dye, again use enough hot salt water and dye to immerse ONLY half of the bundle for about 15-20 min. During the wait time empty other container and fill with hot water and vinegar. This is to set the dye.

When wait time is up remove bundle, cut tie, squeeze excess water and place in container with hot vinegar water, rinse and soak for 30-45 minutes to set dye. While soaking, empty other container and fill with hot rinse water. Remove from vinegar water and squeeze excess water and place in rinse water and slosh around 5 minutes, remove, squeeze water and hang till dry. Enjoy!

You can also substitute a plastic container by taking a cardboard box and lining it with a heavy duty plastic garbage bag and taping the bag to the outside of the box. I’ve also used large disposable aluminum pans. When finished, just through it away.

thanks

i found this subject very usefull and i will try it ...thanks!

Colored Lights instead of / in addition to

I had an idea after making a PVC stand and buying the muslin. I remembered a Christmas light (remember those shiny aluminum Christmas trees with the spot light and the different colored wheel that rotated... yes, I'm old and I hoard things). Anyway, I tried that with the color wheel (the rotator broke long ago), and using the red, green, blue portions of the wheel. It gave a very interesting color pattern to the white muslin. I put the light behind the muslin fabric. I haven't tried it yet from the front... but I'm afraid it might give a color cast to the subject. I'm sure that I could make a spot with various colored celephane (from the craft store), that would do the same.

A LOT less messy but the color isn't nearly as saturated.

Jim

Thanks for the article - my first attempt

Thanks for the article. Very helpful. I've made two solid back ones so far. Well.. close to solid black.

The local JoAnns had the muslin in 120" wide. This worked great, well, mostly until it shrank to 8' wide post dying / drying. I washed it in cold water then put it in the dryer on delicate. Probably my big mistake.

I've not taken the second one and put it up yet to see if it shrank less. That's on today's project list.

Here is how it came out, with a little still-life example to test my lighting and shadows. I did not go tie-dyed, but it still has some 'texture'.

re: cool and cooler

Now, this is a hard choice on what's cooler, the backdrop or bike

My first attempt 2 mini headshot backgrounds...

Well I attempted this DIY background thing by grabbing 2 smaller pieces of muslin from joann fabrics (both are 4x6 feet) the material was onsale so total cost for the 2 muslins $6.

Actually the muslin was 45 inches by 2 yards so a bit shy of 4x6 technically... but at 45 inches it was onsale for 1.49 a yard so i couldn't pass up trying this project.

I bought 100% cotton prewashed muslin one in white one in a tea dyed (light tan) color, one i planned to make a dark rich brown mix and the other a dark blue black mix, time will tell what they look like in the end (they are drying right now).

I got some RIT dye too, for one i got black and navy, and the other I got dark brown and cocco brown.

Washed them up as instructed above, mixed up the dye (but didnt have salt on hand! RATTS!!!!!) figured it was only a few bucks and a test anyways so went ahead followed directions but with no salt added.

Did the lighter colors first (coco and navy) on the two muslins, sorta did a twist up of the fabric then about 6 random large thick rubber bands, after the first soaking of 15 mins hot water i took the bands off and re-soaked the fabric for 5 more mins (I wanted LESS of a contrast in the banded areas).

Then i went to the darker colors, retwisted the fabric back up, followed the dye directions minus the salt, re-rubber banded the twisted fabric, soaked 20 mins in the darker mixtures (flipping every 5 mins or so), then after that i again unbanded and soaked for 2 more mins opened (again i was going for less drastic effects than what were shown above more of a blended effect).

Then i rinsed both well and currently they are hanging to dry, once dry ill take a few pics to show my results and post them on my flickr page (should be up by 3/9/09).

http://flickr.com/photos/bills_d90

Worst case they turn out bad (hard to tell right now they are all wet) but it was only about $12 total for the 4 packs of dye and the 2 4x6 sized muslins, so if they turn out at all they will be fun to mess with or use on headshots or something and I might try a larger one down the road after doing these (and i'll make sure to have salt on hand too!).

Bill

Here are my 2 backdrops

Here are pics of both of my attempts (*see post above these by Bill for more info), overall I like them especially for the $ ($6 each)...

http://www.flickr.com/photos/bills_d90/3339453368

http://www.flickr.com/photos/bills_d90/3339450572

On my flicker page I have started to add a few pics of shots taken with them as well.

Bill

re: backdrops

Hi Bill, love the look on the brown one. It would make a great backdrop for blonds, as you so kindly demonstrated with Julia.

Love it

I made my first one, and I tried the hardest color imaginable... black.

It turned out to be more dark grey... but overall.. I think it's all right.

No special settings on the camera (d50) and just using a SB600 flash. No lights (other than what was in the room)

I will probably try making a seperate red, blue, and green.

DIY

I'm currently in the process of making solid color back drops.
I ordered 108" muslin 100 cotton from Joann.com.
I ordered 10 yards
about 73.00 total including shipping
stay tune for photos and more info..

256studio

Supports for backgrounds

I bought a very expensive vinyl backdrop which I love but want to move it around rather than fixed as I have it now. Any "el cheapo" suggestions to build a support as buying readymade from local distributers is too costly. I reckon it should cost about $50 for materials.

Chromakey?

I was thinking of using this technique to make a solid dark neon green screen. Buying cheap muslin cloth that is already dyed green is not usually dark enough.

I was thinking of doing this, but without the twine, and make sure that the whole cloth is evenly coated with green. Would you believe this is possible?

Making some tonight

I am excited I am about to make some tonight. I ended up buying some King sized sheets from the Value Village for about $4.00 a sheet. I will have to post to tell you how they turn out.

How did it work?

I was thinking about doing the same thing but didn't know how it would work. Can you tell me how it all came out and would you do this again

GOOD STUFF

Been loking for cheaper backdrops fro very long! just landed on a piece of cake here!

Thanks for coming up with this. am surprised how easy it easy let me try it right away!

...Okay...

This would be a great backdrop.... If it were the 1980s and I was wearing acid-washed jeans.

Some of you were wondering...

I ended up using a bedsheet because Walmart didn't have enough muslin fabric left on the bolt. I decided to grab a light blue King size flat sheet (108" x 102"). I figured that if I got the light blue sheet it would ensure that the over all colour was the darker blue that I wanted. Plus I didn't have to redunk the sheet after taking off the twine as the colours weren't too contrasting.

My photos are bad for showing, but my husband is the photographer and he was away, (this is a surprise for him) and our stand is put away at the moment. Check it out here: GreigBery

But here it is. I know some people were curious how it would work on a bed sheet. I'm going to try the muslin next when they have more in stock.

Thanks so much for the tutorial!

I just pick up 9 yards of

I just pick up 9 yards of 108" muslin at Joanns with 40% off. Used2 die packs of navy blue and one of black.

You Made This Too Easy! Thanks!

Thank you so much for teaching me how to do this. I am very excited to get started. Plan on using this idea to take some pics for a 50th birthday party. I am not a professional photographer, just wanted a cool backdrop to use without paying the big bucks! Plus the tie-dyed look gives me the look I want. Thanks for creating this!

Post new comment

The content of this field is kept private and will not be shown publicly.
  • Allowed HTML tags: <a> <em> <strong> <cite> <code> <ul> <ol> <li> <dl> <dt> <dd> <img> <a>
  • Lines and paragraphs break automatically.
  • Web page addresses and e-mail addresses turn into links automatically.

More information about formatting options